|
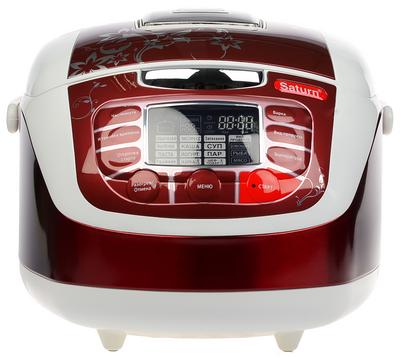
Technical characteristics of the multicooker Saturn ST-MC9194
Power, W 860
Bowl capacity, l 5
Auto cook programs 18
Body material metal
Saturn Multicooker Recipes
Additional properties
LED display;
Ceramic coating of the inner bowl;
Sound signals of the start / end of cooking;
Possibility to change the cooking time;
Possibility to change the cooking temperature in the Chef programs;
Keep warm function;
Delayed start function from 1 minute to 24 hours;
overheat protection
Accessories: rice spoon, soup spoon, measuring cup, steam nozzle
Multicooker device Saturn ST-MC9194
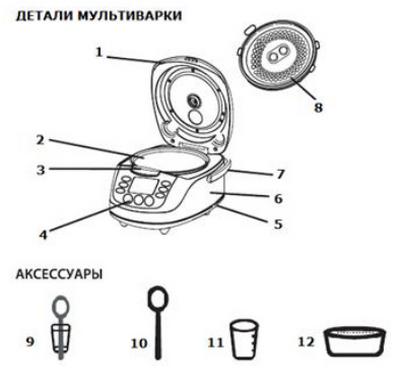
1 - Cover with removable steam valve
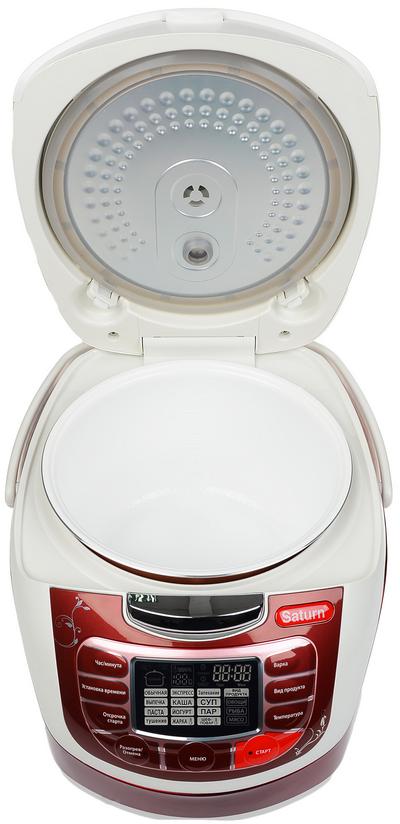
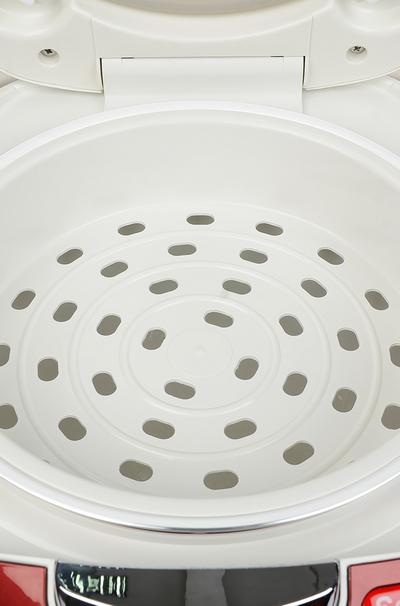
2 - Removable inner bowl
3 - Button to open the multicooker lid
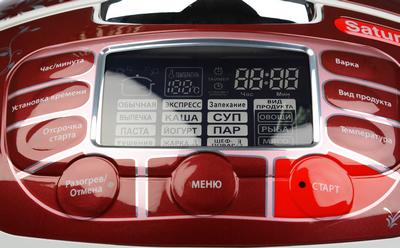
4 - Control panel with display
5 - Stand for the holder of a spoon
6 - the Case
7 - Handle for carrying
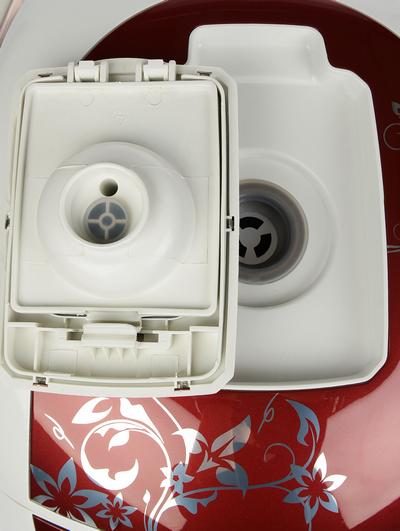
8 - Internal removable cover
9 - Spoon holder
10 - Spoon
11 - Measuring glass
12 - Steamer
Installation of multicooker Saturn ST-MC9194
• Make sure there are no packing materials or foreign objects inside the multicooker.
• Check if not damaged during transportation: cover; body; additional accessories; removable bowl for cooking. If any defects are found, do not turn on the device; contact your dealer or service center. Place the appliance on a dry, level and heat-resistant surface.
• Do not install the device near combustible materials, explosives and self-igniting gases.
• Do not place the appliance next to a gas or electric stove or other heat source.
• Do not place the device in close proximity to a wall or furniture.
• Do not put anything on the multicooker. Do not block ventilation openings.
• The multicooker should not be placed in a cabinet. For normal operation of the device, it is necessary to provide free space for ventilation: at least: 20 cm from the top, 10 cm from the back panel and at least 5 cm from the sides. Before using for the first time, wipe the removable cooking bowl, steamer container, measuring cup, spoon, and the inside and outside of the multicooker with a clean, damp cloth. Remove the protective film from the control panel.
Before using the Saturn ST-MC9194 multicooker for the first time
1. Carefully remove the product from the box, remove all packing materials and advertising labels.
2. Wipe the body of the instrument with a damp cloth.
3. Rinse the bowl with warm soapy water. Dry thoroughly.
4. When using for the first time, an unpleasant odor may appear, in this case clean the device.
5. Place the multicooker on a flat, firm, horizontal surface.
6. During installation, make sure that during operation of the device its ventilation is not impeded, and the hot steam coming out of the steam valve does not get on wallpaper, decorative coverings, electronic devices and other objects that may be affected by high humidity and temperature.
7. Plug the power cord into the socket on the multi cooker.
8. Before cooking, make sure that the inner and outer parts of the multicooker are not damaged, chipped or other defects.
9. There must be no foreign objects between the bowl and the heating element.
Multicooker programs Saturn ST-MC9194
PROGRAM "COOKING: REGULAR"
1. Prepare all required ingredients.
2. Put the ingredients in the bowl, add water.
3. Make sure all ingredients (including liquid) are below the maximum mark on the surface of the inner bowl.
4. Insert the bowl into the body. Make sure the bowl is firmly in contact with the heating element.
5. Close the cover until you hear a click.
Note: If the cover is not closed tightly, the program will not run correctly.
6. Connect the device to the mains.
7. Press the COOK button to set the REGULAR program.
8. Press the START button.
The multicooker will start working, the heating symbol will flash on the display (with the inscription "HEATING"), and the time the multicooker has been operating in this mode will also be displayed.To interrupt the cooking process or cancel the settings, press the HEATING / CANCEL button.
9. Follow the cooking process. This program does not have a time setting, so after cooking you must turn off the program with the HEATING / CANCEL button.
10. Disconnect the device from the mains.
PROGRAM "COOKING: EXPRESS"
1. Prepare all the required ingredients.
2. Put the ingredients in the bowl, add water.
3. Make sure all ingredients (including liquid) are below the maximum mark marked on the surface of the inner bowl.
4. Insert the bowl into the body. Make sure the bowl is firmly in contact with the heating element.
5. Close the cover until you hear a click.
Note: If the cover is not closed tightly, the program will not run correctly.
6. Connect the device to the mains.
7. Pressing the COOK button, set the EXPRESS program.
8. Press the START button.
The multicooker will start working, the heating symbol will flash on the display (with the inscription "HEATING"), and the time the multicooker has been operating in this mode will also be displayed.To interrupt the cooking process or cancel the settings, press the HEATING / CANCEL button.
9. Follow the cooking process. This program does not have a time setting, so after cooking you must turn off the program with the HEATING / CANCEL button.
10. Disconnect the device from the mains.
BAKING PROGRAM
1. Prepare all the required ingredients.
2. Put the ingredients in the bowl, add water.
3. Make sure all ingredients (including liquid) are below the maximum mark marked on the surface of the inner bowl.
4. Insert the bowl into the body. Make sure the bowl is firmly in contact with the heating element.
5. Close the cover until you hear a click.
Note: If the cover is not closed tightly, the program will not run correctly.
6. Connect the device to the mains.
7. Press the MENU button to set the BAKING program.
8. Set the cooking time. To do this, press the TIME SETTING button, then, by pressing the HOUR / MINUTE button, set the cooking time. Automatic time You can change the cooking time from 20 minutes to 2 hours in 10 minute increments.
9. Press the START button. The multicooker will start working, the heating symbol will flash on the display (with the words "HEATING") and the cooking time countdown will also be displayed.To interrupt the cooking process or cancel the settings, press the HEATING / CANCEL button.
10. At the end of the cooking process, a beep will sound, and the multicooker will automatically switch to the mode of maintaining the temperature of ready meals: the HEATING indicator will light up, the display will show the time of the HEATING function. Press the HEAT / CANCEL button to turn off the warm-up and open the lid. Despite the fact that the mode of maintaining the temperature of ready meals is designed for a long time, it is not recommended to leave food in this mode for a long time, this can lead to overdrying of the food.
11. Disconnect the device from the mains.
BAKING PROGRAM
1. Prepare baking dough according to the recipe of your choice.
2. Grease the bowl with butter or margarine to help remove the baked product from the bowl. Place the dough in a bowl and line it out.
3. Make sure all ingredients (including liquid) are below the maximum mark on the surface of the inner bowl.
4. Insert the bowl into the body. Make sure the bowl is tightly heated with the lid before making contact with the element.
5. Close the click.
Note: If the cover is not closed tightly, the program will not run correctly.
6. Connect the device to the mains.
7. Pressing the MENU button, install the program BAKERY PRODUCTS.
8. Automatic time
9. Press the START button. The multicooker will start working, the heating symbol will flash on the display (with the words "HEATING"), and the countdown of the cooking time will also be displayed.
To interrupt the cooking process or cancel the settings, press the HEATING / CANCEL button.
10. At the end of the cooking process, a beep will sound, and the multicooker will automatically switch to the mode of maintaining the temperature of ready meals: the HEATING indicator will light up, the display will show the time of the HEATING function. Press the HEATING / CANCEL button to turn off the heating and open the lid. Despite the fact that the mode of maintaining the temperature of ready meals is designed for a long time, it is not recommended to leave food in this mode for a long time, this can lead to overdrying of the food.
11. Disconnect the device from the mains.
PROGRAM "Porridge"
1. Prepare all the required ingredients.
2. Put the ingredients in the bowl, add water.
3. Make sure all ingredients (including liquid) are below the maximum mark marked on the surface of the inner bowl.
4. Insert the bowl into the body. Make sure the bowl is firmly in contact with the heating element.
5. Close the cover until you hear a click.
Note: If the cover is not closed tightly, the program will not run correctly.
6. Connect the device to the mains.
7. Pressing the MENU button, install the PORSE program.
8. Set the cooking time. To do this, press the TIME SETTING button, then, by pressing the HOUR / MINUTE button, set the cooking time. Automatic cooking time - 1 hour. You can change the cooking time from 20 minutes to 2 hours in 10 minute increments.
9. Press the START button. The multicooker will start working, the heating symbol will flash on the display (with the words "HEATING") and the cooking time countdown will also be displayed.To interrupt the cooking process or cancel the settings, press the HEATING / CANCEL button.
10. At the end of the cooking process, a beep will sound, and the multicooker will automatically switch to the mode of maintaining the temperature of ready meals: the HEATING indicator will light up, the display will show the time of the HEATING function. Press the HEATING / CANCEL button to turn off the heating and open the lid. Despite the fact that the mode of maintaining the temperature of ready meals is designed for a long time, it is not recommended to leave food in this mode for a long time, this can lead to overdrying of the food.
11. Disconnect the device from the mains.
SOUP PROGRAM
1. Prepare all the required ingredients.
2. Put the ingredients in the bowl, add water.
3. Make sure all ingredients (including liquid) are below the maximum mark marked on the surface of the inner bowl.
4. Insert the bowl into the body. Make sure the bowl is firmly in contact with the heating element.
5. Close the cover until you hear a click.
Note: If the cover is not closed tightly, the program will not run correctly.
6. Connect the device to the mains.
7. Press the MENU button to set the SOUP program.
8. Set the cooking time. To do this, press the TIME SETTING button, then, by pressing the HOUR / MINUTE button, set the cooking time. Automatic time
You can change the cooking time from 20 minutes to 2 hours in 10 minute increments.
9. Press the START button.The multicooker will start working, the heating symbol (with the words "HEATING") will flash on the display, and the countdown of the cooking time will also be displayed. To interrupt the cooking process or cancel the settings, press the HEAT / CANCEL button.
10. At the end of the cooking process, a sound signal will sound, and the multicooker will automatically switch to the mode of maintaining the temperature of ready meals: the HEATING indicator will light up, the display will show the time of the HEATING function. Press the HEATING / CANCEL button to turn off the heating and open the lid. Despite the fact that the mode of maintaining the temperature of ready meals is designed for a long time, it is not recommended to leave food in this mode for a long time, this can lead to overdrying of the food.
11. Disconnect the device from the mains.
PROGRAM "PASTA"
1. Prepare all required ingredients.
2. Pour water into the multicooker bowl.
3. Make sure all ingredients (including liquid) are below the maximum mark on the surface of the inner bowl.
4. Insert the bowl into the body. Make sure the bowl is firmly in contact with the heating element.
5. Close the cover until you hear a click.
Note: If the cover is not closed tightly, the program will not run correctly.
6. Connect the device to the mains.
7. Pressing the MENU button, install the PASTA program.
8. Set the cooking time. To do this, press the TIME SETTING button, then by pressing the HOUR / MINUTE button, set the cooking time. Automatic cooking time - 8 minutes. You can change the cooking time from 8 minutes to 20 minutes in 1 minute increments.
9. Press the START button. The multicooker will start to boil water, the heating symbol will flash on the display (with the words "HEATING"),
10. After the water boils, the multicooker will signal this. You can now put the pasta in the bowl.
11. Then press the START button. The cooking time will now count down. To interrupt the cooking process or cancel the settings, press the HEAT / CANCEL button.
12. At the end of the cooking process, a sound signal will sound, and the multicooker will automatically switch to the mode of maintaining the temperature of ready meals: the HEATING indicator will light up, the display will show the time of the HEATING function. Press the HEATING / CANCEL button to turn off the heating and open the lid. Despite the fact that the mode of maintaining the temperature of ready meals is designed for a long time, it is not recommended to leave food in this mode for a long time, this can lead to overdrying of the food.
13. Disconnect the device from the mains.
PROGRAM "YOGURT"
1. Divide the yoghurt raw material (100 ml natural yoghurt per liter of milk) into small glass jars. Pour a small amount of water into the multicooker bowl. Put the jars of raw materials in water.
2. Insert the bowl into the body. Make sure the bowl is firmly in contact with the heating element.
3. Close the cover until you hear a click.
Note: If the lid is not closed securely, the program will not run correctly.
4. Connect the device to the mains.
5. Pressing the MENU button, set the YOGURT program.
6. Set the cooking time. To do this, press the TIME SETTING button, then by pressing the HOUR / MINUTE button, set the cooking time. Automatic cooking time - 8 hours. You can change the cooking time from 6 hours to 12 hours in 30 minute increments.
7. Press the START button. The multicooker will start working, the heating symbol (with the words "HEATING") will flash on the display, and the countdown of the cooking time will also be displayed. To interrupt the cooking process or cancel the settings, press the HEATING / CANCEL button.
8. At the end of the cooking process, a sound signal will sound, and the multicooker will automatically switch to the mode of maintaining the temperature of ready meals: the HEATING indicator will light up, the display will show the time of the HEATING function. Press the HEATING / CANCEL button to turn off the heating and open the lid. Despite the fact that the mode of maintaining the temperature of ready meals is designed for a long time, it is not recommended to leave food in this mode for a long time, this can lead to overdrying of the food.
9. Disconnect the device from the mains.
STEAM PROGRAM
1. Pour 500-550 ml of water into a bowl.
2. Place the steamer insert into the bowl.
3. Prepare all food, rinse and slice. Spread the food evenly in the steamer and insert the bowl into the bowl. Make sure the bowl is firmly in contact with the heating element.
4. Close the cover until you hear a click. Note: If the lid is not closed securely, the program will not run correctly.
5. Connect the device to the mains.
6. Press the MENU button to set the PAR program.
7. Select the type of food you want to cook. To do this, by pressing the PRODUCT TYPE button, select 1 of 3 types: VEGETABLES, FISH or MEAT.
8. Set the cooking time. To do this, press the TIME SETTING button, then by pressing the HOUR / MINUTE button, set the cooking time. Automatic cooking time - 5 minutes. You can change the cooking time from 5 minutes to 50 minutes in 1 minute increments.
9. Press the START button. The multicooker will start working, the heating symbol (with the words "HEATING") will flash on the display, and the countdown of the cooking time will also be displayed. To interrupt the cooking process or cancel the settings, press the HEAT / CANCEL button.
10. At the end of the cooking process, a sound signal will sound, and the multicooker will automatically switch to the mode of maintaining the temperature of ready meals: the HEATING indicator will light up, the display will show the time of the HEATING function. Press the HEATING / CANCEL button to turn off the heating and open the lid. Despite the fact that the mode of maintaining the temperature of ready meals is designed for a long time, it is not recommended to leave food in this mode for a long time, this can lead to overdrying of the food.
11. Disconnect the device from the mains.
EXTINGUISHING PROGRAM
1. Prepare all required ingredients.
2. Place the ingredients in the bowl.
3. Make sure all ingredients (including liquid) are below the maximum mark marked on the surface of the inner bowl.
4. Insert the bowl into the body. Make sure the bowl is firmly in contact with the heating element.
5. Close the cover until you hear a click. Note: If the lid is not closed securely, the program will not run correctly.
6. Connect the device to the mains.
7. Press the MENU button to set the EXTINGUISHING program.
8. Select the type of food you want to cook. To do this, by pressing the PRODUCT TYPE button, select 1 of 3 types: VEGETABLES, FISH or MEAT.
9. Set the cooking time. To do this, press the TIME SETTING button, then by pressing the HOUR / MINUTE button, set the cooking time. Automatic time
cooking - 1 hour. You can change the cooking time from 20 minutes to 2 hours in 10 minute increments.
10. Press the START button. The multicooker will start to work, the heating symbol will flash on the display (with the words "HEATING"), and after the multicooker has reached the preset temperature, the countdown of the cooking time will be displayed. To interrupt the cooking process or cancel the settings, press the HEAT / CANCEL button.
11. At the end of the cooking process, a sound signal will sound, and the multicooker will automatically switch to the mode of maintaining the temperature of ready meals: the HEATING indicator will light up, the display will show the time of the HEATING function.Press the HEATING / CANCEL button to turn off the heating and open the lid. Despite the fact that the mode of maintaining the temperature of ready meals is designed for a long time, it is not recommended to leave food in this mode for a long time, this can lead to overdrying of the food.
12. Disconnect the device from the mains.
PROGRAM "FRYING"
1. Prepare all required ingredients.
2. Place the ingredients in the bowl.
3. Make sure all ingredients (including liquid) are below the maximum mark on the surface of the inner bowl.
4. Insert the bowl into the body. Make sure the bowl is firmly in contact with the heating element.
5. Close the cover until you hear a click. Note: If the lid is not closed securely, the program will not run correctly.
6. Connect the device to the mains.
7. Press the MENU button to set the HEAT program.
8. Select the type of food you want to cook. To do this, by pressing the PRODUCT TYPE button, select 1 of 3 types: VEGETABLES, FISH or MEAT.
9. Set the cooking temperature. To do this, by pressing the TEMPERATURE button, you can set the following temperature modes: 40,60,80,100,120,140,160 ° С.
10. Set the cooking time. To do this, press the TIME SETTING button, then by pressing the HOUR / MINUTE button, set the cooking time. Automatic cooking - 30 minutes. You can change the preparations within
from 10 minutes to 2 hours in 5 minute increments.
11. Press the START button. The multicooker will start working, the heating symbol will flash on the display (with the words "HEATING"), and after the multicooker has reached the preset temperature, the cooking countdown will be displayed. To interrupt cooking or settings, press HEATING / CANCEL.
12. At the end of the cooking process, a sound signal will sound, and the multicooker will automatically switch to the mode of maintaining the temperature of ready meals: the HEATING indicator will light up, the display will show the time of the HEATING function. Press the HEATING / CANCEL button to turn off the heating and open the lid. Despite the fact that the mode of maintaining the temperature of ready meals is designed for a long time, it is not recommended to leave the process of canceling the food button in this mode for a long time, this can lead to overdrying of the food.
13. Disconnect the device from the mains.
FAVORITE DISH PROGRAM
1. Prepare all required ingredients.
2. Place the ingredients in the bowl.
3. Make sure all ingredients (including liquid) are below the maximum mark marked on the surface of the inner bowl.
4. Insert the bowl into the body. Make sure the bowl is firmly in contact with the heating element.
5. Close the cover until you hear a click. Note: If the lid is not closed securely, the program will not run correctly.
6. Connect the device to the mains.
7. Pressing the MENU button, install the FAVORITE program.
8. Select the type of food you want to cook. To do this, by pressing the PRODUCT TYPE button, select 1 of 3 types: VEGETABLES, FISH or MEAT.
9. Set the cooking temperature. To do this, by pressing the TEMPERATURE button, you can set the following temperature modes: 40,60,80,100,120,140,160 ° С.
10. Set the cooking time. To do this, press the TIME SETTING button, then by pressing the HOUR / MINUTE button, set the cooking time. Automatic cooking time - 40 minutes. You can change the cooking time from 5 minutes to 1 hour in 5 minute increments.
11. Press the START button. The multicooker will start to work, the heating symbol will flash on the display (with the words "HEATING"), and after the multicooker has reached the preset temperature, the countdown of the cooking time will be displayed. To interrupt the cooking process or cancel the settings, press the HEATING / CANCEL button.
12. At the end of the cooking process, a sound signal will sound, and the multicooker will automatically switch to the mode of maintaining the temperature of ready meals: the HEATING indicator will light up, the display will show the time of the HEATING function. Press the HEAT / CANCEL button to turn off the warm-up and open the lid. Despite the fact that the mode of maintaining the temperature of ready meals is designed for a long time, it is not recommended to leave food in this mode for a long time, this can lead to overdrying of the food.
13. Disconnect the device from the mains.
FRYING
1. Pour cooking oil (about 1.5 liters) into the bowl.
2. Insert the bowl into the body. Make sure the bowl is firmly in contact with the heating element.
3. Close the cover until you hear a click.
4. Connect the device to the mains.
5. Press the MENU button to set the FAVORITE DISH program.
6. Select the type of food you want to cook. To do this, by pressing the PRODUCT TYPE button, select 1 of 3 types: VEGETABLES, FISH or MEAT.
7. Set the cooking temperature. To do this, by pressing the TEMPERATURE button, you can set the following temperature modes: 40,60,80,100,120,140,160 ° С. Optimum modes for deep fat frying are 120 - 160 ° С.
8. Set the cooking time. To do this, press the TIME SETTING button, then, by pressing the HOUR / MINUTE button, set the cooking time. Automatic cooking time - 40 minutes. You can change the cooking time from 5 minutes to 1 hour. For deep-fat cooking in several passes, set more time.
9. Press the START button. The multicooker will start to work, the heating symbol will flash on the display (with the words "HEATING"), and after the multicooker has reached the preset temperature, the countdown of the cooking time will be displayed. To interrupt cooking or settings, press HEAT / CANCEL.
10. After heating the preset temperature of the timing, open the lid. Be careful hot! Frying with a lid is allowed.
11. At the end of the entire cooking process, press the HEATING / CANCEL button.
12. Disconnect the device from the mains. ATTENTION! It is recommended that you follow the cooking process while deep-fat cooking! process to cancel on the oil button before and start on the display, multicooker. The function of keeping cooked food warm turns on automatically at the end of the cooking program, while the HEATING indicator lights up, the display will show the operating time of the multicooker in this mode. To deactivate the function, press the HEATING / CANCEL button.
Despite the fact that the mode of maintaining the temperature of ready meals is designed for a long time, it is not recommended to leave food in this mode for a long time, this can lead to overdrying of the food. You can also use this function to reheat cold food. To do this, just put food in the bowl, place the bowl in the appliance, close the lid, press the HEATING / CANCEL button. The display will show the operating time of the multicooker in the PREHEAT function. The dish will be warmed up. Pressing the HEATING / CANCEL button again will turn off the heating.
The operating temperature of the multicooker in this function is 70-75 ° C.
To interrupt the cooking process or cancel the settings, press the HEATING / CANCEL button.

CLEANING AND CARE
Before cleaning the appliance, make sure it is unplugged and completely cooled down.
• Cleaning the instrument case
Clean the body of the appliance as needed, using clean warm water and a soft cloth, do not use abrasive detergents or dishwashing detergents. Do not immerse the device in water!
• Cleaning the bowl
Clean the bowl completely after each use. When doing this, use dishwashing detergents and a soft cloth, do not use abrasive detergents. When finished, wipe the outside of the bowl dry.
• Cleaning the inner removable cover
Remove the inner cover using the buttons on it, rinse thoroughly, dry and reinstall.
• Cleaning the steam release valve
The outlet valve must be cleaned every time the appliance is used.
1. Carefully remove the vent valve. Do not put too much effort!
2. Rinse it thoroughly under running water, then dry it thoroughly and reinstall it.
Saturn ST-MC9194 multicooker complete set
Multicooker 1
Removable inner bowl 1
Internal removable cover 1
Spoon holder 1
Soup spoon 1
Rice spoon 1
Measuring cup 1
Steam nozzle 1
User manual with warranty card 1
Package 1


|