Admin
MANUAL FOR BAKING BREAD IN A BREADMARK (BEGINNER'S MANUAL)

Congratulations on your purchase!
You've made a good purchase!
You bought a homemade bread maker!

You brought it home, unpacked it, put it on the table, and ... wondered what to do with it next.
Now make some good tea, sit back at your computer and start reading ...

This work is intended for BEGINNER bakers, as "a guide to baking bread in a bread maker when you don't know how and where to start, and when nothing works."

This MANUAL is only a guideline of what actions must be taken in order for the first bread to turn out, and preferably without errors and problems.
Before you start baking bread in a bread maker, carefully read the instructions for your bread maker, study the oven control buttons, bread baking programs, the cycles included in these programs.

This HANDBOOK contains information in the shortest and most accessible form, and is designed for the most unprepared novice home baker.
For a more detailed study of the ingredients of the bread recipe, the process of baking bread, you must follow the direct links indicated in the text of the MANUAL, as well as go to the site and get acquainted in more detail with other useful materials on the technology and baking of bakery products.

This HANDBOOK will help you bake bread, no matter what model of bread maker you purchased, and from which source you took the bread recipe - from the instructions for your bread maker or other sources, the Internet, the principle is practically the same. All you need is certain skills, knowledge and little "secrets", which are revealed in this beginner's guide.

THIS TOPIC CONSIDERS THE FOLLOWING QUESTIONS:

1.20 practical tips before baking bread

2. Programs and stages (cycles) of bread baking

3. Tools and accessories required for baking homemade bread

4. Information about products (ingredients)

5. Choosing a bread recipe

6. Placing products in a bucket (container) x / oven

7. Formation of a dough piece - "kolobok"

8. If during kneading "kolobok"

9. Work on bugs

10. What types are divided into bread products

11. Gingerbread man made of wheat flour with multigrain grit and flakes. Master Class.

12. Gingerbread man made from wheat-rye flour. Master Class

13. Gingerbread man made of whole grain flour. Master Class

14. Gingerbread man made of wheat flour. Master Class
WARNING
I draw your attention to the fact that this Guide deals with the preparation of dough and bread completely from wheat flour, and, accordingly, the formation of a wheat bun.

Formation of a bun from wheat-rye flour with a share of rye flour up to 40% by weight of wheat flour can be made according to the principles of a wheat bun, only slightly softer.

The formation of a kolobok from wheat-rye flour with a flour share of more than 40% by the weight of wheat flour, as well as from 100% rye flour and from other types of flour in whole or in part (except for wheat), is not considered in this topic, since the principle of its formation is sharply different from a wheat bun.

You can read about the formation of other types of kolobok on the forum in the sections and topics dedicated to baking bread from rye and other flour.

But before you start reading and using this material further, please read the following information:

In accordance with Copyright agreement between the site and the author of the topic under NIK Admin, these materials are on the topic "A guide to baking bread in a homemade bread maker." and located at: https://Mcooker-enn.tomathouse.com/in...tion=com_smf&topic=7271.0, transferred as exclusive rights to use the material to the portal
This topic, titled "A HANDBOOK FOR BAKING BREAD IN HOME BREAD", is an author's work under the NICK Admin, and cannot be edited by users, moderators and administration of this site / forum.
Reproduction of the entire work "A guide to baking bread in a homemade bread maker.", Or any part of it is permitted only with a link to the site and to the name of the author of this material.
The site reserves the right to resolve issues of illegal copying and reproduction of the material "A guide to baking bread in a homemade bread maker." judicially.

Admin
Topic 1. 20 PRACTICAL TIPS BEFORE STARTING THE OVEN BREAD.

Before you start kneading the dough and baking bread, it is necessary to carry out preparatory work, and even remember or even write down some points, namely:

1. Read the instructions for your bread maker carefully, its capabilities, subtleties of behavior and inclusion. Try beforehand "idle" to test all the buttons of the bread maker to get used to them and make sure they work.

2. Purchase the necessary accessories in advance for kneading dough and baking bread. Please carefully study these accessories and how to use them. If any devices are not available, then find an equivalent replacement for them, or learn to do without these devices in advance.

3. Advance understand the units of measurement of products, necessary for kneading the dough. Products can be measured in grams, milliliters, chunks, pieces, tablespoons and teaspoons, measuring cups (cups), etc.

4. Advance read the information about the products that make up bread (flour is different, water (liquid), butter is different, milk is different, yeast is different, and other products), since each of the products and all together affect the state of baking and crumb of finished bread.

5. In advance, long before baking bread, pick up a bread recipe, check if everything suits you in this recipe, if you have a desire to bake this bread.

6. Recalculate the bread recipe for yourself, that is, reduce or increase the number of products, or make the necessary and possible replacement of products.

7. Read the recipe carefully to the end, perhaps several times. Make notes and clarify some points in advance if you don't understand them. Make explanatory notes in the recipe so as not to forget something, to prevent mistakes.

8. Carefully study the capabilities of your bread machine, its programs, baking methods, technological process according to the time of each program. And in particular of the program on which you are going to bake bread at the moment, make explanatory notes for yourself. Understand process terminology ahead of time bread maker programs, what they mean and what they are for, how long they take (kneading, pause, raising (proofing), baking, cooling).

9. Write down the named products in the recipe and their quantity on a separate sheet of paper, with which you will work in the kitchen. Try to keep your own diary of observations of baking bread, where you will enter individual observations and features of kneading and baking, the behavior of products for each recipe, and that will help you learn faster and avoid mistakes in the future.

10. On the day and hour of the start of baking, put on the work table all the necessary products, dishes, other necessary items, a bucket of a bread machine, a bread machine. Don't forget to insert the kneading knife into the bucket of the bread machine.

11. Wash your hands and check that the rest of the kneading, proofing, and baking dishes are also clean and dry.

12. Put all the necessary products on the table, check their availability, quality, appearance.

13. Measure the required amount of food carefullynamed in the recipe. You can immediately put bread makers in a bucket, or you can lay them out in piles and in jars, and then into a bucket. When placing the measured products in the bucket, double-check the list (made from the recipe) and check the boxes next to each product name. This control procedure will save you from making mistakes, missing something, or putting it in the bucket incorrectly. (See below "Bug Fixes" by Admin)

14. If you cook and measure food in advance, you can (and should) put them in the refrigerator, but you will need to take them out in advance before placing them in the bucket, 30-40 minutes before they get warm, if the rules for setting food require it. Carefully read the rules for laying products from the instructions for the bread maker, each manufacturer sets its own temperature regime for the products in the baking mode.

15. The food should be placed in the bucket as recommended by the manufacturer of your bread maker. If you are sure of the result of baking bread, then the laying of products can be done in any order.

16. Switch on the baking program on the baking program that is provided for by the bread recipe, or that you chose when planning the bread. Check that the bake and crust mode is on correctly so that you do not accidentally press another button.

17. Follow the described kneading and baking technology.
Write down the technological process from the instructions for your bread maker in advance, indicating each stage (cycle) and the duration of this stage (cycle).
Each stage (cycle) has a specific goal. Observe carefully the passage of the program through these stages (cycles).

18. Open the lid of the bread maker only at the time and purpose permissible for this purpose.
At the "baking" stage, the lid of the bread maker should not be opened.

19. After baking the bread, turn off the bread maker, remove the bucket of ready-made bread from it. Gently tip the bucket over and remove the finished bread from it, transfer the bread to the wire rack to cool. The bread will be ready only after it has cooled down to room temperature; up to this point, the final stages of baking are still taking place in hot bread. Do not forget to remove the kneading knife from the finished bread, and fill the bucket with warm water for 30 minutes, and then wash it and wipe it dry.

20. Slice the finished bread on a board with a special serrated knife, which makes the slices of bread even and neat, does not crush the crumb of the bread, and gives less crumbs when slicing.

Admin
Topic 2. PROGRAMS AND STAGES (CYCLES) OF BAKERY FOR BAKING BREAD

The principle of baking bread in a bread maker is the same in almost all bread makers, no matter how many programs are named on the display of the bread machine.

In this topic, only one program for baking wheat bread will be considered.
Baking mode Basic (basic) and lasts 3.20-3.50 hours in different models of bread makers.

Hitachi Bread Maker Program, (in which I bake this bread) Whole Wheat Bread, which lasts 3.50 hours.

The duration of the process and the cycles in the Hitachi bread maker by operation is as follows:

1.preliminary kneading - 11 minutes
2.pause - 40 minutes
3. kneading - 14 minutes
4.first ascent - 26 minutes
5.gas outlet - 20 seconds
6.second ascent - 70 minutes
7.baking - 55 minutes
8. End of baking - 13 minutes.


Carefully study the capabilities of your bread machine, its programs, baking methods, technological process for the time of each program. And in particular of the program on which you are going to bake bread at the moment, make explanatory notes for yourself. Understand in advance the terminology of the processes of the bakery program, what they mean and what they are intended for, how long it takes (kneading, pause, raising (proofing), baking, cooling).

Let's take a closer look at each operation (cycle) in more detail:

Cycle 1. - PRE-KMIX - 11 minutes
Primary goal:
The main purpose of kneading the dough (dough) is to obtain a homogeneous mixture throughout the mass (not yet dough) from the corresponding ingredients of the bread recipe.
What happens in the bucket:
First, the kneading knife rotates very slowly for some time, gently stirring the food in the bucket. Then the rotation becomes more active and intense, and a kind of ball (kolobok) begins to form, but still very sticky in consistency and loose in appearance, does not hold its shape. Swollen flour particles form a solid mass under mechanical action of a kneading knife.
Along with solid and liquid products, there is a gaseous phase in the dough, which is formed as a result of the capture and retention of air bubbles in the dough. Part of the air is brought in with a mass of flour, and part in very small quantities - with water. Therefore, it is best to sift flour before placing food in a bucket, thereby saturating it with air. The amount of gas in the dough increases during the kneading process.
Achieving the result:
During the first (preliminary) mixing for 11 minutes, only the mixing of the products occurs, the dry products are soaked in liquid.
The absence in this mixture of lumps of flour, lumps of other products, excess liquid, is usually taken as an indicator of the completion of the process of mixing products and kneading dough (dough).
Temperature inside the bucket:
The stove is not yet heating up. The temperature inside the bucket depends on the temperature of the stored food, either initially warm, at room temperature or from the refrigerator.
Cycle 2. - PAUSE - 40 minutes.
Primary goal:
The adhesion of swelling particles into a solid mass leads to the formation of a dough mass from flour and other products, as well as to the formation of gluten bonds.
What happens in the bucket:
From the very beginning of kneading, flour comes into contact with water, yeast and salt, and a number of processes begin to take place in the mass of the resulting dough.
The flour particles begin to quickly absorb water, swelling at the same time. Wheat dough mass is in the form of a free viscous mass, and spreads along the bottom of the bucket, the dough in this state does not hold its shape.
The pause lasts 40 minutes - at this time, there is a deep interpenetration of products into each other, the dough mass is resting, the flour swells from the water (liquid) taken in.
During a pause, it makes no sense to perform any actions in the bucket, or to add various additives to the dough, since the dough and the kneading knife are at rest. The added food will simply lie on the dough mass without moving.
Achieving the result:
Gluten bonds begin to form inside the dough mass, which further lead this dough mass to the formation of bread dough.
Temperature inside the bucket:
The stove does not heat up during this period (cycle) either. The temperature inside the bucket depends on the temperature of the stored food.
Cycle 3. - KIND - 14 minutes
Primary goal:
By the end of the second (main) kneading, the dough should turn out to be plastic, homogeneous, well mixed and not contain lumps (impurities) and seals throughout the dough depth.
What happens in the bucket:
The main kneading of the dough and the formation of the bun begins - the kneading time is 14 minutes. During this period of time, intensive heating of the stove begins.
The kneading and rotation of the kneading blade also occurs more intensively, the dough practically beats against the walls of the bucket with force.
During this kneading, it is necessary to finally form a bun, and achieve the consistency of the dough piece you need, for which you can and must also add the missing products - flour or water - whatever dough you make, you will get bread like that.
With an increase in the duration of mixing, the amount of the air phase in the dough increases, and can reach 20% of the total dough volume. The gaseous phase formed in the dough during the kneading process plays an essential role in the formation of the porosity of the crumb.
The temperature of the dough affects the properties of gluten and dough. When the temperature of the dough rises from 25 to 35 * C, the elasticity of the gluten decreases and its extensibility and vagueness increase, so we see and feel the bun so warm and soft. But this is a temporary and short-term phenomenon in a bread maker and is intended only for more intensive mixing of products in a warm environment.
But, please note that to add additional products you have only 7-10 minutes out of 14 minutes per cycle, so that the products have time to mix with the rest of the dough until smooth, both along the edges and in the center of the rotating dough, and not there were impurities and seals.
Look into the bucket more often and adjust the dough - this is your last chance, then the dough goes to proofing, that is, to ripening the dough.
Achieving the result:
The dough mass from shapeless turns into an elastic dough piece-bun, becomes very soft and warm, gluten threads develop in it, gluten is released, the dough is saturated with air.
During the main kneading and especially towards the end of it, the gluten of the wheat dough is already sufficiently developed.
Temperature inside the bucket:
The temperature inside the bucket reaches 35 * C by the end of the batch.

In general, try to lay in all the products during the first kneading and adjust the bun, so that there is more time for mixing the products and their penetration into each other during the pause.
To do this, during the first kneading of the dough, the kolobok can be made a little stronger than necessary, and at the end of the second kneading after heating the products in the dough, the kolobok will take on the desired consistency.
In the finished bread, all our flaws are very clearly visible, which were made when kneading the dough.
This is, for example, a "striped" crumb inside, if the dough consists of different types of flour, separate crumb seals located in stripes in the dough along the entire contour of the bread, especially along the edges, when flour was added to the original kneading and it remained unmixed along the edges.
The name for these defects in ready-made bread is non-kneading dough.

During these kneading cycles (except for a pause) and at this time, you can and even need to lift the stove lid and look into the bucket, and interfere with the process of forming a bun. This is expressed in the fact that you add a few tablespoons of flour, add a few tablespoons of water or vegetable oil, remove stuck flour or unmixed dough from the walls.


Cycle 4 - FIRST RISE - 26 minutes
First proving of dough - first proving (fermentation, raising)
Primary goal:
The purpose of proving the dough is to stretch the gluten network using bubbles of carbon dioxide released by the yeast.
What happens in the bucket:
During kneading and shaping of the dough, there is practically no carbon dioxide left in it.
Yeast activity in dough is subject to rapid changes. At the beginning, during the first kneading and first proofing, the yeast is in an aerobic state, there is a lot of oxygen and nutrients around it, and relatively little yeast. They multiply at a fast rate. It depends mainly on the starting amount of yeast, the amount of salt and sugar in the dough and the temperature.
The basic process in the production of wheat bread is alcoholic fermentation caused by yeast. The most noticeable sign of the onset of alcoholic fermentation is a steady increase in dough volume. During the fermentation of dough, yeast cells multiply, and the dynamics of their reproduction is different throughout the entire fermentation period.
The first rise in the bread maker takes only 26 minutes.
The intensity of fermentation of the dough and dough and the accumulation of acids in them depends on their temperature, and for this, the temperature of 26-28 * C is maintained in the bread maker at this stage.
It is not recommended to open the lid of the bread maker during this period of time, so as not to start a stream of cold air, and the dough will not fall from this.
Achieving the result:
As a result of the action of the embedded components in the dough, the action of yeast, salt, sugar, the dough is saturated with oxygen bubbles from the air.
Thanks to these bubbles, increasing in size and trying to rise up, the dough "swells" in volume and becomes elastic.

Smell and taste also depend on this process.
Temperature inside the bucket:
At the same time, the temperature in the bucket of the bread machine decreases from 35 * С (after the second batch) to 26-28 * С by the end of the first proofing.
Cycle 5. - GASES OUT - 20 seconds
This means wrinkle test.
Primary goal:
Dough kneading - short-term repeated dough promises - aims to improve the structure of the dough, allowing you to get the largest volume of bread, with a fine, thin-walled and uniform crumb porosity.
What happens in the bucket:
Between the first and second proofing, it is recommended to knead the dough lightly so that a new portion of oxygen from the air gets into it, since after the first proofing of the dough, the amount of oxygen decreases sharply.
The warm-up lasts only a few seconds. At the same time, not all the dough is crumpled completely, but only partially from the sides, the bun does not even fall off at the same time. Perhaps, from the point of view of the technologists of the Manufacturers of bread makers, this is quite enough, which can be seen later in the secondary proofing of the dough.
Achieving the result:
The formed carbon dioxide, which inhibits the yeast, is partially removed from the dough.
Yeast cells are evenly distributed in the dough and their nutrition is improved.
They are crushed into smaller gas bubbles with a uniform distribution in the mass of the dough, and along with the entrapment of air in the dough, new additional gas bubbles appear, resulting in an improvement in the rheological properties of the dough.
Temperature inside the bucket:
The temperature in the bucket of the bread machine is kept at the level of 26-28 * C, which is optimal for proofing the dough.
Cycle 6 - SECOND LIFT - 70 minutes
Second proofing - second proofing (fermentation, raising)
Primary goal:
The goal is to allow fresh oxygen to penetrate the dough so that the yeast can continue its activity and evenly spread throughout the dough. In addition, thanks to this action, the gluten network remains tense and elastic.
What happens in the bucket:
Over time, conditions change: nutrients and oxygen in the dough becomes less - oxygen is displaced by carbon dioxide, which slows down the process of yeast reproduction. True, there are now much more of them in the test, but they do not multiply.
To induce a second fermentation (i.e., for the dough to come up a second time), it is necessary to recreate the conditions for aerobic activity. To do this, remove carbon dioxide from the risen dough, replacing it with fresh oxygen. As a rule, the second proofing is faster, because there is much more yeast in the dough and the amount of carbon dioxide released is much higher. During fermentation, the volume of the dough increases up to 5 times or more after proofing compared to the original; it becomes lighter and acquires a porous structure.
It is not recommended to open the lid of the bread machine during this period of time, so as not to start a stream of cold air, and the dough will not fall from this.
It is permissible to open the bread maker once, briefly and quickly, just to grease the surface of the dough piece before baking, or to check the readiness of the dough before baking bread.
Achieving the result:
The dough that is baked after the second proofing has an elastic structure and a richer taste and aroma. Its pores are uniform, and their size depends on the amount of water added to the dough.
The sum of the processes that bring the dough as a result of fermentation and kneading to a state optimal for cutting and baking is maturation of dough - a concept used in practice.
The following organoleptic methods are used to determine the properties of the dough:
- by lifting height: the end of fermentation will coincide with the beginning of the semi-finished product falling off.
- by the elasticity of the dough: if you lightly press on the dough with your finger and lower it, then if the dough is not fermented enough, the hole from pressing will quickly level out; when the dough is ready, the fossa is slowly leveled out and with excessive fermentation, the pit remains.
- by external signs: a well-fermenting dough has a convex shape, an intense alcoholic smell and good porosity, while a flat surface, sour unpleasant odor indicates not optimal dough fermentation.
- the fermented dough must have sufficient gas-forming ability.
If you are not yet ready for such a check of the dough piece for readiness, it is better not to risk it and not open the bread maker once again, so as not to spoil the proofing result of the dough.
But it is simply necessary to observe the process of making dough and bread, to write down and remember everything for the future, experience can come quickly, and your observations will be useful to you.
Temperature inside the bucket:
At the same time, the temperature in the bread maker is maintained at a level of up to 26-28 * C, which is optimal for fermentation of the dough.
Cycle 7. - BAKE - 55 minutes and cycle 8. End of baking - 13 minutes.
Primary goal:
Baking is a process in which a distant dough piece, undergoing heat treatment in a bread maker, turns into a finished product - bread.
What happens in the bucket:
The bread machine begins to heat up quickly and strongly.
During heating and increasing the temperature inside the bread machine, an additional rise of the dough is possible, and at the same time it is very sharp. This process will stop when the temperature inside the dough piece reaches 55-60 * C.
This point should be taken into account when placing food in a bucket, so that the finished bread does not support the lid of the bread machine, which is also not good, the crust of the bread will turn out to be mint and pale.
At this time, complex biochemical processes for baking bread take place in the dough piece.
The surface of the dough piece changes, the appearance of a dark-colored dark thickened crust, the formation of an elastic, more durable crumb dry to the touch from the dough.
At this time, water vapor is formed, coming out through the crust of bread into the baking chamber, therefore, the window of the lid of the bread machine may fog up at this time. As the water vapor evaporates, the fogging disappears.
The quality of bread baking is significantly influenced by the mass of the dough piece, the greater the mass (the amount of flour and other products when laying in the dough), the slower the bread maker warms up, the longer it takes to bake bread. But you will not have enough time, since the process of baking bread is automated by the Manufacturer, which we ourselves cannot change upwards.
It is strictly forbidden to open the lid of the bread maker during this period of time, otherwise the dough piece may fall off and never recover.
Achieving the result:
If you follow all the rules, from laying food in a bucket of a bread machine to baking bread, you will get good tasty, beautiful bread.
Temperature inside the bucket:
The ambient temperature in the bucket is very high and can reach 180-190 * C.
The temperature of the crumb inside the finished bread reaches 98 * C.
Admin
Topic 3. Tools and devices necessary for baking homemade bread.


In order to correctly measure the products (ingredients) for kneading dough and baking homemade bread in a bread machine, we need the following tools and accessories. Some of them are included with the bread maker (measuring cup, measuring spoon, kneading knife), others need to be purchased by yourself, since they give accuracy in measurements and are simply necessary in working with the dough.

We look at the photo.

Now I will comment on each item in the photo.

1. Tools for the Hitachi bread maker are shown on the left:
- 240 ml measuring cup.
- measuring spoon at 2 ends - 15 ml tablespoon / 5 ml teaspoon.
- a silicone spatula for raking flour and dough from the sides of the bucket during kneading (not included in the package).

2. The photo in the center shows:
- electronic scales for weighing products (ingredients)
- sieve (battery operated) for sifting flour
- scoop-shovel for bulk products, for the convenience of applying from a bag to a sieve or bucket.
- tools for the Panasonic SD-255 bread maker: 310 ml measuring cup, kneading knives for wheat and rye dough, measuring spoon at 2 ends - 15 ml table spoon. and a teahouse for 5 ml.

3. Shown on the right are other necessary accessories that can be purchased freely at hardware stores.
- measuring cups (plastic and glass) with graduations.
- measuring spoons in a set from 5 to 15 ml.
- measuring spoon at 2 ends - 15 ml tablespoon, 5 ml teaspoon.

All proportions and quantities of products (ingredients) in recipes from Instructions for bread makers, on the Bread Maker forum, ru, or on other sites are indicated by the authors in these very meters - measuring cups (glasses), measuring tablespoons and teaspoons.
Or they are indicated in grams, then the products just need to be weighed in the amount you need on the scales.

The volume of the measuring cups is different from one manufacturer to another.
Measuring tablespoons and teaspoons - all bread makers have the same volume - 15 and 5 ml. respectively.


You can read about what other tools and devices you can use in home baking in the topic: Baking tools and accessories

Topic 4. INFORMATION ABOUT PRODUCTS (INGREDIENTS)

Products used in baking are measured in different sizes: tablespoons and teaspoons, cups, glasses, on the tip of a knife, pieces, pieces, etc.
To do this, a measuring table, a measuring teaspoon (two spoons on one handle) and a measuring cup (cup) are attached to the bread maker. If the measuring spoons are the same for all ovens, then the measuring cups (cups) are different in volume - pay attention to this when the recipe is given in measuring cups.
What if the measuring cup has a volume of 300 ml. (or other than 240 ml), and you need to take 150 grams of flour?
To do this, on your cup (glass) you need to find a mark, a division of 240-250 ml., And pour wheat or rye flour to this mark, shake it slightly - this will be about 150 grams of wheat flour, or 130 grams of rye flour.

REMEMBER:
1.the yeast is free-flowing, salt is measured only in teaspoons, and in grams
2. Granulated sugar is measured only in tablespoons, and in grams.
3. flour is measured only in measuring cups, and in grams.
4. liquid (water, juice, and other liquids) are measured only in measuring cups and in milliliters.
Never confuse units of measurement - milliliters and grams are different units.
Milliliters are the volume of liquid foods.
Grams are the weight of liquid, solid and other foods

The quality of the bread you bake will also depend on how you swap and put these units of measurement in practice. Carefully read the proposed bread recipe and measure the amount of food correctly.

To measure bulk, liquid products (ingredients) in the text, we will introduce the concept of "under the knife". This means that the products indicated in the bread recipe (other pastries), measured with a measuring spoon (tablespoon, teaspoon), or a measuring glass (cup), should be cut off from above with a knife along the edge of the measuring dishes after pouring into the measuring dish. Thus, the products are measured "without a slide" from above, but only what is included in the measuring dishes. If this is not done, then the weight of the products indicated in the recipes will differ from the actually measured in a larger direction, which will entail a discrepancy and correction of the weight of the products.
Pay attention to the measurement accuracy of water, oil, liquid honey, juices and other liquid products. When they are measured with measuring dishes, a "slide" is also possible, which must be cut off with a knife.

REMEMBER:
Number of main ingredients (products) in one measuring cup (240 ml) and one measuring spoon.
The number is approximate. All products are measured "under the knife"

Simple clean water - 1 measuring cup equals 240 ml.
Simple pure water - 1 measuring tablespoon equals 15 ml
Wheat flour - 1 measuring cup equals 150 grams
Wheat flour - 1 measuring tablespoon equals 9 grams
Rye flour - 1 measuring cup equals 130 grams
Rye flour - 1 scoop equals 9 grams
Salt - 1 scoop equals - fine salt 8 grams, coarse salt 7 grams
White granulated sugar - 1 tablespoon equals 15 grams
Bulk yeast - 1 scoop equals 4 grams
Fresh pressed yeast (wet) at the rate of 2 grams per 100 grams of flour.
Vegetable oil - 1 measuring tablespoon equals 15 ml. or 15 grams.


WHEAT FLOUR.
Flour is used for baking wheat white baking bread (this should be written on the bag with flour when buying it). Flour should be well dried, as raw flour contains more moisture, which can affect the dough when kneading.

The flour must be measured with a measuring cup that comes with the oven. Pour the required amount of flour into the cup, but do not tamp it, but simply compact it slightly, tapping the cup on the table, and cut off the excess with a knife (called "under the knife").

We measure (weigh) the flour into a separate bowl and then be sure to sift through a sieve, to remove various impurities "byaki", and saturate the flour with oxygen, it is very useful for her, which will positively affect the quality of the finished bread.

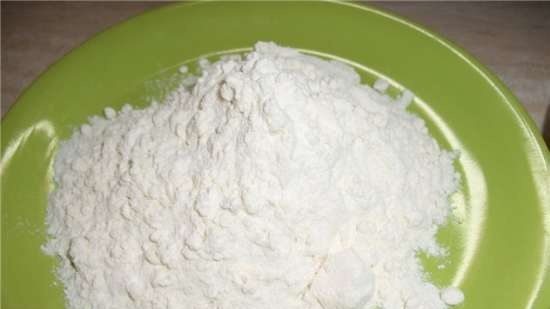
Why you need to sift flour.

Here is a photo flour not sifted - lumps and flour caking are visible. Such flour may contain various flour pests and just garbage.

UNDERSTANDING BREAD IN HOMEMADE BREAD

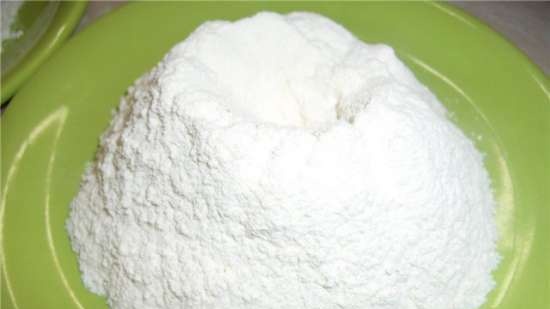
This photo shows already sifted flour - it looks lighter and more airy and there is a certainty that nothing but the flour itself is present here.

UNDERSTANDING BREAD IN HOMEMADE BREAD

REMEMBER:
1.If you are using measuring cups, first measure out the required amount of the flour before sifting.
2. If using a scale, first weigh the required amount of flour, and only then sift it.
The volume of sifted and wholemeal flour will be different, which will not coincide in the end with the amount of flour indicated in the recipe.

In order to predict in advance the result of the finished bread, and to know what can happen when you put different types of flour in the dough, you need to familiarize yourself with their characteristics and properties Classification and grade of Russian and imported flour, their interchangeability

WATER
Water is measured with a measuring cup in milliliters.
Try to measure it correctly as the presence of water (or liquid) in the batch is very important.
Another important point is if the room temp. air up to 27 degrees. it is necessary to take water at room temperature, over 27 * - water from the refrigerator - 5 *.
The water must also be clean, I use tap water, but filtered.
Water quality also plays a role in bread baking, bread height, duty cycle, crumb quality.
Hard water is better for baking bread.
Soft water contains various salts, especially magnesium, which soften the flour and the dough can "float", become softer, more than required.
Never strive for the accuracy of measuring water (liquid) to a milliliter, the error is acceptable.

Read about the effect of water on bread dough here:
Water as a component of the dough
Absorption of liquid by various types of flour, cereals, flakes

YEAST
Any dry active fast-acting yeast is used in bakery, including SAF-moment, SAF-Instant, D "Etker, Fermipan and others.
An indispensable condition - the yeast must be fresh in terms of shelf life and not fake (of which there are many on the market and in stores).
Yeast is measured with a measuring teaspoon in the amount of "under the knife"
In this bread recipe, SAF-Moment yeast was used.
You should not use yeast for bread, intended for baking pizza, muffins and other baked goods, you can read about their purpose on the package.
On each package of yeast, the manufacturer indicates how much yeast should be put in 500 (1000) grams of flour, this is also very important for high-quality kneading of bread dough.
Increasing the amount of yeast in the dough (say, twice) will not lead to the same increase in the rate of fermentation - both because of the struggle of the yeast for the available resources (oxygen and sugar), and because the more yeast, the more carbon dioxide it produces, and it slows down their activities.
By doubling the yeast, we won't make the dough come up twice as fast. Moreover, it can impart an undesirable taste to the product.
Bread made from dough with a little yeast tastes more like traditional bread

In order to predict the result of the finished bread in advance, and to know what can happen when you put certain yeasts in the dough, you need to familiarize yourself with their characteristics and properties.
About yeast - discussion, exchange of experience
Yeast - types, use, bookmark, selection

SALT
We measure the salt with a measuring teaspoon.
Salt can be used by any manufacturer, but it should be borne in mind that iodized salt can affect the structure of the dough, it can become "floating", since iodine softens the food.
Do not mix salt directly with yeast (or add it to yeast solution). The relatively high salt concentration neutralizes the yeast.
Salt is added at the very end, when all the ingredients are already in the dough. Then its percentage is small, and it will not hurt the yeast.
You can use coarsely ground gray salt, sea salt, previously pitching it in a blender (mill), so that it disperses faster in the dough and does not damage the walls of the bread maker's bucket.
Coarse salt was used in this bread recipe.

SUGAR
We measure sugar with a measuring tablespoon

Sugar is used in different colors, properties, and other characteristics. You can use granulated sugar, white, brown, etc.
Sugar can be replaced with sugar syrup, molasses, honey, fructose, cane sugar, lump sugar, etc. in the same amount as regular sugar.
Too high sugar content also interferes with the activity of yeast.
Some housewives ask why, when they put sugar in the yeast dough, the pies are unsweetened. This means that all the sugar the yeast has "eaten". Therefore, it is very important to accurately observe the ratio of all ingredients.
Yeast will not play without sugar, but if there is an excess of it, the dough will not work. Using live (pressed) yeast slows down the process and results in a more balanced flavor.
This bread recipe uses plain white granulated sugar.

OIL
The vegetable oil is measured out with a measuring tablespoon.
This bread recipe uses olive oil.

It should be noted that bread dough loves butter, so do not be afraid to add an extra spoonful of vegetable oil to the dough when kneading.
But with butter, you need to be careful, put in the bread dough as much as required by the recipe. The more butter, the heavier the dough becomes.
You can combine butter with vegetable oil.

In order to predict the result of the finished bread in advance, and to know what can happen when you put certain types of butter in the dough, you need to familiarize yourself with their characteristics and properties. The use of fats in baking

All ingredients used in home baking can be found in the section Bread Baking Ingredients & Accessories

Admin
Topic 5. CHOOSING A BREAD RECIPE

In the topic "20 PRACTICAL TIPS BEFORE HOW TO START BREAD OVEN" we read:
5. In advance, long before baking bread, pick up a bread recipe, check if everything suits you in this recipe, if you have a desire to bake this bread.
6. Recalculate the bread recipe for yourself, that is, reduce or increase the number of products, or make the necessary and possible replacement of products.
7. Read the recipe carefully to the end, possibly several times.... Make notes and clarify some points in advance if you don't understand them. Make explanatory notes in the recipe so as not to forget something, to prevent mistakes.

Wheat dough is made from flour, water, salt, yeast, sugar, fats, and other raw materials.
The list and ratio of certain types of raw materials used for the production of a certain type of bread is called recipe.

1. Where and how will we select a bread recipe?
In order to bake good bread, you can use the recipes and recommendations from the instructions for your bread maker, take any recipe from the instructions for other bread makers, or take a recipe from the site. Any recipe is good for this.
But it should be borne in mind that the recipes published in the instructions for bread makers, unfortunately, sin with a large number of errors in the bread recipe, especially when indicating the amount of flour and water and their units of measurement. On this occasion, there are a lot of complaints on the site's forum to the Manufacturers of bread makers (not all), and to the authors who wrote the recipes and posted them in the instructions.
Either the instructions give only a few bread recipes, or an incorrect translation into Russian, etc.
Many bread recipes are posted on sites and forums, including on our site. Therefore, do not waste time, study the recipes on the site, ask questions and bake good tasty bread according to proven recipes.

At first, try to select bread recipes with a simple recipe and if you can see the final result of baking from the attached photo. Photos will help you understand what kind of product you can get at the end.
The bread should be with a convex roof (dome), smooth, beautiful.
Pay attention to the crumb of the bread, which should be porous and dry.
Pay attention to the detailed description of the bread recipe and the detailed description of the bread baking process.
Read the website users' reviews for this bread recipe, this will also help you make the right decision.
Check if everything suits you in this recipe, if you have a desire to bake this bread.
Take your time to tackle the first recipe you come across and like, evaluate your capabilities and skills, there are many recipes on the site, look for your bread recipe.
It should also be borne in mind that each author of the recipe bakes bread for himself, his family, to his own taste, which may not coincide with your tastes. And in order to find your bread recipe and your bread taste, you will have to bake more than one of your own bread, pick up the ingredients for your bread. Do not scold the author of the bread - just your tastes did not match.
It should be borne in mind that the authors of the recipes live in different countries, with different climates, with different quality products, bake bread on different bread makers, use different flour and water, etc., many more reasons and differences can be indicated.
And your task is to take the bread recipe you like as a basis and adapt it to your baking conditions and your taste.

2. What size bread will we bake?
The size of the bread is determined by the amount of flour of one or several types (in total) put in the dough. The optimal amount of flour in the recipe is 350-500 grams, in order to get a well-mixed and matured dough, there was enough space in the bucket for these operations, the bread did not come out of the bucket and was baked well. With a larger amount of flour and other products, the dough may not be kneaded and defects in the baked goods and crumb of the finished bread are possible.
If you liked the bread recipe posted on the site with more or less flour than the bread size you need, then recalculate the bread recipe for yourself, i.e. reduce or increase the number of products, or make the necessary and possible replacement of products
To do this, you need to use the following theme on the site: Recalculation of the number of ingredients in the bread recipe. Help for beginners.

3. Read the recipe carefully to the end, possibly several times.
Make notes and clarify some points in advance if you don't understand them. Make explanatory notes in the recipe so as not to forget something, to prevent mistakes.
Ask the author of this recipe on the forum and get answers to them.
Check the information about the products in the recipe, the possibility of replacing one product with another.
Specify for yourself the technology for laying food, kneading dough and baking.
Check the bread baking program for this recipe, or a replacement for this program.
At first, put together for yourself a simple and affordable bread recipe with an accessible recipe of products, which will be for you a tried and tested "standard" of your bread in terms of dough consistency and crumb inside the bread. Further, when baking bread, you will start from your "standard" and gradually change and add any products within the amount selected in the "standard".
To create your standard, first use the simplest set of products and focus on the "standards" from the instructions for the bread maker from the topic on the site:
The amount of flour and other ingredients for making bread of various sizes and an "investigative experiment" with the volume and weight of water. For a personal "standard" of bread, the Italian bread recipe, which we will choose today as an example, may well be suitable.

We will bake "Italian bread"
This recipe contains the simplest ingredients that you always have at home, and which will allow you to bake simple, airy bread that tastes good. The recipe for this bread can be seen at Italian bread (bread maker)

The bread recipe is as follows:

Wheat flour - 450 grams, or 3 measuring cups (3 x 150 grams = 450 grams)
Water - 270 ml, (60% by weight of flour)
Olive oil - 2 tbsp. l. \ or 30 ml., \ or 30 grams
Salt - 8 grams, or 1.3 tsp.
Sugar - 27-30 grams, or 1.8 tbsp. l.
Active dry yeast - 4-5 grams, or 1.3 tsp. (can be replaced with 9 grams fresh)

Ready bread weight 670 grams
Baking mode - basic - 3.50 minutes. Crust 3 (medium). Measuring cup 240 ml.


Be prepared to add some flour or water (liquid) to the dough for the best result, keeping a little sifted flour and a measuring tablespoon handy.

For information on the number of products in measuring containers, see here: Amount of main ingredients in one measuring cup and spoon

If desired, the bread recipe can be slightly changed - water can be diluted 50/50 with fresh milk, cottage cheese whey, potato broth.
Products such as mashed potatoes, cottage cheese and cheese whey, potato broth, old kefir, sour cream, cottage cheese have a beneficial effect on the lifting force of the dough, make it more airy.
Vegetable olive oil can also be replaced with any available oil.

Admin
Topic 6. LAYING FOOD IN A BUCKET (CONTAINER) X / OVENS

The products are prepared, weighed, arranged in piles and saucers, sifted, etc.

UNDERSTANDING BREAD IN HOMEMADE BREAD

Now let's put the products in the bucket in the order and quantity in which the manufacturer of the bread maker advises us to lay, for this, lift the instructions for the bread maker and read it carefully.

To begin with, I recommend taking your time and putting the food in a bucket, putting it on the table, and not immediately in the bread maker, and laying the food in this form.
Thus, you will avoid spilling and spilling food past the bucket onto the heating element of the bread machine, which will entail the suspension of the process, and cleaning and washing the bread machine inside. If the flour is very dusty during kneading, put a damp towel on top of the bucket - then remove it when the flour absorbs the water.
By the way, despite my long experience of communicating with the bread maker, I still use this rule and do not neglect it.

Do not forget to insert the kneading knife into the bucket for kneading bread !!!!!!
This is a very common mistake for baking newbies !!!!!!

I am doing this: first I pour water, vegetable oil, then I pour flour, on top of the flour with a spoon I make several depressions in the corners of the bucket, into which I put yeast, salt, sugar, so that they do not come into contact with each other until the moment of kneading and do not begin to interact with each other earlier time

At the forum, there are disputes between bakers about the order in which food should be put in a bucket of a bread machine - first liquid, then dry, or vice versa - first dry, then liquid.
From my own experience I was convinced that the quality of kneading dough and baking bread does not suffer from “changing the places of the components”.
Lay as you see fit and as your experience suggests - either as advised by the instructions for the bread maker, or "dry-liquid" or "liquid-dry".

The amount of flour is never determined in advance when preparing flour (bread) products, because it all depends on how much of the liquid mixture has turned out: what is its specific composition and how much flour this mixture can absorb. If, however, to determine the amount of flour in advance, then it is almost never possible to accurately adjust the liquid to it, because this value is a variable subject to fluctuations.

Different fat content, milk density, water hardness, egg size, butter and fat consistency, as well as the freshness of the yeast and their effect on the liquid part also affect here.

Therefore, do not have much confidence in the recipe where the amount of flour is "precisely" determined for the bread dough. As a rule, it does not provide an opportunity to obtain a quality product, despite our best efforts.

The principle of laying products "flour in water"

I have been using this principle of laying food for many years and constantly, and which never fails me, and even on the contrary helps me to more carefully control the kneading of the dough, not to make mistakes, to predict in advance the structure of the crumb of bread.

The principle of bookmarking products with the following:

Try to fill in the entire amount of water + olive oil first, exactly as required by the recipe, i.e. e. 270 ml. water and 2 tbsp. l. oils.

And add flour - at first almost all, but leave 30-50 grams, and add the remaining flour gradually until you get the desired bun within the time of kneading the dough, about the first 11 minutes of kneading. If you feel that you have not achieved the desired consistency of the dough, and the cycle of the first batch is over, then wait until the start of the second batch and continue adding flour even more until the desired result is achieved. You have another 14 minutes to lay the flour.
You just need to keep in mind that the dough by the end of the second batch will still be much softer than during the first batch. This must be taken into account when reaching the desired dough consistency.

With this approach to kneading (flour into water), it can turn out so that either you will have excess flour, or you will have to add more. But this will be the amount of flour that your dough needs to be completely happy and get a good kolobok from your point of view (see below for ways to feel the kolobok).

As a result, you will not have a situation of under-consumption of flour and water, which will be revealed only after the bread is ready, when the dome has already fallen off or the crumb is too wet or dry and tight.

In my example of baking Italian bread, I used exactly this principle of laying food in a bucket of a bread machine.

Products are packed in a bucket:

UNDERSTANDING BREAD IN HOMEMADE BREAD

Now we put the bucket in the x / stove, turn on the START-key and start the batch.


During kneading, the flour begins to become very dusty and can spill onto the heating element and burn on it, which will lead to an unpleasant burnt smell that will accompany the entire process of baking bread.
To avoid this, as soon as the flour begins to dust, put a napkin or towel on the top of the bucket (under the lid of the bread maker), which will be removed when the flour is soaked in liquid. Remove flour build-ups on the sides of the bucket with a soft silicone spatula.
Admin
Topic 7. FORMATION OF A TEST WORKPIECE - "KOLOBKA".

During the preliminary (11 minutes) and main (14 minutes) dough kneading (cycles 1 and 3), a dough piece for the future bread is formed, which is called a "bun". What kind of bun will turn out - this is how baked bread will turn out, either tall soft fluffy, or dull wet inside (there may be other options for unsuccessful baking).

We look at the photos, which more clearly show the whole process of kneading, proofing of the dough piece of baking ready-made bread.

Here I only give a commentary on the photos
You can read more about the processes that take place with the dough in the bread maker in the post "Topic 2. PROGRAMS AND STAGES (CYCLES) IN BAKERY FOR BAKING BREAD"

Cycle 1. - PRE-KMIX - 11 minutes

The dough has begun. The dough is thin and loose.
I had to add 2 tbsp. l flour, then another 2 tbsp. l. flour for best results.
Do not repeat this procedure for adding 2 + 2 tbsp. l. flour. Everything may turn out differently for you, observe your test and its condition.
Perhaps you can do without the additional addition of flour, or you may have to add 5-6 tbsp. tablespoons of flour.
It all depends on the state of the flour itself and the presence of liquid in flour and other products.
You need to shovel flour from the walls and corners of the bucket under the dough. To do this, use a soft silicone paddle.

ATTENTION:
In order to add additional flour, liquid or other products to the bucket, to scoop the flour off the walls, or to feel the bun while kneading the dough, - you do not need to turn off the bread maker.
To do this, simply lift the lid of the bread machine when the bread machine is running.


UNDERSTANDING BREAD IN HOMEMADE BREAD

The dough piece at the end of the first batch looks like this. The gingerbread man has already acquired a dignified appearance after he was spanked and rewound properly on the walls in a bucket of a bread machine. At first, the kneading is very slow, but then it turns into a very intensive one. Of course, the kolobok looks torn and sticky to the touch.
Do not be afraid to feel the bun with your hands, so you will learn how to determine the readiness of the dough.

UNDERSTANDING BREAD IN HOMEMADE BREAD

Cycle 2. - PAUSE - 40 minutes.

Now the kolobok is in a pause state. In the photo, the bun at the end of the pause, the dough is imposing, has fallen apart and is at the bottom of the bucket.

UNDERSTANDING BREAD IN HOMEMADE BREAD

Cycle 3. - KNOW - 14 minutes

The dough piece at the end of the second batch is of a completely different quality - smoother, more plastic, practically without flaws.

UNDERSTANDING BREAD IN HOMEMADE BREAD

The dough piece after the second kneading really looks like a bun or a ball that rolls in a x / oven.
The gingerbread man should look like a round, smooth ball, without streaks, stripes, breaks, neat, lag behind the walls of the bucket, spin in the center of the bucket at the bottom.
If you touch the bun with your fingers (this must be done many times during the kneading time), it should be elastic, springy, and not stick, not stick to your fingers. Do not hesitate to run your fingers into the bucket with your fingers spread out and hug the bun with them properly to understand its softness, the consistency of the dough.
For comparison - it feels like it should be: a) an earlobe, - b) an elastic female breast, c) the butt of a small child, d) the belly of a sleeping cat, e) other similar comparisons are possible, so choose an object for comparison and practice, before kneading the dough.
These comparisons were taken by me from the forum and from other sources.
Each baker evaluates his own feelings from personal contact with the kolobok to his own taste and describes the state of the kolobok.
The gingerbread man should be of such a consistency (a little softer or a little harder), which will suit you later in the finished bread, but without the defect of the crumb and dome of the finished bread

It is unacceptable for the kolobok to have the shape of a "comma", climb up the side of the bucket with one end and fix it with one end (sucked), and below it was kneaded by a kneading knife, and flour gruel (liquid gruel) is visible at the bottom of the bucket.

The situation is also unacceptable when an even, outwardly beautiful bun rotates with a kneading knife, and at the same time there is flour gruel (liquid smear) under the bun.

These two situations ("unacceptable") indicate the presence of excess liquid in the test.

After you kneaded "correct" from your point of view kolobok in the time allotted for this, the bread maker goes on to the following cycles - the first rise (or proofing, fermentation), the second rise (proofing, fermentation).

Cycle 4 - FIRST RISE - 26 minutes

The first lifting (proofing, fermentation, lifting) the test is short in time. During the proofing period, the dough does not rise very much and not high.

UNDERSTANDING BREAD IN HOMEMADE BREAD

Cycle 5. - GASES OUT - 20 seconds
This means wrinkle test.

This is followed by a short-term dough kneading operation. The release of gases occurs in just 20 seconds, the dough has time to knead slightly from the sides. The bread maker believes that this is enough.

UNDERSTANDING BREAD IN HOMEMADE BREAD

Cycle 6 - SECOND LIFT - 70 minutes

Second lifting (proofing, fermentation, lifting) the dough piece is longer in time, and the dough manages to rise well during this time.

UNDERSTANDING BREAD IN HOMEMADE BREAD

At this time, it is possible to open the oven, but it is not recommended, since the oven is heating up, a comfortable temperature for raising is 26-28 * C, and the dough should be at rest. It can be opened carefully for a very short time 3-5 minutes before baking (the end of the second proofing), in order to grease the top of the bread with something, or sprinkle with seeds if necessary.

Cycle 7. - BAKE - 55 minutes and cycle 8. End of baking - 13 minutes.

Then the next cycle begins - baking. During this cycle, the bread maker gets very hot and the bread baking begins. It is categorically impossible to open the bread maker during this period - the bread can settle from the abruptly incoming cold air flow from the outside and no longer rise.

This is how the bread will look after the end of baking, while still in the bread maker.

UNDERSTANDING BREAD IN HOMEMADE BREAD

Now carefully remove the bread from the bucket and put it on the wire rack to cool.

UNDERSTANDING BREAD IN HOMEMADE BREAD

And the heel of the bread turned out to be neat and beautiful

UNDERSTANDING BREAD IN HOMEMADE BREAD

When the bread is ready, immediately turn off the bread maker and remove it from the bucket, put it on the wire rack under a towel, the bread should rest and cool down. The bread is completely ready when it reaches room temperature, until this moment the final processes are still going on in it. Bread is hot and poorly cut, damp inside, wrinkled and unhealthy

After cooling, cut the bread in half, and then into smaller pieces, slices.
Now you can help yourself, serve bread to the table.

UNDERSTANDING BREAD IN HOMEMADE BREAD

UNDERSTANDING BREAD IN HOMEMADE BREAD

UNDERSTANDING BREAD IN HOMEMADE BREAD

That's it, the bread is ready!
This is how wheat bread is baked in a homemade bread maker.

Requirements for the quality of bread

The shape must be correct without lateral protrusions, not wrinkled; for tin bread - corresponding to the bread form in which it was baked, with a slightly convex upper crust; for the hearth - round, oval or oblong-oval, not vague, without imprints.

The surface must be smooth, for certain types of products - rough, without large cracks and explosions; rolls, loaves - with cuts; for bottom products, pricks are allowed.

The crust should have a color from light yellow to dark brown, depending on the variety, without burning and pallor.

Crumb condition. The bread should be well baked, not sticky and not damp to the touch, without lumps, voids and traces of impurities, with uniform porosity, elastic. After light pressure with your fingers, the crumb should take its original shape, be fresh.

These requirements (standards) for the quality of finished bread relate to bread baked in bakeries in the industrial production of bread.
We, too, can and should use them when baking bread in a homemade bread maker, but with some slight digressions.

Analyzing our baked bread

If you look closely at the bread I have baked, we will notice some deviations from the "standards" in terms of the quality of bread, namely:

The baked bread has a cracked crust and creases on the side crust of the bread, which is clearly visible in the photo.

From experience I know that bread is not always perfect, so you should not be afraid of cracked crusts. The bread maker bakes on the machine, you cannot interfere with the baking process, but you can influence it in certain cases. You can read more about this on the forum.

In this example, the crust is cracked for the following reasons.
The dough piece rose well and high, the proofing was successful (see photo) and the dough no longer needs to rise, the entire resource is selected, but when the bread machine was heated in the "baking" mode, intense heating began and the dough piece began to rise further - the yeast started to play from the heat ... Such a rise can last until the temperature in the center of the dough reaches 50-60 * C, then the rise of the dough stops and bread baking continues in a quiet mode. This is how the growth on the bread arose.

If we look at a photo of the finished bread in a section along the height, we will also see the consequences of this sharp rise in the dough in the form of a darkish arc in the upper part of the bread. Why is that? Because at the end of the second proofing, before baking from the created mode in the bread machine and blowing the fan, a crust begins to form on the dough piece, it is colorless, but as if windy and very fragile. And when, during baking, the dough piece began to rise, the crust also shifted and deformed.

The wrong shape of the products can also be due to insufficient or excessive proofing of the dough. We've got an over-proofing. Since our bakery bakes bread in an automatic mode, strictly according to certain hours and cycles, only she knows when, according to her standards, it is time to move on to the next cycle, we cannot interfere in this process.

Trust me, these minor defects did not affect the quality of the bread.
The quality of the crumb of bread can be seen in the photo (sliced ​​pieces of bread), good quality, non-blemishes, no stinging in the dough, there are few crumbs from slicing, the crust of the bread is thin, the color of the bread is also good.

And it is very helpful that the bread was baked with such defects as to order, and I was able to comment on these defects and touch upon the quality of the finished bread.
After some doubt, I specially left this particular sample of bread for this topic.

Read more about the requirements for ready-made bread and the rules for its storage in the topic:
Cooling of finished bread and the processes taking place in it
Bread quality check
Drying and staleness of bread - how, where and how much bread can be stored ?!

Admin
Topic 8. IF DOES NOT PRODUCE WHEN MIXING THE COLUMNS.

1. A sticky liquid (or too soft) dough - a lot of liquid.
If the dough is completely liquid and sticks to the fingers and to the bucket (climbs up the walls and sticks with one end of the "comma"), then add a little flour, literally on a tablespoon without a top, and again try the bun with your fingers until you achieve the result - the correct bun ...

2. Too hard kolobok and difficult to mix - a lot of flour, little liquid.
This kneading option is worse for the dough than the first, when there is a lot of water (liquid). Because the already mixed kolobok reluctantly absorbs liquid, the kolobok will float for a long time in the resulting slurry at the bottom of the bucket. It turns out to the touch a bun inside tight, and around it a flour slurry. And if, at the same time, the kneading time ends, then nothing good will come of it.
There are times when we add flour to the slurry, we do not guess the amount, the bun is again tight, it is required to add water again, again the bun rolls around in the flour slurry and so on for a long time.
As a result, the dough inside the kolobok is heterogeneous, with seals and impurities.
Control the kneading of the dough and do it as described in this topic.

3. Make it a rule never to add water to the dough !!!!
A better option is when flour was not enough in the dough, you can add it later than add water. Water (liquid) during kneading should be a constant value initially (how much water was poured - so much was poured), and regulated by adding flour.Even initially, when kneading the dough, you can make a special "lack of sleep" of flour in the amount of 30-50 grams, so that then by gradually adding it to the kneading dough over a tablespoon, you can achieve the correct bun.
This principle has been tested and is called "flour in water".

4. The bread rises, but falls inward.
Diagnosis: the bread rises well and quickly, but at the end of the second proofing or at the beginning of the baking cycle, the roof-dome of the bread falls off. This is a fairly common problem and the reason for the marriage of bread among beginners.

There are two main reasons:
1. Increased increase in the volume of the dough piece.
2. Increased moisture content in the dough piece.

The answer to this question can be found here: The bread rises, but falls inward. Causes.

5. Formation of the correct bun and helps to achieve a balance between water (liquid) and flour during the dough kneading period.
You will always have a "war" between liquid and flour, because these products are very sensitive to various external and internal influences: gluten, dampness, dryness, weather, water quality, flour type, and much more.
And when the bun is "felt" and correctly formed, you can be calm, the bread should turn out, then you can no longer go to the x / oven. Then the bread maker will do everything herself. Train!

6. The amount of ingredients indicated in the recipes, in particular the amount of flour and water (liquid), cannot be taken as unconditional for execution. Always remember and proceed as described in points 1 and 2 above.
That is, we take the amount of water (liquid) indicated in the recipe as a basis and gradually add flour to the amount necessary to form the correct bun.
Why is that. Because bakers live in different cities, countries, use different types of flour, with different gluten, different water (hard or soft), the humidity and dryness of the climate, etc., can be called many more reasons why bread may not work ...
Therefore, your task is to adapt the bread recipe you like for yourself, for your baking conditions.
Remember that eggs, fruits, vegetables and other products that contain moisture in the dough are also water (liquid), the amount of which should be taken into account in the total amount of water (liquid) indicated in the recipe, otherwise we will get the baking result under item 1 (see above).

7. The concepts of WATER AND LIQUID are different from each other.
Water is pure tap water, from a bottle, and other sources, which is what is meant by this word.
Liquid is the amount of all liquid products in the bread recipe that you are going to put in the dough bucket.

This may include water, curd whey, mashed potatoes, potato broth, milk, cream, kefir, sour cream, fresh cottage cheese, fresh eggs, juices and mashed potatoes from them, various vegetable and fruit, grated vegetables, fruits, kvass wort, beer, liquid mustard, mayonnaise and many other products of liquid or semi-liquid consistency.
Adding water and other liquid or semi-liquid products to the dough gives us a LIQUID.
Therefore, very often the combination of water (liquid) is indicated in recipes, and we control the balance between the flour and water (liquid) in the dough.


Once again, let me remind you of the statement of V. Pokhlebkin from his book "Secrets of Good Cuisine":
The amount of flour is never determined in advance when preparing flour (bread) products, because it all depends on how much liquid mixture: what is its specific composition and how much flour this mixture can absorb.

Remember that eggs, fruits, vegetables and other foods that contain moisture in the dough are also water (liquid), the amount of which should be taken into account in the total amount of liquid indicated in the recipe, otherwise we get the baking result according to point 1 of this topic (see above).

Make a table of liquid in foods for yourself at home by the names of vegetables and fruits, their approximate size and the amount of liquid in them, for which it will be necessary to squeeze juice from vegetables and fruits through a juicer.

Then, when laying products in the dough, you will approximately know how much liquid is in the products being pledged and how much liquid you can get in total, and you will adjust the deviations from the amount of liquid required for a good bun by adding flour to the dough.

If the recipe says 300 ml water, then all replacements made by you water (in whole or in part) must correspond in total to 300 ml liquids, plus or minus small deviations from this amount, which will be adjusted by the state of the kolobok.

8. Syndrome of "new thing".

Almost all novice bakers on the forum suffer from the disease of the "new thing" when their more worried about the state of the new bread machine and the state of the bucket than the technology of baking bread. And it will take a long time to get rid of this "contagious" disease. During the illness, there are debates on the forum and new topics are opened about how to keep the bucket from scratches, why the bucket and the stove itself become stained, whether salt and sugar should be dissolved in water, whether it is necessary to grind nuts and other additives beforehand, etc. n. questions. And as a rule, novice bakers devote more time to the safety of their own bread machine, and not to baking bread in it.
Everything is correct - things need to be protected, groomed, washed and looked after.

But, the bread maker was originally intended for kneading dough and baking bread in it.
For these purposes, the bread maker has a bucket, a fan and shades that maintain a very high temperature during heating, a thermal fuse at 192 * C, during the proofing of the dough, the temperature in the bread machine can reach 40 * C, during kneading, the kneading knife and dough rotate strongly with force beats against the walls of the bucket, strong influence of steam, moisture. All this cannot but affect the surface of the bucket and the surface of the bread machine as a whole.

The instructions for my bread maker say that
1. Occasionally dark spots appear on the underside of the container and on the sensor surface. They do not affect the bread making process. Remove them with a damp kitchen towel.
2. After using the bread maker for a long time, you may notice some discoloration of the coating due to moisture and steam. This will not affect the operation of the bakery and the quality of the baked bread.
3. Sight glass and inner cover may be fogged. Foggy window dries out during baking.

Thus, the manufacturer himself warns the users of the bread makers about possible natural damage to the inner and outer surfaces of the bread machine. Read the instructions for your bread maker about this to eliminate unnecessary anxiety.

And try to find contact with your bread maker, technology is very sensitive to our attitude towards it, to our fear of technology. Be the master of your bread maker, and not vice versa, and then she will give in and will regularly fulfill your commands, mutual understanding will come between you, you will fully enjoy various options for freshly baked homemade bread.

Good luck to all!
Admin
Topic 10. WORKING ON ERRORS

Let's try to make out the mistakes made by me, the author of this topic, Roma, while baking Buckwheat Bread from Fugasca. The mistakes, as I believe, were made by me simply through inattention, as happens with many of you.
What you are reading now is not an invention to create such an opus, it really was, and therefore I am describing in such detail.
Learn not to do that.

Here is a set of products according to the author's recipe:

Kefir - 100 ml
milk - 300 ml
olive oil - 2 tbsp. l.
buckwheat flour - 100 gr
wheat flour - 450 gr
sugar - 2 tbsp. l.
salt - 1.5 tsp.
yeast - 2 tsp

What do I do when laying food and kneading dough.

I will describe the order in which the food is laid in the same way as I do constantly, because from the experience of baking bread in a bread maker, I did not see any difference in the method of laying food (first water then flour or vice versa).

So:

When I went to put the dough, I wrote down the recipe from the computer on a piece of paper.

I put 100 ml directly into the bucket. homemade yogurt.
Then I measure and add 200 ml. milk (noted the difference).
Then I add 2 tbsp. l. olive oil.
Then I weigh 100 grams of buckwheat flour and 400 grams of wheat flour into a sieve (note the difference).
Salt - 1.5 tsp.
Yeast SAF-moment - 2 tsp.

After filling in the food (and before putting the bucket in the oven), I always check the amount of food in the recipe with what is written in the recipe according to the principle - put it in, put it in ... (and how much).
Then something shot in my head, and I realized that I measured only 400 grams of wheat flour, and immediately measured another 50 grams and added it to the products.
Then I discovered that the recipe on my leaflet contains no sugar at all (this happens in recipes). But go to the computer - it is already turned off. I decided to add 1 tbsp. l. sugar, according to the principle one spoon will not spoil anything.

I put the bucket in the oven and start kneading the dough. I see that the dough turns out to be steep, which should not be. I begin to quickly add curd whey, it turns out that I had to add about 120 ml. At this time, I scold the author of the recipe for an inaccuracy in the recipe, a small amount of water in the recipe, and at the same time I remember those who baked this bread and complained about the same drawback.
Then I look at the recipe sheet and see the figure 300 ml. milk. That is, it turns out that my mistake and I did not fill 100 ml. milk (20 ml. I write off on a bun).
But this is not enough if you follow the accuracy of the recipe. I didn't have any more milk. I had to replace it with either water or serum. I added curd whey to the dough, it gives a better effect compared to just water.

I continue to knead the dough, after all my manipulations with the bookmark of products, I track the bun, add another 1 tbsp. l. serum for a bun, because you want to get a softer dough, after all, buckwheat flour is present in the recipe (it is heavy and requires more water).

Now that's all. All errors have been fixed, changes have been made, a kolobok of the required consistency has been formed. Then you don't have to worry, the bread will turn out what you need.

So the bread is ready, look what a handsome man it turned out, and in the context of the pieces are porous, airy. The result is good table bread, the taste of buckwheat is practically not felt, the bread is gray in color. The height of the bread is 17 cm.

UNDERSTANDING BREAD IN HOMEMADE BREAD

Now let's rewrite the recipe for this bread, leaving all my shortcomings in the food tab.

Kefir - 100 ml
milk - 200 ml
olive oil - 2 tbsp. l.
buckwheat flour - 100 gr
wheat flour - 400 gr
salt - 1.5 tsp.
yeast - 2 tsp

Feel the difference. If there are those who want to bake bread according to this recipe, please share your impressions of the taste of such bread later.

CONCLUSIONS:

None of us is immune from mistakes, even experienced bakers, but you need to be very careful about what you are going to do, read carefully, and check what you have written.
You need to prepare for baking bread, check the set of products before you start putting the dough.
And always remember that mistakes made lead to the marriage of bread.
And only control over the balance of flour and liquid when kneading the dough - FORMATION OF THE COLUMN - saved the day and baked goods.

Learn not to do that!
Sorry, I can (but don't need!), Because I know the technique of adjusting the balance of flour and liquid when kneading dough, the bun technique and the principle of replacing products.
Although, as they say - there is a hole in the old woman.
Admin
Dear users and guests of the forum!

This topic is A guide to baking bread in a bread maker, and is read only!

If you have a need to ask a question Admin on kneading dough, baking bread and other problems of baking - please do it in the topic Help, nothing happens with bread !!! (Ambulance) , or in topics / recipes for baking bread Adminwhich can be found in the Admin profile RUM RECIPES

If you want to thank the author of the manual Admin - please do it in the subject Thanks to Admin

Good bread and koloboks to everyone

Happy communication to everyone on the forum

When reprinting "Tutorials for baking bread in a bread machine" in whole or in parts, an active link to the site is required!

Admin
5 years and 3 months have passed since this topic was posted on 04.11.08 to 04.02.14

During this time, the topic was viewed 579325 times!

This means that the "Benefit" was opened 307 times a day or 13 times an hour !!!!

The COLUMN has great power !!!

Let the topic "MANUAL TO BAKING BREAD IN HOME BAKERY" continue to bring knowledge to the masses, help our users learn the basics of home baking !!!

All recipes

© Mcooker: best recipes.

map of site

We advise you to read:

Selection and operation of bread makers