|
Technical characteristics of the multicooker REDMOND RMC-M95
Power: 860-1000 W
Voltage: 220-240 V, 50 Hz
Electric shock protection: class I
Bowl volume: 5 l
Bowl coating: non-stick ceramic
Display: LED, color
Steam valve: removable
Number of automatic programs: 17
Automatic programs:
- MULTIPOOK
- MILK Porridge
- EXTINGUISHING
- FRYING
- SOUP
- FOR STEAM
- PASTA
- SOLDENING
- COOKING
- BAKERY PRODUCTS
- CEREALS
- PLOV
- YOGURT
- PIZZA
- BREAD
- DESSERTS
- EXPRESS
The function of maintaining the temperature of ready meals (auto-heating): up to 24 hours
Disabling the auto-heating function: yes
Reheating food function: up to 24 hours
Delayed start function: up to 24 hours
Equipment:
- multicooker
- bowl RB-C512
- container for steaming
- beaker
- scoop
- flat spoon
- scoop / spoon holder
- power cord
- book of recipes
- manual
- service book
Warranty: 2 years

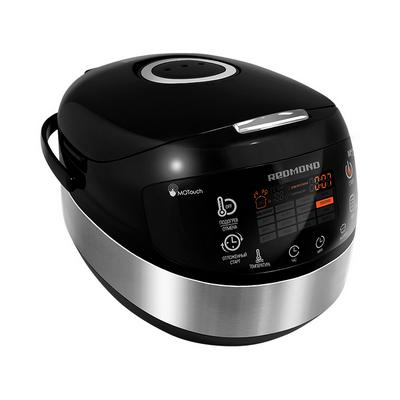
Multicooker device Redmond RMC-M95
1. Instrument cover
2. Removable inner cover
3. Bowl
4. Cover open button
5. Control panel with display
6. Case
7. Carrying handle
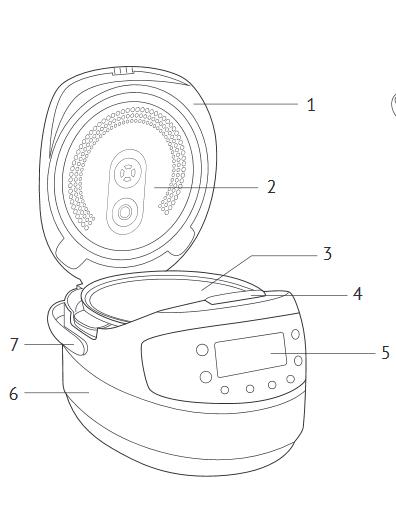
8. Removable steam valve
9. Flat spoon
10. Soup spoon
11. Measuring glass
12. Container for steaming
13. Holder for ladle and spoon
14. Power cord
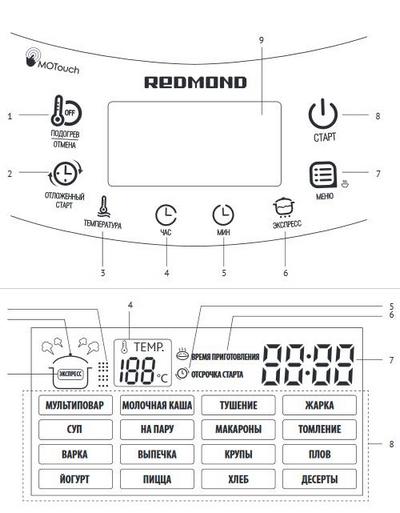
Control Panel
The REDMOND RMC-M95 multicooker is equipped with a touch control panel with a multifunctional color LED display.
1. "Heating / Cancel" - enable / disable the heating function; interruption of a cooking program; reset made settings.
2. "Delayed start" - enable the delayed start time setting mode.
3. "Temperature" - setting the cooking temperature in the "MULTI-COOK" program.
4. "Hour" - selection of the hour value in the cooking time setting and delayed start modes.
5. "Min" - selection of the value of minutes in the modes of setting the cooking time and delayed start.
6. "Express" - launch of the "EXPRESS" program.
7. "Menu" - selection of an automatic cooking program; preliminary deactivation of the auto-heating function
8. "Start" - switching on the preset cooking mode.
9. Display
Redmond Multicooker Recipes
Display device
1. Indicator of the automatic program "EXPRESS".
2. Indicator of the cooking / heating program operation.
3. Indicator of cooking stages.
4. Indicator of the set temperature in the MULTI-COOK program.
5. Indicator of the "Delayed start" function.
6. Indicator of the cooking program and the mode of the timer.
7. Timer.
8. Indicator of the selected automatic cooking program.
I. Before using for the first time
Carefully remove the product and its accessories from the box. Remove all packing materials and promotional labels.
Be sure to keep the warning decals, directional decals in place (when
availability) and a plate with the serial number of the product on its body!
After transportation or storage at low temperatures, keep the device at room temperature for at least 2 hours before turning it on.
Wipe the body of the device with a damp cloth and rinse the bowl, let them dry. When using the device for the first time, to avoid the appearance of foreign smell, clean it thoroughly (see “Caring for the device”).
Place the appliance on a firm, level, horizontal surface so that the hot steam escaping from the steam valve does not get onto wallpaper, decorative coverings, electronic devices and other objects or materials that may be affected by high humidity and temperature.
Before cooking, make sure that the external and visible internal parts of the multicooker are not damaged, chipped or other defects. There must be no foreign objects between the bowl and the heating element.
II. Operation of the multicooker Redmond RMC-M95
setting cooking time
In the REDMOND RMC-M95 multicooker, you can independently set the cooking time for each program, except for the "EXPRESS" program. The increment and possible range of the set time depend on the selected cooking program. To change the time:
1. After selecting a cooking program, press the "Hour" button to set the hour. If the button is held down for a few seconds, the value will change rapidly.
2. Press the "Min" button to set the minutes. If the button is held down for a few seconds, the value will change rapidly.
3. If it is necessary to set the cooking time less than one hour, press the "Hour" button until the hour is reset. Then, pressing the "Min" button, set the desired value of minutes.
4. When the cooking time has been set (the display continues to flash), proceed to the next step according to the algorithm of the selected cooking program. To cancel the settings made, press the "Warm Up / Cancel" button, then re-enter the entire cooking program.
IMPORTANT! When setting the cooking time manually, take into account the possible setting range and setting step provided by the preselected cooking program in accordance with the table of factory settings.
For your convenience, the range of times for cooking programs starts from the minimum values. This allows you to extend the work of the program for a short time, if the dish did not have time to cook during the main time.
In some automatic programs, the set cooking time counts down only after the appliance reaches the set operating temperature. For example, if you pour cold water and set the cooking time in the STEAM program to 5 minutes, then the program starts and the countdown of the set cooking time will start only after the water boils and a sufficient amount of steam has formed in the bowl.
Delayed start function
The function allows you to set the time interval at the end of which the dish should be ready (taking into account the program run time). The time can be set in the range from 10 minutes to 24 hours in 10 minute increments. It should be borne in mind that the delay time must be longer than the set cooking time, otherwise the program will start working immediately after pressing the "Start" button.
You can set the delayed start time after selecting an automatic program, setting the temperature and cooking time. For this:
1. Press the "Delayed start" button to turn on the time setting mode for
false start. The display shows Delayed Start and the timer starts flashing.
2. Press the Hour button to set the hour. The time format is set to 24 hours. If the button is held down for a few seconds, the hour starts to change rapidly.
3. Press the "Min" button to set the minutes. If the button is held down for a few seconds, the minutes will begin to change rapidly.
4. If it is necessary to set the delayed start time less than one hour, press the "Hour" button successively until the hour value is reset. Then, pressing the "Min" button, set the desired value of minutes.
5. To cancel the settings made, press the "Warm Up / Cancel" button, then re-enter the entire cooking program.
6. At the end of the time setting, press and hold the "Start" button for a few seconds. The indicator of the "Delayed start" function will light up, the program will begin to run and the time will count down.
7. After the appointed time, the dish will be ready.At the end of the program, depending on the settings, the device will switch to the auto-heating mode (the indicator of the “Heat / Cancel” button is on) or to the standby mode (the indicator of the “Start” button is flashing),
8. To turn off auto-heating, press the Menu button. The button indicator turns off.
• The delayed start function is available for all automatic cooking programs, with the exception of the "FRY", "PASTA" and "EXPRESS" programs.
• It is not recommended to use the Delayed Start function if the recipe contains dairy or other perishable products (eggs, fresh milk, meat, cheese, etc.).
• When setting the time in the "Delayed start" function, take into account that the countdown in the "ON STEAM" program starts only when the multicooker reaches the required operating temperature (after the water boils).
The function of maintaining the temperature of ready meals (auto heating) It turns on automatically immediately after the end of the cooking program and can maintain the temperature of the prepared food within 70-75 ° C for 24 hours. When automatic heating is active, the indicator of the Heating / Cancel button is on, the display shows a direct countdown of the operating time in this mode.
If necessary, auto-heating can be turned off by pressing and holding the "Heat / Cancel" button for a few seconds.
Preliminary shutdown of auto-heating
It is not always desirable to turn on auto-heating at the end of a cooking program. Taking this into account, the REDMOND RMC-M95 multicooker provides the ability to pre-disable this function during the start or operation of the main cooking program. To do this, during the start or operation of the program, press and hold the "Menu" button for a few seconds while the indicator of the "Heat / Cancel »Will not go out. To reactivate auto-heat, press and hold the Menu button again, the Heat / Cancel button indicator will turn on.
Reheating food function
The REDMOND RMC-M95 multicooker can be used to heat cold food. For this:
• Transfer the food to the bowl, place it in the multicooker body.
• Close the cover, connect the device to the mains.
• Press and hold the Heat / Cancel button for a few seconds until you hear a beep. The corresponding indicator on the display and the button indicator light up and the timer starts counting the warm-up time.
The device will heat the dish to 70-75 ° C and keep it hot for 24 hours. If necessary, heating can be stopped by pressing and holding the Heat / Cancel button for a few seconds until the corresponding indicators on the display and button go out.
Despite the fact that the multicooker can keep the food warmed up for up to 24 hours, it is not recommended to leave the dish preheated for more than two to three hours, as sometimes this can lead to a change in its taste.
General cooking tips
To obtain a high-quality result, we suggest using recipes for cooking dishes from the recipe book attached to the REDMOND RMC-M95 multicooker, developed specifically for this model.
This book is the result of a lot of hard work. All presented recipes were developed and tested in the REDMOND RMC-M95 multicooker by our team of chefs, and all the products used in their preparation were purchased in regular stores.
The ingredients indicated in the recipes, their weight, proportions, instructions for the sequence of actions, setting the temperature and time or using automatic cooking programs were carefully selected taking into account the volume and type of products, as well as the peculiarities of the operation of this multicooker model.
The book contains a lot of tips from our chefs that you will surely find useful.If, in your opinion, you have not succeeded in achieving the desired result on automatic programs, the REDMOND RMC-M95 multicooker provides a universal MULTIPOOK program with an extended range of manual settings, which opens up tremendous opportunities for your culinary experiments. At your discretion and to your taste, you can set the cooking time and temperature yourself, use a wide range of available additional functions.
MULTIPOOK program
This program is designed to cook almost any dish according to user-specified temperature and cooking time parameters. Thanks to the MULTIPOOK program, the REDMOND RMC-M95 multicooker will be able to replace a whole range of kitchen appliances and will allow you to cook a dish according to almost any recipe that interests you, read in an old cookbook or taken from the Internet. For your convenience, when cooking at temperatures up to 80 ° C, the auto-heating function is disabled. If necessary, it can be turned on manually by pressing and holding the Menu button for a few seconds after starting the cooking program. The Heat / Cancel indicator will light up.
Temperature setting range: 35-170 ° С with a step of 5 ° С.
The time setting range is 5 minutes - 12 hours in increments of 1 minute for an interval up to 1 hour or 5 minutes for an interval over 1 hour.
1. Prepare the ingredients according to the recipe. Spread them out evenly in the bowl and insert it into the body of the appliance. Make sure that all ingredients, including liquid, are below the maximum mark on the inside of the bowl. Make sure the bowl is firmly in contact with the heating element.
2. Close the cover until you hear a click. Connect the device to the mains.
3. Press the "Menu" button to select the "MULTI COOK" program. The cooking temperature indicator lights up on the display.
4. Press the "Temperature" button to set the cooking temperature indicated in the recipe book. In the MULTI-COOK program, the default temperature is 100 ° C.
5. Press the "Hour" and "Min" buttons to set the required cooking time. The default cooking time in the MULTI COOK program is 15 minutes.
6. If necessary, set the delayed start time.
7. Press and hold the Start button for a few seconds. The indicators come on
Start and Heat / Cancel buttons. The set program starts and the cooking time counts down.
8. By pressing and holding the "Menu" button, you can disable the auto-heating function in advance (the "Heat / Cancel" button indicator will go out). Pressing the “Menu” button again will enable this function again.
9. At the end of the program, a beep will sound. Depending on the settings, the device will switch to the auto-heating mode (the indicator of the “Heat / Cancel” button is on) or to the standby mode (the indicator of the “Start” button is flashing).
10. Press and hold the Heat / Cancel button to cancel the entered program, interrupt the cooking process or turn off the auto-heating.
The MULTIPOVAR program can cook a wide variety of different dishes.
Use the recipe book from our professional chefs or the table of recommended temperatures for cooking various dishes and products in this program.
If the expected result was not achieved, refer to the section “Tips for
cooking ”, where you can find answers to the most frequently asked questions and get the necessary recommendations.
Milk Porridge program
Recommended for preparing milk porridge. You can manually set the cooking time in the range from 5 minutes to 1 hour 30 minutes in 1 minute increments.
1. Measure out the recipe food, transfer to the bowl. Make sure that all ingredients (including liquid) are below the maximum mark on the inside of the bowl.Insert the bowl into the body of the device, make sure that it is firmly in contact with the heating element.
2. Close the cover until you hear a click. Connect the device to the mains.
3. Press the "Menu" button to select the "MILK Porridge" program.
4. Press the "Hour" and "Min" buttons to set the required cooking time. The default cooking time in the MILK PORSE program is 10 minutes.
5. If necessary, set the delayed start time.
6. Press and hold the Start button for a few seconds. The Start and Warm / Cancel button lights will turn on. The set program starts and the cooking time counts down.
7. By pressing and holding the "Menu" button, you can disable the auto-heating function in advance (the indicator of the "Heat / Cancel" button will go out). By pressing the button again
“Menu” you can re-enable this function.
8. At the end of the program, a beep will sound. Depending on the settings, the device
will go into auto-heating mode (the Heat / Cancel button indicator is on) or standby mode (the Start button indicator is flashing).
9. Press and hold the Heat / Cancel button to cancel the entered program, interrupt the cooking process or turn off the auto-heating.
Recommendations for cooking milk porridge in a slow cooker
The program "MILK Porridge" is intended for cooking porridge from pasteurized milk of low fat content. To avoid boiling milk and get the desired result, it is recommended to do the following before cooking:
• thoroughly rinse all whole grain cereals (rice, buckwheat, millet, etc.) until the water becomes clear;
• grease the multicooker bowl with butter before cooking;
• strictly observe the proportions, measuring the ingredients according to the recipes from the enclosed book. Decrease or increase the amount of ingredients only proportionally;
• when using whole milk, dilute it with drinking water in a 1: 1 ratio. The properties of milk and cereals, depending on the place of origin and manufacturer, can
vary, which sometimes affects the cooking results. If the desired result was not achieved in the "MILK Porridge" program, refer to the "Tips
for cooking "or use the universal program" MULTI-COOK ".
The optimum temperature for preparing milk porridge is 95 ° C. Set the amount of ingredients and cooking time according to the recipe.
EXTINGUISHING program
Recommended for stewing vegetables, meat, poultry, seafood. Possibility of manual setting of cooking time in the range from 20 minutes to 12 hours in 5 minute steps.
1. Measure and prepare food according to recipe, put in bowl. Make sure that all ingredients (including liquid) are below the maximum mark on the inside of the bowl.
2. Insert the bowl into the body of the device, make sure that it is firmly in contact with the heating element.
3. Close the cover until it clicks, connect the device to the mains.
4. Pressing the Menu button select the EXTINGUISHING program.
5. Press the "Hour" and "Min" buttons to set the required cooking time. The default cooking time in the STEWING program is 1 hour.
6. If necessary, set the delayed start time.
7. Press and hold the Start button for a few seconds. The Start and Warm / Cancel button lights will turn on. The set program starts and the cooking time counts down.
8. By pressing and holding the "Menu" button, you can disable the auto-heating function in advance (the "Heat / Cancel" button indicator will go out). By pressing the button again
“Menu” you can re-enable this function.
9. At the end of the program, a beep will sound. Depending on the settings, the device
will switch to auto-heating mode (Warm / Cancel button indicator is on) or to standby mode (Start button indicator blinks).
10. To cancel an entered program, interrupt a cooking process or a mode
Auto Heat Press and hold the Heat / Cancel button.
If the expected result has not been achieved, refer to the Cooking Tips section, where you can find answers to the most frequently asked questions and get the necessary recommendations.
Frying program
Recommended for frying meat, vegetables, poultry, seafood. You can manually set the cooking time in the range from 5 minutes to 1 hour 30 minutes in 1 minute increments.
The Delayed Start function is not available in this program.
1. Measure and prepare the food according to the recipe, spread the food evenly
in the bowl and insert it into the body of the device. Make sure the bowl is firmly in contact with the heating element. Add the recipe oil.
2. Close the cover until you hear a click. Connect the device to the mains.
3. Press the "Menu" button to select the "FRY" program.
4. Press the "Hour" and "Min" buttons to set the required cooking time. The default cooking time in the "FRY" program is 15 minutes.
5. Press and hold the Start button for a few seconds. The Start and Warm / Cancel button lights will turn on. The set program starts and the cooking time counts down.
6. By pressing and holding the Menu button, you can disable the auto-heat function in advance (the Heat / Cancel button indicator will go out). By pressing the button again
“Menu” you can enable this function again.
7. At the end of the program, a beep will sound. Depending on the settings, the device will switch to auto-heating mode (the indicator of the “Heat / Cancel” button is on) or to standby mode (the indicator of the “Start” button is flashing).
8. Press and hold the Heat / Cancel button to cancel an entered program, interrupt a cooking process or auto-heat mode.
We recommend that you follow the instructions from the book to avoid burning the ingredients.
recipes and stir the contents of the bowl periodically.
If the expected result was not achieved, refer to the "Tips for
cooking ”, where you can find answers to the most frequently asked questions and get the necessary recommendations.
SOUP program
The program is recommended for preparing various broths and first courses, as well as compotes and drinks. You can manually set the cooking time in the range from 20 minutes to 8 hours with a setting step of 5 minutes.
1. Measure and prepare food according to recipe, put in bowl. Make sure that all ingredients (including liquid) are below the maximum mark on the inside of the bowl.
2. Insert the bowl into the body of the appliance, make sure that the bowl is firmly in contact with the heating element.
3. Close the cover until you hear a click. Connect the device to the mains.
4. Press the Menu button to select the SOUP program.
5. Press the "Hour" and "Min" buttons to set the required cooking time. The default cooking time in the SOUP program is 1 hour.
6. If necessary, set the delayed start time.
7. Press and hold the Start button for a few seconds. The “Start” and “Warm / Cancel” button indicators will light up, the set program will start and the time will count down.
8. By pressing and holding the "Menu" button, you can disable the auto-heating function in advance (the indicator of the "Heat / Cancel" button will go out). Pressing the "Menu" button again will enable this function again.
9. At the end of the program, a beep will sound. Depending on the settings, the device will switch to the auto-heating mode (the indicator of the “Heat / Cancel” button is on) or to the standby mode (the indicator of the “Start” button is flashing).
10. Press and hold the Heat / Cancel button to cancel an entered program, interrupt a cooking process or auto-heat mode.
If the expected result was not achieved, refer to the "Tips for
cooking ”, where you can find answers to the most frequently asked questions and get the necessary recommendations.
STEAM program
Recommended for steaming vegetables, fish, meat, manti, dietary and vegetarian dishes, children's menu. The cooking time can be manually set in the range from 5 minutes to 2 hours with a setting step of 5 minutes.
The countdown of the cooking program time will start after the appliance has entered the operating mode (after the water has boiled).
Pour 600-1000 ml of water into a bowl. Place a container for steam cooking in the bowl.
1. Measure and prepare the food according to the recipe, spread it evenly in the steaming container and insert the bowl into the appliance body. Make sure the bowl is firmly in contact with the heating element.
2. Close the cover until it clicks, connect the device to the mains.
3. Press the "Menu" button to select the "STEAM" program.
4. Press the "Hour" and "Min" buttons to set the required cooking time. The default cooking time in the STEAM program is 15 minutes.
5. If necessary, set the delayed start time.
6. Press and hold the Start button for a few seconds. The Start button and Warm / Cancel button indicator lights up and the set program starts. The countdown of its operation time will begin after the water boils and a sufficient amount of steam has formed in the bowl. By pressing and holding the "Menu" button, you can disable the auto-heating function in advance (the indicator of the "Heat / Cancel" button will go out).
7. Pressing the “Menu” button again will enable the function again.
8. At the end of the program, a beep will sound. Depending on the settings, the device will switch to the auto-heating mode (the indicator of the “Heat / Cancel” button is on), or to the standby mode (the indicator of the “Start” button is flashing).
9. Press and hold the Heat / Cancel button to cancel an entered program, interrupt a cooking process or auto-heat mode.
If you are not using the automatic time settings for this program, please refer to the Table of Recommended Steaming Times for Different Foods.
If the expected result was not achieved, refer to the "Tips for
cooking ”, where you can find answers to the most frequently asked questions and get the necessary recommendations.
Program "PASTA"
Recommended for cooking pasta, dumplings, sausages, khinkali, boiling eggs, etc. You can manually set the cooking time in the range from 2 to 20 minutes in 1 minute steps. The program provides for bringing
water to a boil, loading the ingredients and cooking them further. The countdown of the cooking program time will start after the water boils.
The Delayed Start function is not available in this program.
1. Pour water into a bowl. Make sure the water level is below the maximum mark on the inside of the bowl. Place the bowl in the body of the appliance, make sure that it is firmly in contact with the heating element.
2. Close the cover until you hear a click. Connect the device to the mains.
3. Press the "Menu" button to select the "PASTA" program.
4. Press the "Hour" and "Min" buttons to set the required cooking time. The default cooking time in the PASTA program is 8 minutes.
5. Press and hold the Start button for a few seconds. The Start button and Warm / Cancel button indicator lights up and the set program starts.
6. By pressing and holding the "Menu" button, you can disable the auto-heating function in advance (the indicator of the "Heat / Cancel" button will go out). By pressing the button again
"Menu" you can re-enable this function
7. After boiling water, a signal will sound.Open the lid carefully and immerse the food in boiling water, close the lid until it clicks. Click the "Start" button. The set program starts and the cooking time counts down.
8. At the end of the program, a beep will sound. Depending on the settings, the device will switch to auto-heating mode (the indicator of the “Heat / Cancel” button is on) or to standby mode (the indicator of the “Start” button is flashing).
9. Press and hold the Heat / Cancel button to cancel an entered program, interrupt a cooking process or auto-heat mode.
When cooking some foods (for example, pasta, dumplings, etc.), foam forms. To prevent its possible leakage outside the bowl, you can
open the lid a few minutes after placing food in boiling water.
If the expected result was not achieved, refer to the "Tips for
cooking ”, where you can find answers to the most frequently asked questions and get the necessary recommendations.
Slowing program
Recommended for cooking stew, shank. You can manually set the cooking time in the range from 1 to 8 hours with a setting step of 10 minutes.
1. Measure and prepare food according to recipe, transfer to bowl. Make sure that all ingredients (including liquid) are below the maximum mark on the inside of the bowl.
2. Insert the bowl into the body of the device, make sure that it is firmly in contact with the heating element.
3. Close the cover until it clicks, connect the device to the mains.
4. Press the "Menu" button to select the "STEALTH" program.
5. Press the "Hour" and "Min" buttons to set the required cooking time. The default cooking time in the BROKEN program is 5 hours.
6. If necessary, set the delayed start time.
7. Press and hold the Start button for a few seconds. The Start and Warm / Cancel button lights will light up. The set program starts and the cooking time counts down.
8. By pressing and holding the "Menu" button, you can disable the auto-heating function in advance (the "Heat / Cancel" button indicator will go out). By pressing the button again
"Menu" you can re-enable this function
9. At the end of the program, a beep will sound. Depending on the settings, the device will switch to auto-heating mode (the indicator of the “Heat / Cancel” button is on) or to standby mode (the indicator of the “Start” button is flashing).
10. Press and hold the Heat / Cancel button to cancel an entered program, to interrupt a cooking process or auto-heat mode.
If the expected result was not achieved, refer to the "Tips for
cooking ”, where you can find answers to the most frequently asked questions and get the necessary recommendations.
Program "VARKA"
Recommended for cooking vegetables and legumes. The cooking time can be manually set in the range from 5 minutes to 2 hours with a setting step of 5 minutes.
1. Measure and prepare food according to recipe, transfer to bowl. Make sure that all ingredients (including liquid) are below the maximum mark on the inside of the bowl.
2. Insert the bowl into the body of the device, make sure that it is firmly in contact with the heating element.
3. Close the cover until it clicks, connect the device to the mains.
4. Pressing the "Menu" button, select the "COOK" program.
5. Press the "Hour" and "Min" buttons to set the required cooking time. The default cooking time in the “BAKE” program is 40 minutes.
6. If necessary, set the delayed start time.
7. Press and hold the Start button for a few seconds. The “Start” and “Warm / Cancel” button indicators will light up, and the set program will begin to run and its running time will count down.
8. By pressing and holding the "Menu" button, you can disable the auto-heating function in advance (the indicator of the "Heat / Cancel" button will go out). By pressing the button again
“Menu” you can re-enable this function.
9. At the end of the program, a beep will sound. Depending on the settings, the device will switch to auto-heating mode (the indicator of the “Heat / Cancel” button is on) or to standby mode (the indicator of the “Start” button is flashing).
10. Press and hold the Heat / Cancel button to cancel an entered program, to interrupt a cooking process or auto-heat mode.
If the expected result was not achieved, refer to the section "Tips for
cooking ”, where you can find answers to the most frequently asked questions and get the necessary recommendations.
The program is recommended for baking biscuits, casseroles, yeast and puff pastries. You can manually set the cooking time in the range from 20 minutes to 8 hours with a setting step of 5 minutes.
1. Measure and prepare the ingredients according to the recipe, transfer to the bowl. Make sure that all ingredients are no more than half the volume of the bowl.
2. Insert the bowl into the body of the device, make sure that it is firmly in contact with the heating element.
3. Close the cover until you hear a click. Connect the device to the mains.
4. Press the Menu button to select the BAKE program.
5. Press the "Hour" and "Min" buttons to set the required cooking time. The default cooking time in the BAKE program is 1 hour.
6. If necessary, set the delayed start time.
7. Press and hold the "Start" button for a few seconds. The Start and Warm / Cancel button indicators will light up. The set program starts and the cooking time counts down.
8. By pressing and holding the "Menu" button, you can disable the auto-heating function in advance (the "Heat / Cancel" button indicator will go out). Pressing the "Menu" button again will enable the function again.
9. At the end of the program, a beep will sound. Depending on the settings, the device will switch to auto-heating mode (the indicator of the “Heat / Cancel” button is on) or to standby mode (the indicator of the “Start” button is flashing).
10. Press and hold the Heat / Cancel button to cancel an entered program, to interrupt a cooking process or auto-heat mode.
You can check the readiness of the biscuit by sticking a wooden stick (toothpick) into it. If you take it out and there are no fragments of sticky dough left on it, the biscuit is ready.
When baking bread, it is recommended to deactivate the automatic heating function at all stages of cooking.
If the expected result was not achieved, refer to the "Tips for
cooking ”, where you can find answers to the most frequently asked questions and get the necessary recommendations.
Program "KRUPY"
The program is recommended for cooking crumbly cereals from different types of cereals, preparing various side dishes. The cooking time can be manually set in the range from 5 minutes to 4 hours with a setting step of 5 minutes.
1. Measure and prepare ingredients according to recipe, transfer to bowl. Make sure that all ingredients (including liquid) are below the maximum mark on the inside of the bowl.
2. Insert the bowl into the body of the device, make sure that it is firmly in contact with the heating element.
3. Close the cover until you hear a click. Connect the device to the mains.
4. Pressing the "Menu" button, select the "CROUPS" program.
5. Press the "Hour" and "Min" buttons to set the required cooking time. The default cooking time in the program "GRANUES" is 35 minutes.
6. If necessary, set the delayed start time.
7. Press and hold the "Start" button for a few seconds. The indicators light up
Start and Heat / Cancel buttons. The set program starts and the cooking time counts down.
8. By pressing and holding the Menu button, you can disable the auto-heating function in advance (the indicator of the Heat / Cancel button will go out). Pressing the "Menu" button again will enable this function again.
9. At the end of the program, a beep will sound. Depending on the settings, the device will switch to the auto-heating mode (the indicator of the “Heat / Cancel” button is on) or to the standby mode (the indicator of the “Start” button is flashing).
10. Press and hold the Heat / Cancel button to cancel an entered program, interrupt a cooking process or auto-heat mode.
If the expected result was not achieved, refer to the "Tips for
cooking ”, where you can find answers to the most frequently asked questions and get the necessary recommendations.
PLOV program
The program is recommended for cooking various types of pilaf. You can manually set the cooking time in the range from 20 minutes to 1 hour 30 minutes with a setting step of 10 minutes.
1. Measure out the recipe ingredients. Place the ingredients in a bowl. Make sure that all ingredients (including liquid) are below the maximum mark on the inside of the bowl.
2. Insert the bowl into the body of the device, make sure that it is firmly in contact with the heating element.
3. Close the cover until you hear a click. Connect the device to the mains.
4. Pressing the "Menu" button, select the "PLOV" program.
5. Press the "Hour" and "Min" buttons to set the required cooking time. The default cooking time in the PLOV program is 1 hour.
6. If necessary, set the delayed start time.
7. Press and hold the Start button for a few seconds. The indicators come on
Start and Heat / Cancel buttons. The set program starts and the cooking time counts down.
8. By pressing and holding the "Menu" button, you can disable the auto-heating function in advance (the indicator of the "Heat / Cancel" button will go out). Pressing the "Menu" button again will enable this function again.
9. At the end of the program, a beep will sound. Depending on the settings, the device will switch to the auto-heating mode (the indicator of the “Heat / Cancel” button is on) or to the standby mode (the indicator of the “Start” button is flashing).
10. Press and hold the Heat / Cancel button to cancel an entered program, interrupt a cooking process or auto-heat mode.
If the expected result has not been achieved, refer to the Cooking Tips section, where you can find answers to the most frequently asked questions and get the necessary recommendations.
YOGURT program
Yogurt is a fermented milk product with useful properties, popular all over the world. With the help of the YOGURT program, you can prepare various tasty and healthy yoghurts at home. It is possible to manually set the cooking time in the range from 6 to 12 hours with a setting step of 10 minutes.
In the YOGURT program, the auto-heating function is not available.
1. Measure the ingredients according to the recipe, transfer to the bowl. Make sure all ingredients are below the 1/2 mark on the inside of the bowl.
2. Insert the bowl into the body of the device, make sure that it is firmly in contact with the heating element.
3. Close the cover until you hear a click. Connect the device to the mains.
4. Pressing the Menu button, select the YOGURT program.
5. Press the "Hour" and "Min" buttons to set the required cooking time. The default cooking time in the "YOGURT" program is 8 hours.
6. If necessary, set the delayed start time.
7. Press and hold the Start button for a few seconds. The indicator of the Start button will light up. The set program starts and the cooking time counts down.
8. At the end of the program, a beep will sound. The device will go into standby mode (the “Start” button indicator blinks).
nine. To cancel an entered program or to interrupt the cooking process, press and hold the Heat / Cancel button.
To prepare yoghurts, you can use the special set of REDMOND RAM-G1 yoghurt jars (purchased separately).
If the expected result has not been achieved, refer to the Cooking Tips section, where you can find answers to the most frequently asked questions and get the necessary recommendations.
PIZZA program
Recommended for making pizza. You can manually set the cooking time in the range from 20 minutes to 1 hour with a setting step of 5 minutes.
1. Measure and prepare ingredients according to recipe, place in bowl.
2. Insert the bowl into the body of the appliance, make sure it is in close contact with the heat
body element.
3. Close the cover until you hear a click. Connect the device to the mains.
4. Press the Menu button to select the PIZZA program.
5. Press the "Hour" and "Min" buttons to set the required cooking time. The default cooking time for the PIZZA program is 25 minutes.
6. If necessary, set the delayed start time.
7. Press and hold the Start button for a few seconds. The indicators come on
Start and Heat / Cancel buttons. The set program starts and the cooking time counts down.
8. By pressing and holding the "Menu" button, you can disable the auto-heating function in advance (the "Heat / Cancel" button indicator will go out). Pressing the “Menu” button again will enable this function again.
9. At the end of the program, a beep will sound. Depending on the settings, the device will switch to the auto-heating mode (the indicator of the “Heat / Cancel” button is on) or to the standby mode (the indicator of the “Start” button is flashing).
10. Press and hold the Heat / Cancel button to cancel an entered program, interrupt a cooking process or auto-heat mode.
If the expected result has not been achieved, refer to the Cooking Tips section, where you can find answers to the most frequently asked questions and get the necessary recommendations.
BREAD program
Recommended for baking various types of bread from wheat flour and with the addition of rye flour. The program provides for a complete cooking cycle from proving the dough to baking. Now you can bake delicious bread yourself. You can manually set the cooking time in the range from 1 to 6 hours with a setting step of 10 minutes. In the BREAD program, the auto-heating function is not available.
1. Knead the dough following the directions in the recipe of your choice. Place the dough in a bowl.
Place the bowl in the multicooker body. Make sure all ingredients are below the 1/2 mark on the inside of the bowl. Make sure it is firmly in contact with the heating element.
Close the cover until you hear a click. Connect the device to the mains.
Pressing the "Menu" button, select the "BREAD" program.
Press the "Hour" and "Min" buttons to set the time indicated in the recipe. The default cooking time in the "BREAD" program is 3 hours.
It should be borne in mind that during the first hour of the program, the dough is proofed, and then directly baked.
Press and hold the Start button for a few seconds. The indicator of the Start button will light up. The set program starts and the cooking time counts down.
At the end of the program, a signal sounds. The device will go into standby mode (the “Start” button indicator blinks).
Press and hold the Heat / Cancel button to cancel an entered program, interrupt a cooking process or auto-heat mode.
Before using the flour, it is recommended to sift it to saturate it with oxygen and remove impurities.
We do not recommend using the Delayed Start function, as this may affect the baking quality.
Do not open the lid of the multicooker until the baking process is complete! From
the quality of the baked product depends on it.
To shorten the time and simplify the preparation, we recommend using ready-made mixtures for making bread.
DESSERTS program
Recommended for preparing various desserts from fruits and berries. The cooking time can be manually set in the range from 5 minutes to 4 hours with a setting step of 5 minutes.
1. Measure the ingredients according to the recipe, transfer to the bowl. Make sure that all ingredients (including liquid) are below the maximum mark on the inside of the bowl.
2. Insert the bowl into the body of the device, make sure that it is firmly in contact with the heating element.
3. Close the cover until you hear a click. Connect the device to the mains.
4. Pressing the Menu button, select the DESSERTS program.
5. Press the "Hour" and "Min" buttons to set the required cooking time. The default cooking time in the DESSERTS program is 1 hour.
6. If necessary, set the delayed start time.
7. Press and hold the Start button for a few seconds. The Start and Warm / Cancel button lights will turn on. The set program starts and the cooking time counts down.
8. By pressing and holding the "Menu" button, you can disable the auto-heating function in advance (the "Heat / Cancel" button indicator will go out). Pressing the “Menu” button again will enable this function again.
9. At the end of the program, a beep will sound. Depending on the settings, the device will switch to the auto-heating mode (the indicator of the “Heat / Cancel” button is on) or to the standby mode (the indicator of the “Start” button is flashing).
10. Press and hold the Heat / Cancel button to cancel an entered program, interrupt a cooking process or auto-heat mode.
If the expected result was not achieved, refer to the section “Tips for
Cooking ”, where you can find answers to the most frequently asked questions and get the necessary recommendations.
EXPRESS program
Instant cooking program for rice, crumbly cereals. Cooking time adjustments and the Delayed start function are not available in this program.
1. Measure out the recipe food, transfer to the bowl. Make sure that all ingredients (including liquid) are below the maximum mark on the inside of the bowl. Insert the bowl into the body of the device, make sure that it is firmly in contact with the heating element.
2. Close the cover until you hear a click. Connect the device to the mains.
3. Press and hold the Express button for a few seconds. Execution will begin
the set cooking program, the EXPRESS indicator lights up on the display and the countdown of the program time starts.
4. By pressing and holding the Menu button, you can disable the auto-heat function in advance (the Heat / Cancel button indicator will go out). Pressing the “Menu” button again will enable this function again.
5. At the end of the program, a beep will sound. Depending on the settings, the device will switch to the auto-heating mode (the indicator of the “Heat / Cancel” button is on) or to the standby mode (the indicator of the “Start” button is flashing).
6. Press and hold the Warm Up / Cancel button to cancel an entered program, interrupt a cooking process or auto-heat mode.
III. Additional features
Proofing dough
Proofing (raising) is the most important stage in the dough preparation technology immediately before baking. During the molding process, the porosity of the dough is disturbed,
almost all carbon dioxide. During the proofing, intensive fermentation takes place with the formation of up to 95% of carbon dioxide, the structure of the dough and its volume are restored
increases to 50-70% of the original. One of the main conditions for a successful process is the absence of drafts and maintaining a constant temperature and
air humidity, for which special cabinets are used. Using a multicooker
REDMOND RMC-M95 in the MULTIPOVAR program you can create the maximum
favorable conditions for proving the dough at home.
1. Knead the dough according to the recipe. Place the kneaded dough in a bowl. Make sure that all ingredients are no more than a third of the bowl's volume.
2. Place the bowl in the body of the device, make sure that it is firmly in contact with the heating element.
3. Close the cover until you hear a click. Connect the device to the mains.
4. Pressing the "Menu" button, select the "MULTI-COOK" program. The cooking temperature indicator lights up on the display.
5. Pressing the "Temperature" button, set the cooking temperature specified in
recipe book. The default temperature in the MULTIPOVAR program is 100 ° C.
6. Press the "Hour" and "Min" buttons to set the cooking time according to the recipe.
The default cooking time in the MULTI COOK program is 15
minutes.
7. Press and hold the Start button for a few seconds. The indicator of the Start button will light up. The set program starts and the cooking time counts down.
8. At the end of the program, a signal will sound and the indicator of the Start button will start blinking.
The device enters standby mode.
9. Press and hold the Heat / Cancel button to cancel an entered program or to interrupt the cooking process.
In the MULTIPOVAR program, you can prepare many different dishes. Use a recipe book from our professional chefs or a table of recommended temperatures for preparing various dishes and products in this program.
Do not forget that when proofing, the dough will almost double in volume. To
the dough did not "run away", the volume of its initial filling should not exceed half the volume of the bowl.
When proving the dough, it is necessary to maintain a constant temperature and humidity of the environment. For best results, do not open the cover
multicooker until the end of the cooking program.
Making fondue
The kind of dishes prepared in heat-resistant dishes heated over an open fire (at home - using special devices) has long been known all over the world. The homeland of European fondue (from the French fondre - "melt", "melt") is unconditionally recognized in Switzerland, where it is considered a national culinary treasure. Some kind of fondue analogs exist in the Far East: for example, Chinese ho-go or Japanese nabemono dishes. Using the REDMOND RMC-M95 multicooker in
with the MULTIPOVAR program, you can prepare fondue at home. Follow the recipes from the book from our chefs.
1. Prepare the fondue mixture according to the recipe, transfer the mixture to the bowl. Make sure that all ingredients (including liquid) are below the maximum mark on the inside of the bowl.
2. Place the bowl in the body of the device, make sure that it is firmly in contact with the heating element.
3. Press the "Menu" button to select the "MULTI COOK" program. The display lights up -
The cooking temperature indicator appears.
4. Press the "Temperature" button to set the cooking temperature indicated in the recipe book. The default temperature in the MULTIPOVAR program is 100 ° C.
5. Press the "Hour" and "Min" buttons to set the required cooking time. The default cooking time in the MULTI COOK program is 15 minutes.
6. If necessary, set the delayed start time.
7. Press and hold the Start button for a few seconds. The Start and Warm / Cancel button lights will turn on. The set program starts and the cooking time counts down.
8. By pressing and holding the "Menu" button, you can disable the auto-heating function in advance.
(The Heat / Cancel button light turns off). Pressing the "Menu" button again
you can enable this function again.
9. At the end of the program, a beep will sound. Depending on the settings, the device
will go into auto-heating mode (the Heat / Cancel button indicator is on) or standby mode (the Start button indicator is flashing).
10. To cancel an entered program, interrupt a cooking process or a mode
Auto Heat Press and hold the Heat / Cancel button.
In the MULTIPOVAR program, you can prepare many different dishes. Use a recipe book from our professional chefs or a table of recommended temperatures for preparing various dishes and products in this program.
Cooking curd
Cottage cheese has been known to man since ancient times. Of all dairy products, it is the richest in protein, which is very easily absorbed by the body. There is also a lot of calcium in the cottage cheese, which is useful for teeth and bones. It is a good source of vitamins and minerals that increase the body's resistance to infections, normalize the metabolic process.
Cottage cheese goes well with sour cream, kefir, yogurt, milk, as well as with any fruits and berries. It is an ideal filling for pies, cheesecakes and an excellent base for tasty and healthy casseroles or cheesecakes. Nutritionists recommend using natural low-fat or fat-free cottage cheese.
With the REDMOND RMC-M95 multicooker you can quickly and easily make homemade cottage cheese, which can be used as an end product or as an ingredient in other dishes. Follow the cooking instructions in the included recipe book.
Cooking cheese
Cheese is another representative of fermented milk products, the manufacturing technology of which was familiar to our distant ancestors. Today, hundreds of varieties of cheese are known, each has its own fans. In terms of protein content, cheese is ahead of meat or fish, including amino acids, vitamins, phosphorus, zinc, calcium and other useful substances important for our body. Now in the REDMOND RMC-M95 multicooker you can easily prepare great natural homemade cheeses and experiment with their flavors by adding various fillings. Our chefs have developed several recipes for making hard, cottage cheese and melted cheese, which you will find in the attached recipe book.
The properties of the products used may differ depending on the place of origin and manufacturer, which sometimes affects the cooking results.
IV. To help mom
Preparing baby food
With the advent of the baby, the mother adds a lot of trouble, to which almost all her free time is devoted. The multicooker REDMOND RMC-M95 will help to facilitate the solution of issues related to the nutrition and care of a child at different stages of growth and development.
In the cookbook attached to the multicooker, you will find many recipes for dishes that can be given from the beginning of complementary foods until preschool age. This book was developed by our team of chefs specifically for this model. All presented recipes have been adapted and tested directly in the REDMOND RMC-M95 multicooker.
Complementary feeding is a new food for babies, replacing first one, and then several feedings. Complementary foods, depending on age, can be various mashed potatoes, cereals, kefir, yoghurts, broths, mashed meat and fish.
Age 4-6 months One-component vegetable and fruit puree from zucchini, cauliflower, apples, pears; one-component juices
Age 6-8 months Vegetable puree from cabbage, pumpkin, carrot, beet with the addition of mashed meat and fish; fruit purees, cottage cheese, kefir, yoghurts, cereals
Age 8-12 months Vegetable multicomponent mashed potatoes, tomatoes, green peas with the addition of mashed meat and fish; fruit purees, cereals, cottage cheese, kefir, yoghurts, soups in vegetable broth
Vegetable and fruit purees
Mashed potatoes are single-component (from one type of vegetables, fruits) or multicomponent (from a mixture of several types). You need to start with a one-component product.
Dairy and dairy-free cereals
Porridge is considered one of the healthiest foods for babies.The nutritional value of porridge depends on the type of cereal and grain processing technology. In terms of the sum of different indicators, buckwheat and oatmeal are the leaders, containing the most dietary fiber, protein, fat, vitamins and mineral salts.
Yoghurts
Yogurt is a healthy and popular fermented milk product all over the world, which can be introduced into the child's diet from 6 months of age. With the REDMOND RMC-M95 multicooker you can prepare a variety of tasty and healthy yoghurts at home.
Soups
Various decoctions, soups and broths are of great benefit to the child's body. They are well absorbed, regulate the water-salt balance, are rich in vitamins and have a high energy value. They can be introduced into the diet from 8 months of age. You can find recipes for making soups and broths for babies in the attached recipe book.
IMPORTANT! The above information is for informational purposes only. Before deciding to start complementary foods, choosing mixtures or products for the children's menu, it is imperative to consult with a pediatrician or dietitian!
Sterilization
Until your baby's immune system is sufficiently strong, sterilizing food utensils will help protect him from many harmful bacteria. The most effective methods are considered to be sterilization using water (autoclave) or steam. In the REDMOND RMC-M95 multicooker, you can create both steam and water (medical) sterilization methods, which are fast, simple and effective.
For bottles and large items (water-based autoclave method):
1. Fill the feeding bottles with water, seal the lids and
place in the bowl. Fill a bowl with water up to the neck of the bottles. Place the bowl in the body of the appliance, make sure that it is firmly in contact with the heating element.
1. Close the cover until it clicks, connect the device to the mains.
3. Press the "Menu" button to select the "SOUP" program.
4. Press the "Hour" and "Min" buttons to set the sterilization time from the recipe book. The default cooking time in the SOUP program is 1 hour.
5. If necessary, set the delayed start time.
6. Press and hold the Start button for a few seconds. The Start and Warm / Cancel button lights will turn on. The set program starts and the cooking time counts down.
7. Press and hold the Menu button to turn off the auto-heat function (the Heat / Cancel button indicator goes out).
8. At the end of the program, a beep will sound. The device will go into standby mode (the “Start” button indicator blinks),
9. Press and hold the Heat / Cancel button to cancel an entered program or to interrupt the cooking process.
10. At the end of the program, remove the bottles from the bowl and leave them closed. In this form, they will be sterile for up to 12 hours. Empty the bottle if necessary and use it as directed.
For nipples and small items (steam method):
1. Place small items (teats, cutlery, teethers, etc.) in the steaming container.
2. Pour 600-1000 ml of water into the bowl, place the bowl in the body of the device, make sure that it is firmly in contact with the heating element. Place the container in the bowl.
3. Close the cover until it clicks, connect the device to the mains.
4. Press the Menu button to select the STEAM program.
5. Press the "Hour" and "Min" buttons to set the sterilization time according to the recipe. The default cooking time in the STEAM program is 15 minutes.
6. If necessary, set the delayed start time.
7. Press and hold the Start button for a few seconds. The Start and Warm / Cancel button lights will turn on. The installed program will start executing. The countdown of its operation time will begin after the water boils and a sufficient amount of steam has formed in the bowl.
8. Press and hold the Menu button to turn off the auto-heat function (the Heat / Cancel button indicator goes out).
nine. At the end of the program, a signal sounds. The device will go into standby mode (the “Start” button indicator blinks),
10. To cancel an entered program or to interrupt a cooking process, press and hold the Heat / Cancel button.
At the end of the program, all items placed in the container will be sterilized.
|