|

Technical characteristics of the Avex BM-250 bread maker
Power 460 W
Number of programs 16
Baking dish coating non-stick
Voltage / current frequency 220 V / 50 Hz
Electronic control
The choice of crust color is light, medium. dark
Memory reserve in case of power failure 10 minutes
Bread weight 500 g / 750 g
Maintaining temperature for 60 minutes
Timer for 15 hours
There is a delayed start
Yoghurt and jam cooking program yes
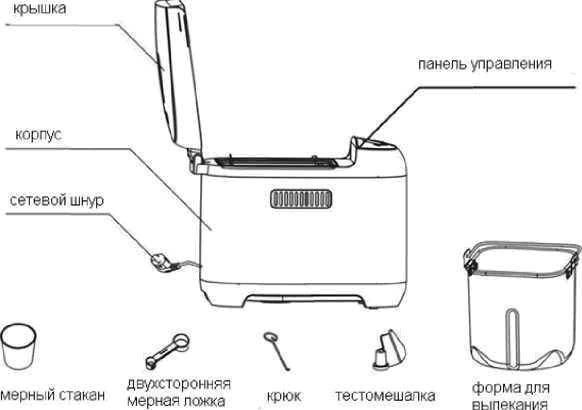
There is a hook
There is a measuring glass
There is a dough mixer
Double-sided measuring spoon
There is a glove
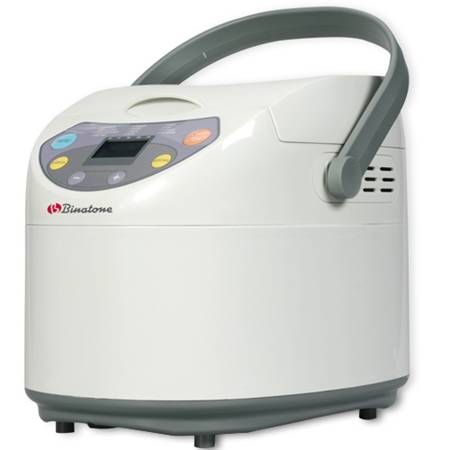
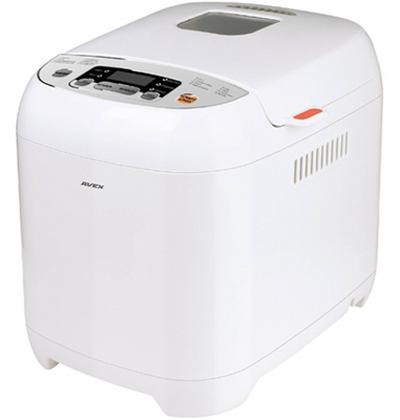
Avex BM-250 white
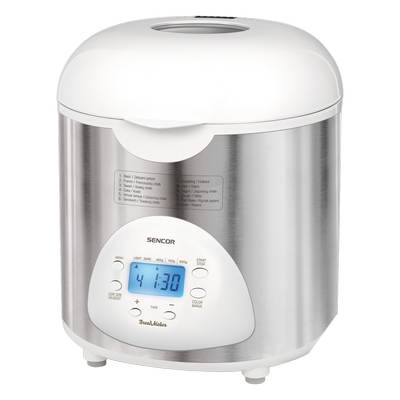
Avex color BM-250 X stainless steel
Case material metal / plastic
Motor power 23 W
Size (WxDxH), cm 32.7x25x27.5
1 year warranty
Country of origin China
BAKERY is an irreplaceable household appliance for making fresh bread, sweet pastries, dough. In addition, the AVEX breadmaker offers the possibility of making jam and yoghurt. You can not only cook your favorite goodies, but also experiment, create new unique recipes. Additional functions such as delayed start, automatic overheating shutdown, infrared heating element, automatic temperature control, warning and alarm signals make cooking less cumbersome.
• The AVEX bread machine has several automatic modes for making bread, sweet pastries, jam dough, yogurt.
• Built-in mini-computer fully automates the cooking process.
• Automatic maintenance of temperature allows bread to stay fresh longer.
• Teflon coating prevents baked goods from burning and sticking to the edges of the pan.
• Function "delayed start", will prepare bread at the time you need. The delayed cooking time can be up to 15 hours.
• Overheating protection function provides additional safety for housewives.
• The special coating of the inner wall of the bread machine has heat-reflecting properties. This speeds up the baking process and therefore makes the whole process more economical.
• The infrared heating element heats up quickly and lasts a long time.
• Silent and powerful electric motor will ensure stable and efficient operation of your bread maker.
• Saves time when making buns, muffins and other types of bread.
• The ability to experiment and prepare new baked goods.
• Control the cooking process from ingredients used to baking modes.
• The bread maker is an indispensable device if you live far from shops and industrial bakeries.
• The AVEX bread maker is easy to make jams and jams.
• The bread machine should only be used in an upright position. Never use the breadmaker on uneven or high temperature surfaces.
• The appliance is not intended for use by persons (including children) with reduced physical or mental capabilities, or lack of life experience or appropriate knowledge of the operation of electrical appliances, unless they are supervised or instructed to use the appliance by a person responsible for their safety ...
• Improper use of the appliance can result in high voltage electric shock and personal injury.
• If the power cord is damaged, in order to avoid personal injury, it must be replaced by a qualified technician at a certified service center.
• The distance between the bread maker and objects must be at least 10 cm to avoid damage. Avoid placing the bread maker close to objects and electrical appliances easily deformed by moisture.
• Do not open the appliance while baking bread. The only exception is opening the lid at the stage of kneading the dough.
• Do not leave the device unattended during use.
• The cord should not hang over the edge of the table and touch hot surfaces. Pay close attention to the appliance when it is switched on or when children are near it.
• Any changes or modifications to the device without the manufacturer's permission are not permitted, as they may cause damage, inconvenience or even injury to the user.
• Do not start the bread maker without loading as this may damage the bread maker.
• Do not exceed the stated maximum ingredient amounts, as this could overload the bread maker.
• Do not touch the baking dish while the device is operating.
• Do not move the operating device.
• Do not use the bread maker outdoors.
• Do not use the appliance if it is not properly closed.
• Do not use the device if damaged after being dropped. Contact a certified service center.
• Do not place the appliance near a gas, electric stove or a heated oven.
• Strictly follow the instructions and safety measures specified in this manual to prevent burns, fires and electric shocks. This appliance generates heat and discharges steam during use.
To reduce the risk of fire or electric shock:
• Unplug the breadmaker after use.
• Do not insert or remove the plug from the outlet with wet hands.
• Do not plug in the appliance if there is water on the surface.
• Do not overheat the plug; make sure that it is firmly and completely inserted into the outlet;
• Do not use the bread maker if the power cord is damaged or wet; unplug the device from the mains before cleaning, let the removable parts of the device cool down.
• Never pull on the power cord, if you want to turn off the device, carefully pull the plug from the socket.
• The bread maker is intended for household use only.
• If any malfunction occurs during operation, turn off the device, disconnect the plug from the power outlet. Contact an authorized service center with a warranty card. Never troubleshoot yourself.
• Never pour water onto the working surface of the heating element.
• Do not leave water in the mold if you do not use the appliance for more than two days.
• Never remove the mold to remove the loaf without disconnecting the power from the mains, otherwise, the heat sensor will be damaged.
• Do not press the START / STOP button before placing the ingredients in the dish and before placing it inside the bread maker. Never leave potholders, towels or other materials on the lid of the bread maker while it is running.
• Do not cut the baked bread without removing it from the mold, and do not use metal objects to stir the ingredients to avoid scratching the coating.
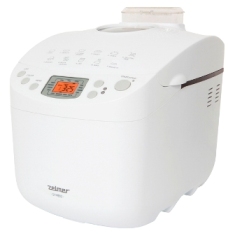
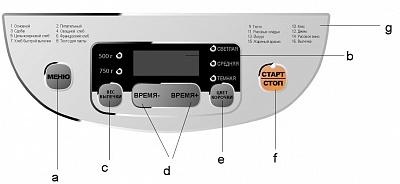
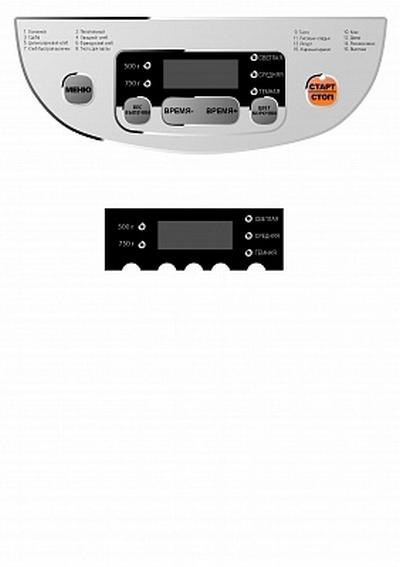
1 - button for selecting the programs of the bread maker
2 - display
3 - button for selecting the weight of the baked loaf
4 - buttons for setting the time
5 - button for selecting the desired level of brown crust
6 - button to start / end the selected program 7 - list of programs
Please read these instructions carefully before using the device. ATTENTION!
Before using for the first time or after a long break in work, it is recommended to wipe the inside of the machine with a damp cloth.The detachable, non-electrical parts of the bread maker should be washed in warm soapy water and then wiped dry.
1. Place the bread maker on a flat, dry, heat-resistant, non-slip surface as close to the outlet as possible.
2. Open the cover of the bread maker.
3. Remove the pan from the bread maker and insert the kneader into it.
4. Pour water or milk into the mold and add flour evenly on top.
5. Pour sugar, salt and other ingredients on the flour closer to the corners of the pan. The oil can be poured directly into the corner of the mold. It is desirable to achieve a load such that the ingredients are not mixed prior to kneading.
6. If your recipe contains yeast, be especially careful about measuring and loading it. They must not come into contact with ingredients other than flour before kneading. Make a small hole for the yeast in the flour towards the center so that no liquid or oil comes through. Always use fresh dry yeast from the same manufacturer, in this case you will not have dosing errors.
7. Carefully place the baking dish into the chamber of the breadmaker. Check - the form must be securely fixed and located exactly relative to the inner walls of the bread machine.
8. Close the lid of the bread maker.
9. Use one of 16 programs.
10. At the end of cooking, disconnect the appliance from the mains. Remove the baking dish and turn it over to remove the baked goods. Be careful, the lid and mold will be very hot, use gloves to protect your hands from the heat.
11. Place freshly baked bread or pastries on a wire rack away from drafts or wrap them in a thin towel for cooling, the bread should cool slowly so that the moisture is evenly distributed. If you try to cut bread or pastries that have not yet cooled down, its crumb will stick together, and the crust, on the contrary, will be too hard.
12. The mixer may remain in the loaf or baked goods, in which case remove it with the hook supplied.
Cooking programs
1. BASIC
• To select this program, press the "MENU" button until the display shows the number of the desired program.
• Then select the size of the loaf with the BAKING WEIGHT button and the crust color with the CRUST COLOR button. When all settings are complete, press the START / STOP button to start the cooking process. The display will show the time until the end of cooking.
• At the end of the baking cycle, the appliance will beep several times and enter auto-keep warm mode for 60 minutes.
To stop this mode, press and hold the START / STOP button for 3 seconds.
The cooking process takes a maximum of 2 hours 55 minutes.
2. NUTRITIOUS
• To select this program, press the "MENU" button until the display shows the number of the desired program.
• Then select the size of the loaf with the BAKING WEIGHT button and the crust color with the CRUST COLOR button. When all settings are complete, press the START / STOP button to start the cooking process. The display will show the time until the end of cooking.
• At the end of the baking cycle, the appliance will beep several times and enter auto-keep warm mode for 60 minutes.
To stop this mode, press and hold the START / STOP button for 3 seconds.
The cooking process takes a maximum of 2 hours 58 minutes.
3. BADGE
• To select this program, press the "MENU" button until the display shows the number of the desired program.
• Then select the size of the loaf with the BAKING WEIGHT button and the crust color with the CRUST COLOR button. When all settings are complete, press the START / STOP button to start the cooking process. The display will show the time until the end of cooking.
• At the end of the baking cycle, the appliance beeps several times and goes into automatic keep warm mode for 60 minutes.
To stop this mode, press and hold the START / STOP button for 3 seconds.
The cooking process takes a maximum of 2 hours 48 minutes.
4. VEGETABLE BREAD
• To select this program, press the "MENU" button until the display shows the number of the desired program.
• Then select the size of the loaf with the BAKING WEIGHT button and the crust color with the CRUST COLOR button. When all settings are complete, press the START / STOP button to start the cooking process. The display will show the time until the end of cooking.
• At the end of the baking cycle, the appliance beeps several times and goes into automatic keep warm mode for 60 minutes.
To stop this mode, press and hold the START / STOP button for 3 seconds.
The cooking process takes a maximum of 2 hours 52 minutes.
5. WHOLE GRAIN BREAD
• To select this program, press the "MENU" button until the display shows the number of the desired program.
• Then select the size of the loaf with the BAKING WEIGHT button and the crust color with the CRUST COLOR button. When all settings are complete, press the START / STOP button to start the cooking process. The display will show the time until the end of cooking.
• At the end of the baking cycle, the appliance beeps several times and goes into automatic keep warm mode for 60 minutes.
To stop this mode, press and hold the START / STOP button for 3 seconds.
The cooking process takes a maximum of 3 hours 02 minutes.
6. FRENCH BREAD
• To select this program, press the "MENU" button until the display shows the number of the desired program.
• Then select the size of the loaf with the BAKING WEIGHT button and the crust color with the CRUST COLOR button. When all settings are complete, press the START / STOP button to start the cooking process. The display will show the time until the end of cooking.
• At the end of the baking cycle, the appliance beeps several times and goes into automatic keep warm mode for 60 minutes.
To stop this mode, press and hold the START / STOP button for 3 seconds.
The cooking process takes a maximum of 3 hours 40 minutes.
7. QUICK BAKED BREAD
• To select this program, press the "MENU" button until the display shows the number of the desired program.
• Then select the size of the loaf with the BAKING WEIGHT button and the crust color with the CRUST COLOR button. When all settings are complete, press the START / STOP button to start the cooking process. The display will show the time until the end of cooking.
• At the end of the baking cycle, the appliance beeps several times and goes into automatic keep warm mode for 60 minutes.
To stop this mode, press and hold the START / STOP button for 3 seconds.
The cooking process takes a maximum of 1 hour 58 minutes.
8. PASTE BAKING
• To select this program, press the "MENU" button until the display shows the number of the desired program.
• Press the START / STOP button to start the cooking process. The display will show the time until the end of cooking.
• At the end of the cycle, the device will beep several times. Press and hold the START / STOP button for 3 seconds to turn off and stop the program.
9. DOUGH
• To select this program, press the "MENU" button until the display shows the number of the desired program.
• Press the START / STOP button to start the cooking process. The display will show the time until the end of cooking.
• At the end of the cycle, the device will beep several times. Press and hold the START / STOP button for 3 seconds to turn off and stop the program.
The cooking process takes a maximum of 1 hour and 25 minutes.
10. Cupcake
• To select this program, press the "MENU" button until the display shows the number of the desired program.
• Press the START / STOP button to start the cooking process. The display will show the time until the end of cooking.
• At the end of the cycle, the device will beep several times. Press and hold the START / STOP button for 3 seconds to turn off and stop the program.
It is important to mix the ingredients before placing the ingredients in the baking dish:
1. Beat eggs and sugar until smooth. Add sugar in small portions, continuing to beat.
2. Add flour to the mixture (in small portions). Whisk until smooth.
3. Add the rest of the ingredients and whisk thoroughly as well.
4. Place the resulting mixture in a baking dish after greasing the dish with oil. The cooking process takes a maximum of 1 hour.
11. RICE Fritters
• To select this program, press the "MENU" button until the display shows the number of the desired program.
• Press the START / STOP button to start the cooking process. When the display shows the time 0:20, the device will beep. Sugar must be added (to taste).
• At the end of the cycle, the device will beep several times. Press and hold the START / STOP button for 3 seconds to turn off and stop the program.
The cooking process takes a maximum of 1 hour 15 minutes.
12. JAM
• To select this program, press the "MENU" button until the display shows the number of the desired program.
• Press the START / STOP button to start the cooking process. The display will show the time until the end of cooking.
• At the end of cooking, the device will beep several times. Press and hold the START / STOP button for 3 seconds to turn off and stop the program.
• Always use fresh fruit for jam.
• For best results, use a special sugar with pectin content.
• From time to time open the lid and stir the jam, and be careful not to overflow.
Peel the pineapple and cut it into pieces. Place in a juicer. Add lemon juice and sugar. Turn on the juicer and get pineapple juice. Pour the resulting juice into a baking dish, add the pectin.
The cooking process takes a maximum of 1 hour and 20 minutes.
13. YOGHURT
• To select this program, press the "MENU" button until the display shows the number of the desired program.
• Press the START / STOP button to start the cooking process. The display will show the time until the end of cooking.
• At the end of cooking, the device will beep several times. Press and hold the START / STOP button for 3 seconds to turn off and stop the program.
Stir all the ingredients thoroughly before turning on this mode so that the sugar is completely dissolved.
The cooking process takes a maximum of 8 hours.
14. RICE WINE
1. Place the glutinous rice in water for 5-24 hours until it creases easily.
2. Dry the rice and steam it. Then cool it down to 30 ° C.
3. Mix wine with water and add to rice. Stir.
4. Place the mixture in a baking dish and press down. Make a small indentation at the top of the mixture.
5. Cover the baking dish with cling film and place in the bread maker.
6. Press the "MENU" button until the display shows the number of the desired program.
7. Press the START / STOP button to start the cooking process. The display will show the time until the end of cooking.
8. At the end of cooking, the device will beep several times. Press and hold for 3 seconds the "START / STOP" button to turn off and stop the program
The cooking process takes a maximum of 30 hours.
15. ROASTED PEANUTS
• To select this program, press the "MENU" button until the display shows the number of the desired program.
• Press the START / STOP button to start the cooking process. The display will show the time until the end of cooking.
• At the end of the baking cycle, the appliance will beep several times. Press and hold the START / STOP button for 3 seconds to turn off and stop the program.
ingredients weight, g. measuring cup / spoon, ml.
Peanuts 235 1 m. Glass
Vegetable oil 4 1 tsp
The cooking process takes a maximum of 30 minutes.
16. BAKING
• Place the ingredients in a baking dish.
• Press the "MENU" button until the display shows the number of the desired program. Set the desired time (10-60 minutes)
• Press the START / STOP button to start the cooking process.
• At the end of the cycle, the device will beep several times. Press and hold the START / STOP button for 3 seconds to turn off and stop the program.
The cooking process takes max. 1 hour 00 minutes
Additionally, you can use the "Delay cooking" function. To use this function, you must perform the following procedure:
Select one of the programs with the "MENU" button (except for programs 10-16).
• Then select the size of the loaf with the BAKING WEIGHT button and the crust color with the CRUST COLOR button.
• Set the time. The set time is the time after which the bread and pastries will be cooked. One press of the "TIME +" button adds 30 minutes.
• One press of the "TIME -" button decreases 30 minutes.
• The device allows you to postpone the start of baking and baking for 15 hours.
• After pressing the START / STOP button, the corresponding indicators and the digital display light up.
While the bread maker is operating, press START / STOP for 3 seconds to cancel the selected program and return to the mode selection.
• Use only fresh food for cooking. Stale or expired products affect
on the quality of the bread.
• Use only fast fermentation dry yeast for baking in the bread maker.
• Temperature conditions directly affect the preparation of bread. The optimum temperature range in the room during the baking process should be between + 18 ° C and + 25 ° C. If the room temperature is not optimal, you will have to adjust the yeast dosage yourself.
• We recommend that you remove freshly made bread from the bread maker immediately after baking to preserve the crispness, as it may soften if the loaf is left in the bread machine during the keep warm cycle.
• After the bread has cooled completely, wrap it in foil or plastic bag. For 2-3 days storage, place well-packed bread in the refrigerator. Place it in the freezer for longer storage.
• Eat freshly sliced or toasted bread with your meals. Place the leftover bread in a plastic bag to keep it fresh and dry.
DRY YEAST
They provide the rise of the dough and are one of the important products for baking bread. After opening the yeast packaging, place the leftover in the refrigerator to keep it active and try to use the leftover as soon as possible. When using yeast taken from the refrigerator or freezer, you must first bring it to room temperature as chilled yeast is inactive.
FLOUR
Flour comes in different types and varieties. Wheat baking flour is subdivided into 5 grades: gritty flour, superior, first, second and wallpaper. Rye and barley are subdivided into 3 varieties: seeded, peeled and wallpaper. Wheat flour of the highest grade is mainly used for baking bread. it has optimum baking properties.Wheat flour dough is viscous and elastic. But wallpaper flour (made from whole grain) is the most useful. The dough rises worse. When preparing rye dough, an important feature is to ensure a sufficiently fast and high accumulation of acids, since the quality of rye bread depends on the ratio of lactic acid bacteria and yeast, which create conditions under which the number of acid-forming bacteria in rye starters and dough would be 60 - 80 times higher the number of yeast cells. Rye flour dough is plastic with a slightly damp surface. Rye flour products are denser. The taste and aroma of rye bread depends on the amount of acids formed. Black bread that has not undergone lactic acid fermentation is unleavened and has a sticky crumb.
SALT
Avoid contact between salt and yeast. Place them in different corners.
SUGAR
Gives the bread flavor, color and softness. You can add honey or molasses (in the same amount) instead of sugar. When using honey or molasses, keep in mind that the liquid they contain must be taken into account when calculating the total liquid content.
Recipes with added fruits or berries require less sugar due to the high sugar content in these foods.
FATS
Use room temperature butter or margarine for baking. Fats prevent the bread from hardening and give it flavor.
DAIRY
Dairy products such as milk powder and fresh milk have a big impact on the taste and color of bread. When using the Delayed Start function, due to the possibility of lactic acid fermentation, milk powder and water should be used instead of fresh milk. For high room temperatures (above + 27 ° C), use fresh milk chilled in the refrigerator with a temperature of about + 5 ° C. Cream, yoghurts, sour cream, pressed cottage cheese are used as part of the liquid to form a more moist, tender crust. The cream gives the baked goods a pleasant, somewhat sour taste.
WATER
Use water at room temperature. If the room temperature is high (above + 27 ° C), use water chilled in the refrigerator with a temperature of about + 5 ° C.
EGGS
Eggs can be added to enrich the taste, improve the color and aroma of the bread and the structure of the dough during the rising of the dough. When adding 1 whole egg to the recipe, reduce the amount of liquid by 1/8 cup.
Unplug the device from the power supply and allow it to cool completely before cleaning.
• Remove all removable parts from the bread maker.
• Wipe the inside and outside of the lid of the bread maker with a damp cloth, then wipe them with a soft dry cloth.
• Clean the connecting piece with paper towels.
• Do not expose the device to water or splashing water. This could cause a short circuit.
• Do not immerse the device in water.
• In order to thoroughly clean the baking dish, it is recommended to remove the stirrer installed inside. Sometimes it is difficult to detach it from the axis. Immediately after removing the baked bread, pour warm water into the mold and let sit for 30 minutes. Then remove the blades from the axle. Leaving the agitator on the axle makes it even more difficult to detach.
• Wipe the mold and the mixer blades with a damp cloth or wash gently with soapy water. Do not use harsh sponges or aggressive detergents to avoid damaging the non-stick surface. Do not immerse the bottom of the container in water.
• Wipe the container shaft with a soft cloth or sponge very carefully so as not to damage the seal, then dry.
• Do not wash the removable parts of the bread maker in the dishwasher.
Old appliances are a collection of technical materials and therefore cannot be disposed of with household waste! Therefore, we would like to ask you to actively support us in saving resources and protecting the environment and hand over that device to a collection point for recycling.
|