|
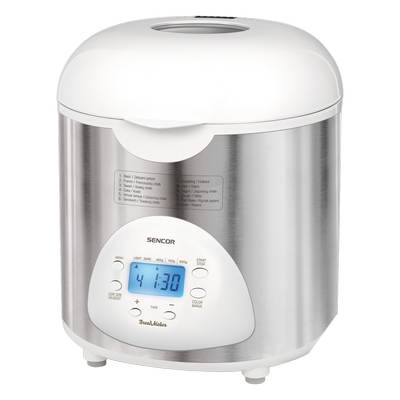
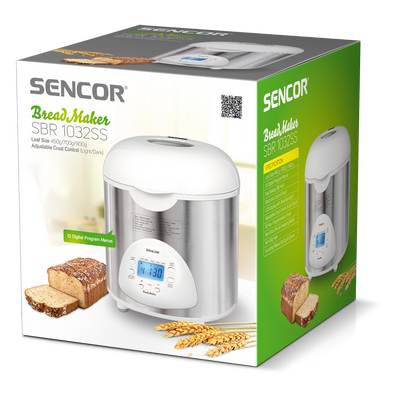
Features of the Sencor SBR 1032SS bread maker
Breadmaker with workflow automation
The outer casing is made of stainless steel
Fully automated cooking at every stage (kneading, proving, baking)
Suitable for baking breads, sandwich breads, cakes, jams, pizza dough, loaves, bagels, donuts, pastries, etc.
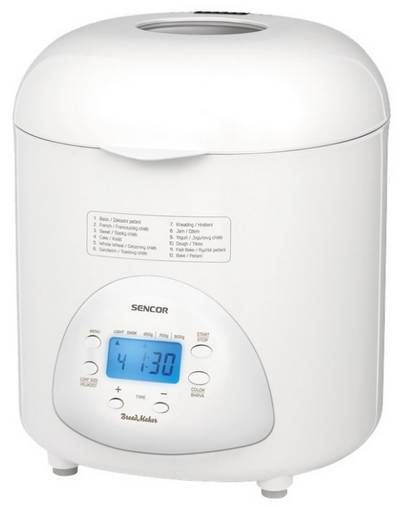
12 built-in baking programs
Special program for making jam and marmalade
Special program for making doughs (e.g. pizzas, loaves, bagels, donuts, etc.)
Quick bake program (90 minutes)
Possibility to bake with raisins, nuts, orange peel, dried fruit, etc.
Buzzer to add additional ingredients with shorter baking times
1 kneading spatula
10-hour delayed baking timer that can be set in 10-minute steps
Backlit blue LCD display to indicate remaining baking time
Maximum bread weight 900 g
Possibility to specify the final size of the loaf (450 g / 700 g / 900 g)
Memory for 20 minutes in case of loss of power (the bread maker will continue to work)
Lid with a viewing window for monitoring the baking process
2 levels of bread crust setting (light / dark)
Keeps the loaf warm for 60 minutes after baking is complete
Double plastic with thermal insulation to maintain a stable temperature during proofing and baking
Easy to clean:
• removable baking dish with non-stick surface and foldable handle
• kneading blade with non-stick surface
Non-slip feet
Supplied accessories: recipes, measuring cup, measuring spoon, hook for removing the bread spatula
Input power 480-580 W
Power cable length: 1mm
Dimensions (width x depth x height): 276 x 280 x 320 mm
Weight: 4.2 kg
Voltage and frequency: 220-240 V, 50 Hz

Description of the programs of the Sencor SBR 1032SS bread machine
1) BASIC / Standard baked goods
This program is used to bake standard breads from white wheat flour,
2) FRENCH / French bread
This program is used to bake traditional white French bread with a soft inside and a crispy crust.
Recommendation: French bread does not last long. It must be eaten on the day of preparation.
3) SWEET / Sweet bread
This program is used to bake sweet breads with a high fat and sugar content, dried fruit, nuts, chocolate chips, sweetened orange peel, etc.
4) SAKE / Cupcake
This program is used to bake muffins and sweet baked goods with baking powder.
5) WHOLE WHEAT / Whole Wheat Bread
This program is used to bake bread from whole grain flour.
Recommendation: It is not recommended to use the delay start function for this program. Otherwise it can negatively affect the quality of the bread.
6) SANDWICH / Sandwich Bread
This program is used to bake soft breads that are suitable for making sandwiches.
7) KNEADING / Kneading
This program is used for mixing / kneading ingredients. It is not possible to set the crust color or loaf weight for this program, as it does not use a baking step. At the end of the program, remove the dough from the baking dish and let it rest for about 10 minutes before handling.
8) JAM / Jam
This program is used to make jams from various types of fruit.Jam should be cooked in small portions as its volume increases during the cooking process. The jam is sticky. If it leaks out of the baking dish, it will be very difficult to remove.
9) YOGURT / Yoghurt bread
This program is used to bake bread that contains yoghurt.
10) DOUGH / Dough
This program is used for mixing / kneading ingredients and then lifting the text, for example for pizza, bagels, etc. But it does not contain a baking step.
11) FAST WAKE / Fast baking
This program is a faster alternative to the Basic / Standard baking program.
12) WAKE / Baking
The baking program turns the bread maker into a small oven. The preset baking time for this program is 1 hour. The preset baking time can be shortened by pressing the TIME button. Confirm the setting with the START / STOP button. This program is usually used to bake purchased pre-made dough or to bake a freshly cooked loaf extra if the crust appears too light.
Using the Sencor SBR 1032SS Bread Maker
1) Remove the container
Open the lid and remove the baking dish by lifting it firmly by the handle. Place it on your work surface. It is important to fill the baking dish with ingredients outside of the bread maker so that ingredients cannot get into the bread machine if they are accidentally spilled.
2) Install the kneading blade
Press down on the kneading spatula to secure it to the shaft located at the bottom of the baking dish.
3) Measure out the ingredients
Measure out the required ingredients and add them to the baking dish in the order shown (see the BAKING BREAD section in the next part of the user manual).
4) Place the baking dish back into the bread maker.
Place the baking dish back into the bread maker and press firmly until it snaps into place. Close the cover.
5) Connect the bread maker to the mains.
Insert the breadmaker's power plug into an electrical outlet. The electrical connection will be indicated by a beep. The display will show "1" and "2:50". This means program 1 (Basic) is selected by default, which takes 2 hours 50 minutes to bake a 450 g loaf.
6) Select a program
Press the MENU button to select the desired program from the list.
7) Install the mass
Press the LOAF SIZE button to select the size of the loaf (450/700/900 g).
Attention! It must be remembered that the total weight of the loaf is selected, not just the baking mix.
8) Choose the peel color
Press the COLOR button to select the desired peel color (LIGHT = light, DARK = dark).
9) Choose delay time
If you want to bake the bread later, set the delay time - see description elsewhere.
10) start the bread maker
Press the START / STOP button to start the bread maker. The display backlight will start flashing at 5-second intervals. The countdown of the remaining time in minutes starts.
11) Baking steps
The bread maker will automatically advance from one step in the program to the next. During the kneading phase (not in all programs), a beep sounds (10 times), indicating the possibility of adding dried fruits, nuts, etc.
12) End of baking
At the end of the program, the display will show "0:00" and an acoustic signal will sound (12 times).
13) Keeping warm
The keep warm function in most programs circulates hot air for the next 60 minutes (see OVERVIEW OF THE INDIVIDUAL PROGRAM STAGES). After the keep warm time has elapsed, an audible signal will sound. To deactivate the keeping warm function ahead of time, press and hold the START / STOP button until you hear a beep.
14) Remove the baking container
Press and hold the START / STOP button until you hear a beep. Then open the lid and use the hook to lift the handle of the baking dish. Use an oven mitt to remove the baking dish from the machine.
15) Extract the bread
Let the bread cool in the baking dish for 10 to 15 minutes, then turn the baking dish over, remove the bread and let it cool.
16) When finished using the bread maker, always unplug the power cord from the mains.
Overview of audio signals
1 long beep
- connecting the bread machine to the mains.
1 short beep
- the button on the control panel is pressed:
- indication of the start of the program in the delayed start mode.
5 signals
The temperature in the bread maker is too high. Wait until the bread machine has cooled down before restarting.
10 signals
Beginning of kneading step 2 for BASIC (standard baked goods), FRENCH (French bread), SWEET (sweet bread), WHOLE WHEAT (whole wheat bread) or SANDWICH (sandwich bread) programs. Ingredients such as dried fruits, nuts, etc. can be added.
12 signals
Notification of the end of the program. Further, in all programs with a baking phase, a warm phase will follow.
Using the timer
Use the timer if you want to bake your bread later. Do not use this function for recipes containing ingredients that spoil quickly, such as fresh eggs, milk, sour cream, cheese, etc.
Example.
It's 9:00 pm now. You want to bake white bread weighing 700 g from white wheat flour in the morning
at 8:00 (i.e., the difference is 11 hours).
1) Place the ingredients in the baking dish and place the bowl in the bread maker.
2) Use the MENU button to select program 1 (Basic / Standard baked goods).
3) Use LOAF SIZE button to select 700g loaf size).
4) Use the COLOR button to select the peel color.
5) The display will show the total program time 2:55 (2hbbmin). Use the TIME + and TIME- buttons to change the time so that the display shows 11:00. This is the time after which the bread will be ready to be removed from the bread machine. Each time you press TIME + (time-t) or TIME- (time-), the set time will increase or decrease by 10 minutes.
6) Press the START / STOP button to start the program in delayed start mode. The time counts down on the display.
Note.
The start of the program can be delayed by up to 10 hours.
After starting the set program, check the bread maker regularly. At the 2nd stage of kneading (time 2:15 on the display), a beep will sound (10 times), indicating that you can add dried fruits, nuts, etc. If you need to add these ingredients, open the lid and add dried fruits, nuts, etc. The bread maker continues with the program set. At the end of the program, a beep will sound (12 times) and the bread maker will automatically switch to keep warm.
Do not press the START / STOP button before opening the cover, otherwise the program will be canceled.
Power outage
After a short power failure (max. 20 minutes), the bread maker will automatically resume the set program when the power supply is restored.
For longer power outages, the bread maker will return to its original position.
• If ascent step 1 has not started yet, select the desired program again and press the START / STOP button.
• If the program has finished lifting stage 1, you must start over with fresh ingredients.
Slicing and storing bread
• For best results, let the bread cool for 30 to 40 minutes before slicing.
• Use an electric or serrated knife to obtain even slices.
• Bread that has not been eaten can be sealed in a plastic bag and stored at room temperature for up to 3 days. If it's warm and damp, put the bread in the refrigerator overnight.
• If you need longer storage of bread (up to 1 month), place it in an airtight container, then place the container in the freezer.
• If the bread has been placed in the refrigerator, wait until it reaches room temperature before serving it.
• Since home-baked bread does not contain preservatives, it tends to dry out and dry out earlier than commercial bread.
Cleaning and maintenance
Unplug the device from the power source and allow it to cool before cleaning.
1) Container for baking. Clean the inside and outside with a damp cloth. To avoid damaging the non-stick layer, do not use sharp or abrasive cleaners. The baking dish must be completely dry before replacing it.
2) Kneading blade. If it is difficult to detach the kneading paddle from the shaft, fill the mold with a warm veda and let it rest for 30 minutes. After 30 minutes, the kneading paddle should be easy to remove. Gently clean the kneading paddle with a cotton cloth.
3) Cover and sight glass. Clean the inside and outside of the cover with a damp cloth.
4) Housing. Clean the inside and outside of the cabinet gently with a damp cloth. Do not use abrasive cleaners for cleaning, as this may damage the glossy surface finish. Do not immerse the housing in the lead during cleaning.
5) Before packing the bread maker for storage, make sure it is completely cool, clean and dry, and that the lid is closed.
Attention)
• Brown spots may appear on the inside of the cover and vents. These are the residual vapors of the ingredients that got into the escaping steam during baking. They have no harmful effect on the bread maker or the quality of the bread made. Simply remove them after each use (or whenever they occur) with a cloth or sponge soaked in warm water.
• After prolonged use, the surface layer of the baking dish may change color due to heat and moisture. The color change has no negative effect on the bread maker or the quality of the bread.
Council. When finished, place a drop of vegetable oil in the hole in the middle of the kneading spatula and place it back on the shaft in the baking dish.
Baking bread
A brief description of the most common ingredients for making bread
1) Bread flour
Bread flour is high in gluten (which is why it can be called a high gluten flour, which contains a lot of proteins). It has good elasticity and after lifting it is able to keep the shape of the bread so that it does not fall off. Since the gluten content is higher than regular flour, it can be used to make larger breads with stronger inner fibers. Bread flour is the most important ingredient for baking bread,
2) Sifted flour
The sifted flour is obtained from carefully selected durum and soft wheat. This flour is suitable for making quick breads or for baking muffins and pastries.
3) Whole wheat flour
Whole wheat flour is made by grinding wheat grains. It contains grains and gluten. Wheat chain flour is heavier and more nutritious than regular wheat flour. Whole wheat bread is usually smaller in size. This is why most recipes mix whole wheat flour with baked flour for the best results.
4) Coarse flour
Coarse flour is also called wallpaper flour. It has a high fiber content similar to whole grain flour.To achieve a larger size after lifting, it must be used in combination with a large amount of bread flour.
5) Rye flour
Rye flour is primarily intended for baking dark bread. It contains a large amount of mineral compounds. It contains less gluten than wheat flour and is therefore usually used in combination with wheat flour.
6) Baking powder
Baking powder is made by grinding small grains of wheat with a low protein content and is mainly used for baking muffins. The various Vedas of flour look similar. The efficacy of yeast and the absorption capacity of different flours differ significantly depending on where the grain is grown, as well as on growing conditions, grinding processes and storage conditions. Try different brands of flour available on the market, taste it and compare the results. Then choose the flour that, based on your experience, gives the best results.
7) Corn and oat flour
Corn and oatmeal are made by grinding corn and oats. They are both complementary ingredients for making coarser breads and are used to enhance the flavor and texture of the bread.
8) Sugar
Sugar is a very important ingredient for achieving the color and sweetness of bread. White sugar helps lift and is widely used as a nutrient. In special cases, brown sugar, powdered sugar and cotton candy can be used.
9) Yeast
Yeast helps the dough rise and produces carbon dioxide, which allows the bread to expand and makes the inner fibers thinner. But getting up quickly requires carbohydrates from sugar and flour.
1 teaspoon active dry yeast = 3/4 teaspoon instant yeast 5 teaspoons active dry yeast = 1 stop spoon instant yeast
2 teaspoons of active dry yeast = 1.5 teaspoons of instant yeast
The yeast should be kept refrigerated as high temperatures make it sour. Check their expiration date before use. Place them back in the refrigerator after each use as soon as possible. Bread's inability to rise is usually the result of dead yeast cells.
A. Council.
V The procedure described below will determine if the yeast is fresh and active or not.
1.Pour 1/2 cup of warm water (45 - 50 ° C) into a measuring cup
2. Add 1 teaspoon of white sugar and stir. Then add 2 teaspoons of yeast.
3. Place the measuring cup in a warm place for about 10 minutes. Do not stir the mixture.
4. The foam should reach the rim of the measuring beaker. If this does not happen, the yeast cells are dead or inactive.
10) Salt
Salt is essential to improve the flavor of the bread and the color of the crust. At the same time, salt blocks the yeast from working. Do not use too much salt for baking. If you do not want to use salt, you can omit this ingredient. In this case, the bread will be larger than the bread made with soap.
11) Eggs
Eggs can improve the texture of bread, make bread more nutritious and bulky, and add a specific egg flavor to bread. If you want to use eggs, remove the shells and stir them evenly.
12) Fat, butter, and oil
Fat can make bread thinner and keep it fresh for longer. Before using butter, melt it or cut it into small pieces after removing it from the refrigerator so that it mixes evenly.
13) Baking powder
The baking powder is mainly used for lifting up when baking breads and muffins on an ultra-fast program (very fast baking). Due to its chemical properties, no climbing time is required. It forms a gas that creates bubbles or thinns the bread structure.
14) baking soda
Has the same properties as baking powder. Also can be used in conjunction with baking powder.
15) Water and other liquids
Vodia is an essential ingredient for making bread. Typically, the most suitable water temperature is 20-25 ”C. For lifting in accelerated programs, the water temperature should be 45 - 50 ° C. Instead of water, you can use fresh milk or water mixed with 2% milk powder, which will improve the flavor of the bread and make the crust color more attractive. In some recipes, juice (for example, apple, orange, lemon, etc.) can be used to enhance the flavor of the bread.
The sequence of adding ingredients
In all recipes, it is important to follow the general consistency when adding ingredients.
* First, liquids (water, milk, beer, kefir, sour milk, yogurt, eggs, etc.) are added to the baking container.
* Then add loose ingredients (flour, herbs, bread spices, bran, bean sprouts, flakes, seeds, etc.).
* Add salt to one corner.
* Add sugar to the second corner.
* Spices are added to the third.
A small hole is made in the middle of the baking container. Yeast or baking powder is placed here and covered with flour. If fresh yeast is used, it is best to add sugar directly with the yeast. Yeast or baking powder is always placed on dry flour!
Council.
For best results when using a thick dough that contains a lot of rye flour or whole grains, it is recommended that you use the reverse order of adding the ingredients, i.e. add dry yeast and flour first, and then liquid.
• Dried fruits, nuts, etc. are added at the 2nd stage of mixing, after the bread maker will beep (10 times). This feature is not available for all programs.
There are several more important points to remember when baking in a household bread maker.
• Salt and yeast should never touch!
• Soak cereals in water overnight.
• Only cold ingredients should be used with the delay start function.
• Do not use ingredients that spoil quickly with the delay start function, such as eggs, fresh milk, fruit, onions, etc.
• After removing the bread from the maker, let it cool on a suitable surface (such as a wooden or nylon cutting board).
Note: The weights, volumes and contents of all individual ingredients in the recipes below are for reference only. Baking results depend on many factors:
* water hardness (when using too soft water, the dough rises faster);
* air humidity in the room (with high humidity, you need to reduce the volume of water by 1 - 2 tablespoons);
* height above sea level (at an altitude of more than 750 m above sea level, the dough rises faster);
* uniformity of ingredients.
For the above reasons, it is advisable to change the selected recipe depending on the conditions at the time of baking.
The standard accessories of the bread maker are a measuring spoon and a measuring cup. The measuring spoon is double-sided and has a large and small indentation. The measuring spoon has a small indentation capacity of 5 ml. The measuring spoon has a large depression of 15 ml. The volume of the measuring cup is 250 ml.
The volume of one measuring glass is equal to 150 g of flour or 250 ml of water.
The volume of one small depression of the measuring spoon is equal to 6 g of soap, 3.5 g of dry yeast, 4.5 g of flour improver, 3.5 g of tartar or 6 g of potassium bicarbonate.
The volume of one large depression of the measuring spoon is equal to 14 g of sugar, 7 g of raisins, 6 g of nuts, 6.5 g of powdered milk or 16 g of vegetable oil. One whole egg weighs approximately 50 - 60 g. When measuring ingredients, place the measuring spoon / beaker on a flat surface. You can check the exact volume of liquids when the measuring spoon / beaker is at eye level.
Council.
If for some reason you do not want to bake bread using recipes, you can purchase new bread mixes at the grocery store. If using sweat mixtures, follow the instructions on the package. Remember that even these pre-mixed blends from some manufacturers require yeast to be added as a separate ingredient.
|