|
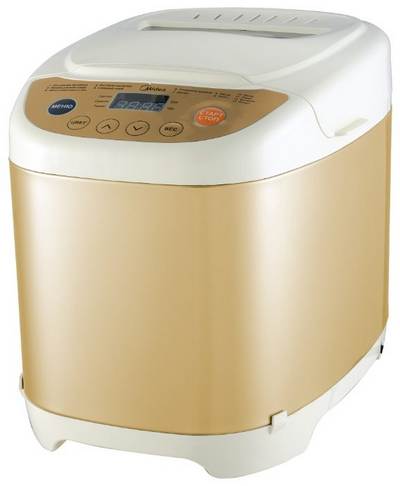
Characteristics of the Midea BM-210JN-IV bread machine
Minimum baked goods weight (g) 750.0
Maximum baking weight (g) 1000.0
Voltage and frequency 220-240 V, 50-60 Hz
Control
Control type Touch
Delayed start 13 hours
Display Yes
Functions
Number of automatic programs 13.0
Saving the program after a power outage 10 minutes
3 degrees of baking crust is
Keeping bread warm for 60 minutes
Yogurt container included
Viewing window Yes
Cooking mold material Aluminum
Cooking pan coating Non-stick
Outside material Plastic
The main bread is
There is special bread
There is quick bread
Yogurt is
There is a pie
There are recipes for cooking
Color, dimensions and weight
Color Ivory
Overall dimensions (H * W * D), mm 345 * 258 * 287
Weight (kg) 5.1
Service life 5 years
Warranty
Warranty, month 12.0
Breadmaker device Midea BM-210JN-IV
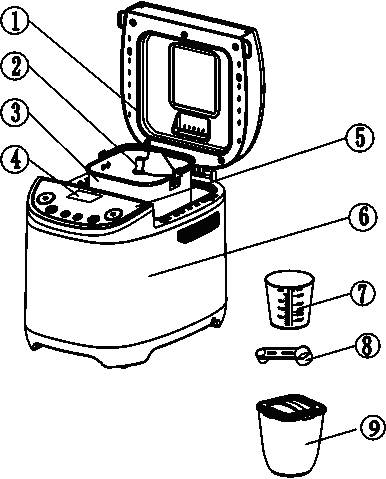
(1) Cover
(2) Kneader paddle
(3) Baking dish
(4) LCD LCD display
(5) Control panel
(6) Housing
(7) Measuring cup
(8) Measuring Spoon (Table & Tea)
(9) Yoghurt container
How to bake bread in the Midea BM-210JN-IV bread maker
1. Remove the baking dish from the bread machine by turning it counterclockwise and pulling it up. In order for the dough mixer blade to be easily removed from the finished bread, it is necessary to grease the shaft, the dough mixer blade and the hole in it with margarine before loading the ingredients.
2. Pour the ingredients into the baking dish. Follow the order of adding ingredients as indicated in the recipe being used. Usually, the liquid ingredients are added first, followed by sugar, salt and flour. Add dry fast yeast or baking powder last. If you are making bread with rye or whole wheat flour, the dough will work better when the ingredients are added in reverse order: yeast and flour, and then all the liquid ingredients.
3. Make a small indentation in the flour with your finger, pour the fast-acting yeast into it. Never mix them with salt or any liquid.
4. Install the form. Turn clockwise until it locks into place.
5. Close the cover gently and plug the power cord into a power outlet.
6. Press the MENU button repeatedly until the display shows the number of the desired baking program.
7. Press the COLOR button to select the crust color.
8. Press the WEIGHT button to select the required loaf size (750 g or
1000 g).
9. Press the TIME + or TIME - button to set the idle time delay. If you're ready to jump straight into the baking process, then skip this step.
10. Press the START / STOP button to start the program. The colon in the cooking cycle duration display will start flashing and the time will count down.
11. When using the baking programs Basic baked, French bread, Whole grain bread, Quick bake, Sweet bread, Fast bake in
During the cooking process, you will hear quick beeps to indicate that it is time to add the rest of the ingredients. Steam may escape from the ventilation slots during baking. This is completely normal.
12. As soon as the baking process comes to an end, you will hear beeps. Hold the START / STOP button for 2 seconds to stop the program.
13. If the bread is not fried enough or the desired crust color is not present, start program 12 for additional bakes.
14. Before removing the bread pan, disconnect the bread machine from the mains. Use oven mitts to remove the bread.
15. Open the lid, and firmly gripping the baking dish with your hands, turn it counterclockwise and pull it up to remove it from the machine.Turn the baking dish over and gently shake the bread out onto the rack>. Use a non-stick spatula to remove bread from the mold, if necessary. If the paddle remains inside the bread, you can carefully cut the bread and remove the paddle.
WARNING: The baking dish and bread will be very hot! Therefore, always keep them very neat and be sure to use oven mitts or oven mitts.
16. If you do not press the START / STOP button at the end of the program, the oven will automatically switch to heating mode and your bread will be kept hot for another 1 hour. Heating stops after 1 hour.
17. Put the bread in a dry and cool place and let it cool for about
20 minutes.
18. If you have finished making bread or are not using the bread maker, unplug it.
NOTE The bread maker works equally well at different temperatures, however there may be a difference in the size of a loaf cooked in a very warm room and a very cold room. We advise you to keep the room where the appliance stands at a temperature between 15 ° C and 34 ° C.
Cooking yoghurt in the Midea BM-210JN-IV bread maker
1. Preparation for cooking
a. Equipment preparation
Thoroughly rinse and boil the yogurt container, lid inside and outside with hot water, then wipe with a dry soft towel.
b. Preparing ingredients for making yoghurt
You can use store-bought yoghurt starter or live Lactobacillus yogurt as a source of lactobacilli for making yoghurt. Whole or pasteurized milk is also needed. For best results, all ingredients should be at room temperature. Fruit juices, berries, fruits, jams, chocolate, sugar, and other flavors can be added.
Attention:
Buy yogurt that is refrigerated and contains live lactobacilli. Fermented milk drinks that are stored at room temperature are not suitable for making yoghurt. The number of live lactobacilli must be at least 10 "CFU / ml.
When purchasing all ingredients, pay attention to their expiration date.
2. Preparation
a. Mix milk and yoghurt in a yoghurt container in a 10: 1 ratio (100 ml yoghurt to 1 liter of milk). First, mix the yogurt with a little milk, then pour in the remaining milk and use a whisk to stir the mixture evenly. Close the lid tightly.
b. Place the covered yoghurt container in the bread maker's bowl, place it correctly, then close the roof of the bread machine.
in. Press the "MENU" button to select the "Yogurt" program. Set the cooking time. The fermentation process usually takes 8-10 hours. If the temperature of the milk and the environment is lower, fermentation takes longer. The longer the cooking time, the thicker the yoghurt.
d. Press the “Start / Stop” button to start cooking, the time will count down on the display. Store yoghurt in the refrigerator after cooking.
Important safety instructions:
The yoghurt container can only be used in the Yogurt mode in the bread maker, otherwise the container may melt. It is forbidden to use this container when cooking in other modes of operation of the bread maker.
3. Storage
a. The resulting yoghurt with live lactobacilli can be consumed immediately after preparation. The yoghurt tastes better after cooling.
b. After cooking, you can add any flavors to your homemade yoghurt. Try adding fruit juice, fruit purees, drinks, chocolate, sugar, or other additives you like.
in. Store ready-made yogurt in the refrigerator.
Cleaning and caring for the Midea BM-210JN-IV bread maker
Unplug the bread maker and let it cool completely before cleaning.
Use only liquid detergents for washing.It is not recommended to use aggressive detergents, gasoline, oven cleaners and other agents that can scratch or damage the surface to be cleaned. Open the lid, and firmly holding the baking dish with your hands, turn it counterclockwise and pull it upwards to remove it from the bread maker.
To remove any remaining ingredients and crumbs from the lid, cabinet and cooking cabinet, wipe with a damp cloth and then wipe dry. Do not immerse the bread maker in water or pour water into the cooking compartment!
Wipe the outside of the baking dish with a damp cloth. Rinse inside with water and dishwashing liquid. Do not immerse the baking dish in water.
The baking dish is covered with a non-stick coating. Do not use metal tools for cleaning that could damage the non-stick coating. Don't worry if the non-stick coating changes color over time. This can be caused by exposure to steam, moisture, food, acids and mixtures of ingredients, rather than wear or defects in the device. These changes are not dangerous and do not affect the operation of the device.
If the blade does not come off the shaft, pour warm water into the mold and let sit for about 30 minutes. Now you can easily remove the blade. Wipe it gently with a damp cotton cloth. WARNING: The baking dish and kneader paddle must not be washed in the dishwasher.
Wipe the inside and outside of the lid and viewing window with a slightly damp cloth.
Wipe gently with a soft, damp cloth. Do not use abrasive products to clean the surface of the case, as you can scratch its shiny surface.
The bread maker must be kept clean and dry.
1. Wheat baking flour
It has a high gluten content (it contains a lot of protein, which is necessary for the formation of gluten, which determines the structure and elasticity of the bread), and therefore the bread turns out to be tall and elastic, and does not settle after baking. Well, since there is more gluten in this flour than usual, you can use it for baking large breads and a better internal structure. Wheat bread flour is the most important ingredient in the bread baking process.
2. Fine flour
The flour produced by mixing carefully selected soft and durum wheat varieties is suitable for making quick bread or muffins.
3. Whole wheat flour
It is made from crushed wheat grains, including bran and gluten. Whole wheat flour is heavier and more nutritious than regular flour. Breads made with whole wheat flour are usually smaller. Many recipes recommend mixing bakery flour and whole wheat flour for best results.
4. Coarse flour
A high-fiber flour variety, very similar to whole wheat flour. Allows the bread to rise a lot, therefore it is recommended to use in combination with a lot of bread flour.
5. Flour for baking muffins
It is made by grinding a variety of soft wheat that is low in protein. It is used for baking muffins. Different flours differ from each other. The absorption capacity of flour, or in other words, how well the bread made from it will rise depends very much on where the wheat was grown, in what conditions, how it was ground, how it was stored. You can buy and compare flavors from different manufacturers and choose the one that gives you the best taste and result.
6. Corn and oat flour
Corn and oatmeal are made by grinding corn and oats, respectively. This flour is usually used as an additive to regular flour to give the resulting bread a specific taste and texture.
7. Yeast
The yeast induces the fermentation process, producing carbon dioxide, giving the bread volume and structure. To provide nutrition for yeast, carbohydrates are needed, which are found in sugar.
Store yeast in the refrigerator as high temperatures are harmful to microorganisms. Check their expiration date before use. Put the leftover yeast in the refrigerator as soon as possible. Often, dead yeast is the reason why the bread does not rise. In the following way, you can check if your yeast is dead, fresh or not:
1) pour half a cup of warm (45-50 ° C) water into a measuring cup
2) Put 1 teaspoon of white sugar in a measuring cup and stir, then add 2 teaspoons of yeast. 3) Place the measuring cup in a warm place on
10 minutes. Do not shake the water.
4) The foam should rise to the level of 1 cup. Otherwise, the yeast is either dead or unusable.
8. Sugar
A very important ingredient that gives sweet taste and color to bread. White sugar is used by yeast as a nutrient medium for fermenting dough. Dark sugar, powdered sugar or cane sugar can be classified as special additives.
9. Salt
Salt is used to add flavor and color to the crust. But it can also suppress the action of yeast. Don't use too much salt in your recipe. You can not use salt, then the bread will turn out to be larger in volume.
10. Eggs
Eggs are added to increase bread's nutritional value, size, texture, and flavor. Beat them thoroughly before placing in the dough.
11 Fat, oil and vegetable oil
The fat makes the bread soft and lasts longer. The oil that you take out of the refrigerator must be kneaded or cut into thin pieces, so that it is evenly mixed.
12. Baking powder
Baking powder is most commonly used for Quick Bread Baking and muffin baking. When using it, it does not take time for the dough to rise, and for the yeast to give the bread an airy or soft structure, in this case, a chemical principle is used for the same purposes.
13. Soda
Same as baking powder. Often used in conjunction with it.
14. Water and other liquids
Water is a wonderful ingredient for making bread. It is worth mentioning that most often water is used with a temperature of 20-25 ° C. But the water can be hot. So, for example, to make bread according to the Accelerated baking program, you need to use water at a temperature of 45-50 ° C to raise the bread. Instead of water, you can use fresh milk or 2% milk powder diluted with water. Milk will improve the taste of the bread and the color of the crust. Some recipes use juices to add flavor: apple, orange, lemon, etc.
|