|
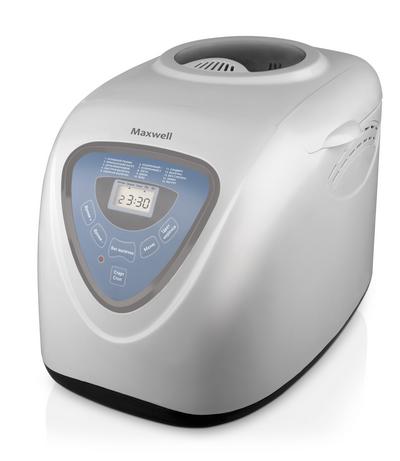
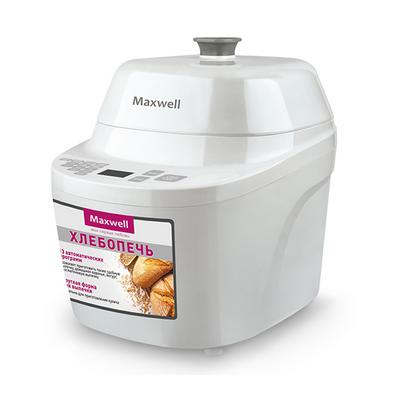
Technical characteristics of the Maxwell MW-3751 W bread machine
Gluten Free Baking +
Yeast-free baking +
Jam +
Choice of crust color +
Dispenser -
Additional functions yogurt
Kneading the dough +
Memory reserve in case of power failure 10 vin
Overheating protection +
Cupcake +
Number of baking programs 15
Maximum holding time 1 h
Maximum timer setting time 13 hours
Maximum baking weight 900 gr
Case material plastic
Power 600 W
Maintaining temperature +
Wheat bread +
Baking weight adjustment +
Sweet pastries +
Removable cover -
Timer +
Expedited baking +
Loaf baking form
French baguette +
Wholemeal bread +
Number of kneaders 1
Breadmaker device Maxwell MW-3751 W
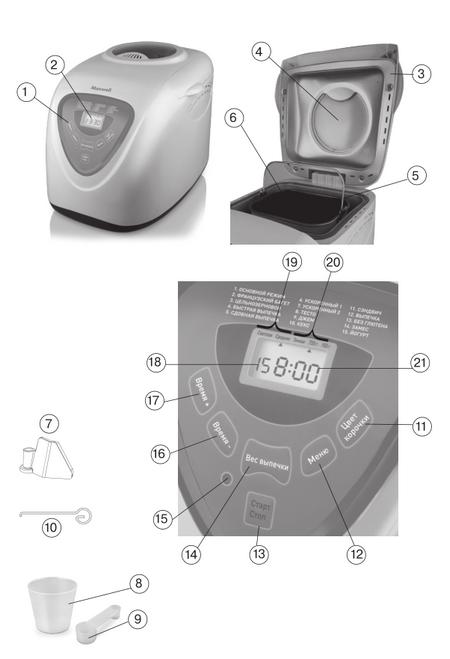
1. Control panel
2. Display
3. Cover
4. Observation window
5. Handle
6. Baking dish
7. Kneading paddle
8. Measuring cup
9. Measuring spoon
10. Hook
Control Panel:
11. Button for selection of crust color "SHORT COLOR"
12. Button for selecting the baking program "MENU"
13. ON / OFF button "START / STOP"
14. Button for setting the weight "BAKING WEIGHT"
15. Work indicator
16. Button for decreasing the delay "TIME -"
17. Button for increasing the delay time "TIME +"
18. Number of the selected program
19. Choice of crust color
20. Weight selection
21. Digital readout of delay time / remaining running time
Bread Maker Maxwell MW-3751 - reviews and discussion
Baking modes
1. BASIC MODE
The program includes all three stages of bread preparation: kneading the dough, raising the dough and baking.
2. FRENCH BAGUETTE
It takes a longer time to prepare the bread, and the bread has a large, porous crumb and a crispy crust.
3. WHOLE GRAIN BREAD
Bake healthy bread with fine or coarse flour. It is not recommended to use the delay function when baking such bread, as this may lead to undesirable results.
4. FAST BAKING
Shorter cooking process compared to BASIC MODE. This type of bread is usually smaller and has a tighter crumb.
Attention! Quick bread is baked using baking soda or baking powder. For best results, place liquid foods on the bottom of the dish and dry foods on top. During the kneading process, lumps may form at the edges of the mold, using a silicone spatula, mix the lumps into the dough.
5. COMFORTABLE BAKING
Kneading, raising the dough and baking muffins. Add fruit juice, raisins, dried apricots, coconut flakes, chocolate to the dough. A longer rise in the dough provides a light, airy bread structure.
6. ACCELERATED 1
Making bread weighing 750 grams in one hour. The bread is smaller and has the tightest crumb.
Attention! After choosing this program, pour water at the temperature of 48-50 ° C into the baking dish (measure the water temperature with a kitchen thermometer). The water temperature plays a decisive role when baking bread in the "FAST" mode: too low a temperature will not allow the dough to rise on time, and too high will lead to the death of the yeast.
7. ACCELERATED 2
Making 900 grams of bread in the shortest time. When baking bread, follow the recommendations for SPEED 1.
8. DOUGH
The bread maker kneads the dough and lets it rise. Use this dough for homemade cakes (pies, pizzas, etc.).See the Recipes section for examples of dough recipes.
9. JAM
Make aromatic homemade jam. Pre-cut the fruit for jam.
10. Cupcake
Add baking powder or baking soda to your sweet dough and make a flavorful cake or cookie.
11. SANDWICH
Use this program to prepare fluffy and light bread with a thin crust.
12. BAKING
The device works like a conventional electric oven. The program excludes the modes of kneading and raising the dough. It is used for baking ready-made doughs or additional browning of baked bread. The program settings are designed for baking 900 g of dough, the duration of the program is 1 hour. When using less dough, monitor product readiness yourself.
13. GLUTEN-FREE
Gluten, or gluten, is a protein found in the seeds of cereal plants (especially in wheat, rye, and oats). It defines such characteristics of the dough as elasticity and firmness. For the vast majority of people, including children, gluten is successfully broken down by digestive enzymes and is a good source of protein. But there is a group of people with a hereditary predisposition in whom gluten can cause celiac disease, a fairly rare disease. With this disease, it is required to exclude gluten-containing foods from the diet. In our bread maker, you can make dietary gluten-free bread (usually from rice, corn, buckwheat flour or special baking mixes).
14. KIND
Use a bread maker to quickly knead the dough. This program eliminates the dough raising cycle. See the Recipes section for examples of dough recipes.
15. YOGHURT
Prepare delicious natural yoghurt from milk and sourdough. Use yogurt or prebiotics as a starter. See the Recipes section for details. Adjust the cooking duration by pressing the "BAKING WEIGHT" button (14).
Control panel buttons
Each press of the control panel buttons is accompanied by a short beep.
Button (11) "SHORT COLOR"
- By repeatedly pressing the button (11) "COLOR OF THE CROWN" select "LIGHT", "MEDIUM" or "DARK" (symbol (19)).
Note: This function is not available for programs 8-12, 14, 15.
Button (12) "MENU"
- By repeatedly pressing the "MENU" button (12) select one of 15 programs. The selected program number (18) will be shown on the display (2).
Button (13) "START / STOP"
- Press the START / STOP button (13) to start the cooking program. A short beep will sound, the operation indicator (15) will light up, the colon in the time display (21) will flash, and the countdown will begin.
- During cooking, the remaining buttons become inactive.
- To stop the cooking process, press and hold the START / STOP button (13) until a long beep appears, after which the operation indicator (15) will go out.
Button (14) "BAKING WEIGHT"
- By pressing the button (14) "BAKING WEIGHT" select the bread weight: 750 or 900 grams. The weight settings are indicated on the display (2) by the symbol (20).
Note: The baking time will vary depending on the weight of the loaf set.
- Button (14) "BAKING WEIGHT" is inactive in programs 4, 6-10 and 12, 14, 15. For the YOGHURT program, adjust the cooking duration by pressing the "BAKING WEIGHT" button (14).
Time delay buttons (16) "Time -" and (17) "Time +"
You can pre-program by what time the cooking process will be completed.
- Use the control panel buttons to select the program, the weight of the pastry and the crust color.
- After that, by pressing the buttons (16) "Time -" and (17) "Time +", set the delay time (after what time the cooking process will be completed, starting from this moment). The display (2) will show the delay time (21).
Note: The maximum delay time is 13 hours, the setting step is 10 minutes.
Example: If it is 8:30 pm and you want your freshly baked bread to be ready by 7:00 am the next day, set the delay time to 10:30 am.
- After setting the delay time, press the START / STOP button (13), the operation indicator (15) will light up, the colon in the remaining time (21) will flash and the countdown will begin.
- To cancel the delay and stop work, press and hold the "START / STOP" button (13) until a long beep appears, the indicator (15) will go out.
Note: The delay function is not available for programs 6, 7, 9, 14.
Do not use the delay function when using perishable food such as milk, eggs, fruit, etc.
Additional functions
Heating
- If you have not switched off the device after the end of the baking process (programs 1-7, 10-12), it will automatically switch to heating mode (duration - 1 hour).
- At the end of the heating mode, you will hear a beep.
- If you want to cancel the heating function, press and hold the "START / STOP" button (13).
Memory
- In the event of a power outage during operation, the memory function is activated for up to 10 minutes.
- If the power supply is restored within 10 minutes, the bread maker continues to execute the set program from the moment at which it was suspended.
- In case of power failure for more than 10 minutes, you need to reload the products and program the device.
- If an interruption occurs while kneading the dough, simply press the START / STOP button (13), and the program will start from the very beginning.
Before first use
- Remove the device from the packaging.
- Place the device on a flat, stable surface. The distance to the nearest surfaces should be at least 20 cm.
Note: When transporting or storing the device at low temperatures, keep it at room temperature for at least two hours.
The appliance is designed to operate over a wide temperature range, however, excessively high or low room temperatures will affect the rising of the dough and therefore the size and density of the baked goods. The most optimal room temperature is from 15 to 34 ° C.
- Open the cover (3) using the handle (5).
- Grasp the baking dish (6) by the handle, turn it in the direction of the arrow REMOVE 4 and pull it up.
- Close the cover (3), turn on the device by plugging the power cord into the socket. A long beep will sound, the display (2) will show the number of the first program (18), the operating time “3:00” (21) and symbols (19, 20) reflecting the standard baking settings: crust color - medium; loaf weight - 900 g.
- Press the “MENU” button (12) repeatedly to select the “BAKING” program, press the “START / STOP” button (13) and let the device warm up for 10 minutes.
Note: When using for the first time, there may be an odor from the heating element and a small amount of smoke, this is acceptable.
- After 10 minutes, turn off the bread maker. To do this, press and hold the "START / STOP" button (13) until a long beep appears and unplug the power cord from the socket.
- Open the cover (3) using the handle (5) and let the device cool down.
- Wash the baking dish (6), paddle (7), measuring cup (8), spoon (9) and hook (10) with a soft sponge and neutral detergent.
- Dry removable parts.
- The device is ready for use.
Using the device
- Place the blade (7) on the mold shaft (6).
Note: Before installing, it is advisable to grease the blade with oil in order to avoid further dough getting under the blade (7) and to facilitate the removal of the blade (7) from the already prepared bread.
- Place the ingredients in the mold (6) in the order described in the recipe. Usually the ingredients are placed in the following order:
1. liquids,
2.free-flowing ingredients (sugar, salt, flour),
3. yeast and baking powder.
Note: The yeast should not come into contact with liquids or salt before kneading the dough. Use your finger to make a depression in the flour and place the yeast in it.
- Wipe off spilled food or liquid from the surface of the mold (6).
- Take the mold (6) by the handle, place it in the cooking compartment and turn in the direction of the LOCK► arrow.
- Close the cover (3), plug the device into a power outlet.
- Press the “MENU” button (12) repeatedly to select the required program.
- Set the crust color and loaf weight by pressing the button (14) “BAKE WEIGHT” and (11) “COLOR OF BAKING”.
- Set the delay time by pressing the buttons (16) "Time -" and (17) "Time +".
Note: Skip setting the delay time if you want to start cooking immediately.
- To start the program, press the START / STOP button (13).
- The end of the program is indicated by successive beeps, after which the operation indicator (15) will go out.
- After the end of programs 1-7, 10-12, the device switches to heating mode, the display will show the symbols "0:00" and the colon will flash.
- After the end of the heating cycle, a signal sounds and the display (2) shows the default settings for the finished program.
- To cancel heating, press and hold the "START / STOP" button (13). A long beep will sound, the operation indicator (15) will go out, after a while the display (2) will go out.
- Unplug the power cord from the outlet.
- Put on heat-resistant oven gloves, open the lid (3) by the handles (5), grasp the mold (6) by the handle, turn the mold in the direction of the arrow REMOVE 4
- Let the mold (6) cool down for 10 minutes.
- Separate the baked goods from the sides and bottom of the tins (6) using a non-stick kitchen spatula.
- To remove the bread, turn the tin (6) over and shake gently.
- Before slicing the bread, let it cool for 10 minutes and remove the paddle (7) with the hook (10).
- Cut the bread with a sharp bread knife.
Cooking time
General time mode (in hours)
Weight 750 g (Weight 900 g)
1.main 2:53 (3:00)
2. FRENCH BAGUETTE 3:40 (3:50)
3. WHOLE GRAIN 3:32 (3:40)
4. FAST BAKING 1:40
5. BAKERY 2:50 (2:55)
6. ACCELERATED 1 0:58
7. ACCELERATED 2 0:58
8. DOUGH 1:30
9. JAM 1:20
10. Cupcake 2:50
11.SANDWICH 2:55 (3:00)
12. BAKING 1:00
13.GLUTEN-FREE 3:25 (3:30)
14.KIND 0:15
15. YOGURT 6:00 (8:00)
Ingredients
Flour
The properties of flour are determined not only by the variety, but also by the conditions of grain growing, processing and storage. Try to bake bread with flour from different brands and brands and find the one that suits your needs. The main types of bread flour are wheat and rye. Wheat flour finds wider application, due to the pleasant taste and high nutritional value of wheat flour products.
Baking flour
Bakery (refined) flour, consisting only of the inner part of the grain, contains the maximum amount of gluten, which ensures the elasticity of the crumb and prevents the bread from falling off. Bread flour baked goods are fluffier.
Whole grain flour (wallpaper)
Whole grain (wallpaper) flour is obtained by grinding whole wheat grains together with the shell. This type of flour has a high nutritional value. Whole grain bread is usually smaller. To improve the consumer properties of bread, whole grain flour is often mixed with bakery flour.
Corn and oat flour
Combine wheat or rye flour with corn or oatmeal to improve the texture and flavor of the bread.
Sugar
Sugar enriches baked goods with additional flavors and gives the bread a golden color. Sugar is a breeding ground for yeast growth. Add not only refined, but also brown sugar and powdered sugar to baked goods.
Yeast
Yeast growth is accompanied by the release of carbon dioxide, which contributes to the formation of a porous crumb. Flour and sugar are the breeding ground for yeast growth. Add fresh pressed or fast acting dry yeast.Dissolve fresh pressed yeast in warm liquid (water, milk, etc.), add fast-acting yeast to flour (does not require preliminary activation, i.e. adding water). Follow the recommendations on the packaging or observe the following proportions:
1 teaspoon of fast acting dry yeast equals 1.5 teaspoons of fresh compressed yeast.
Store yeast in the refrigerator. The high temperature kills the yeast and the dough does not rise well.
Salt
Salt gives the bread extra flavor and color, but slows down yeast growth. Do not use excessive amounts of salt. Always use fine salt (coarse salt can damage the non-stick coating of the mold).
Eggs
Eggs improve the structure and volume of baked goods, add additional flavor. Beat the eggs thoroughly before adding to the dough.
Animal and vegetable fats
Animal and vegetable fats make baked goods softer and longer shelf life. Before adding the butter, cut it into small cubes or let it thaw a little.
Baking powder and soda
Soda and baking powder (baking powder) shorten the time it takes to rise the dough. Use baking powder or baking soda when baking in "SPEED" mode. Soda must be pre-mixed with citric acid and a small amount of flour (5 g of baking soda, 3 g of citric acid and 12 g of flour). This amount of powder (20 g) is calculated for 500 g of flour. Do not use vinegar to quench baking soda, as this makes the crumb less homogeneous and more moist. Simply pour the baking powder (baking powder) into the mold, following the directions in the recipe.
Water
Water temperature plays an important role when baking bread. The optimum water temperature is 20-25 ° С, for the "ACCELERATED" mode - 45-50 ° С. You can also replace water with milk or enrich the taste of bread by adding some natural juice.
Dairy
Dairy products improve the nutritional value and taste of bread. The crumb turns out to be more beautiful and appetizing. Use fresh dairy or milk powder.
Fruits and berries
Use only fresh and high quality fruits and berries for making jam.
Dosage
The secret of good bread is not only the quality of the ingredients, but also the strict observance of their proportions.
- Use the kitchen scale or measuring cup (8) and spoon (9) supplied.
- Fill the measuring cup (8) with liquid up to the appropriate mark. Check the dosage by placing the glass on a level surface.
- Thoroughly clean the beaker before measuring any other liquid.
- The flour should be sieved, remove the slide with a smooth knife.
- Do not compact dry ingredients by pouring them into a measuring cup (8).
- It is important to sift the flour before measuring in order to saturate it with air to ensure the best baking result.
Common Problems When Baking Bread
The dough rises too quickly
Excessive amounts of yeast, flour, or not enough salt
The bread does not rise
Not enough yeast
Old or inactive yeast
High temperature of fluids used
Yeast touched liquid ingredients or salt prior to kneading
The wrong kind of flour is chosen, or the flour is of poor quality
Not enough sugar
Intense rising of the dough, dough extends beyond the baking dish
Soft water leads to more active yeast growth
Excessive amounts of yeast or flour
Opal bread in the center
Excessive amount of dough
Yeast growth is poor due to high temperature of the liquid or its excessive amount
Dense crumb, lumps
Excessive flour or lack of liquid
Not enough yeast and sugar
Excessive amounts of fruits, whole grains, etc.
Low quality flour
Excessive temperature of the liquid used leads to rapid yeast growth and early dough fall
No salt or not enough sugar
The bread is not baked in the center
Lack of flour
Using a lot of liquid and liquid ingredients (such as yogurt)
Coarse crumb
Excessive amounts of liquid ingredients
No salt
Water is too hot
Unbaked bread surface
Excessive amount of dough
Excessive flour (especially if you are baking white bread)
Excessive yeast or lack of salt
Excessive Sugar
Other sweet ingredients besides sugar are used
The crumb of the cut pieces is grainy and uneven
You didn’t cool the bread before slicing (excess moisture didn’t have time to evaporate)
Ingredients tab
- Recommended sequence for placing the ingredients (unless otherwise indicated in the recipe): liquids (water, milk, butter, beaten eggs, etc.) are poured into the bottom of the baking dish, then dry ingredients are added, dry yeast is added only last.
- Make sure that the flour does not get completely wet, put the yeast only on dry flour. The yeast should also not come into contact with the salt prior to kneading, as salt reduces the activity of the yeast.
- When using the delay function, do not place perishable food such as eggs, fruit, milk in the dish (6).
|


