|
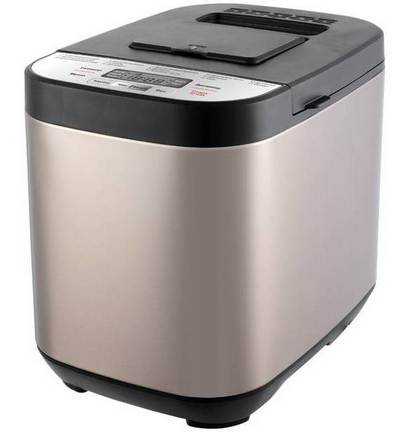
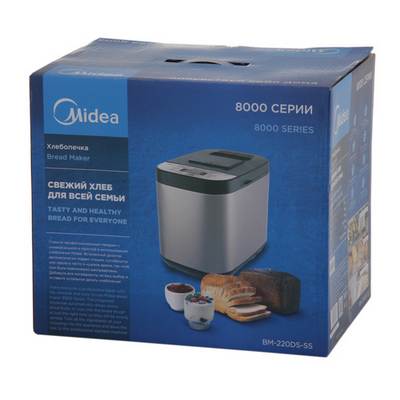
Characteristics of the Midea BM-220DS-SS bread machine
Power consumption, Watt 550.0
Mixing power, Watt 80.0
Minimum baked goods weight (g) 500.0
Maximum baking weight (g) 750.0
Voltage and frequency 220-240 V, 50-60 Hz
Control
Control type Touch
Delayed start 13 hours
Display Yes
Functions
Number of automatic programs 14.0
Saving the program after a power outage 10 minutes
3 degrees of baking crust is
Keeping bread warm for 60 minutes
Dispenser for automatic feeding of grains / nuts into bread
Yogurt container included
Viewing window Yes
Cooking mold material Aluminum
Cooking pan coating Non-stick
Outside material Stainless steel
The main bread is
Special bread, French, whole grain, sweet, rye, apple, wheat-corn, soda, spinach, coffee, banana, cinnamon, pineapple, raisins, sesame, coconut, walnut, orange, apple-oat
There is quick bread
There is jam
Oil no
Yogurt is
Sponge cake, honey, berry-coconut, apple, rice pudding
There are recipes for cooking
Baking Recipes 11.0
Jam Recipes 2.0
Pie recipes 5.0
Dough Recipes 2.0
Cooking time Special bread 3: 20-3: 30
Cooking time Yogurt 6-10 hours
Color, dimensions and weight
Color Black / Silver
Overall dimensions (H * W * D), mm 340 * 240 * 296
Weight (kg) 5.6
Service life 5 years
Warranty, month 12.0
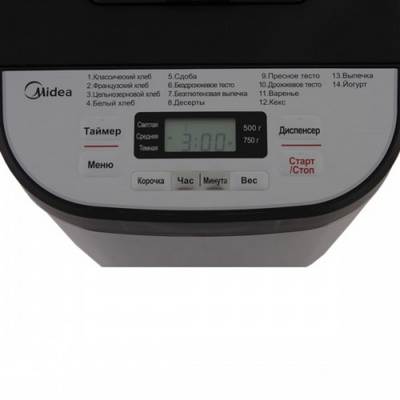
Control of the Midea BM-220DS-SS bread maker
1. Baking dish
2. Control panel
3. Cover
4. Viewing window
5.LCO LCD
6. Case
7. Measuring glass
8. Measuring spoon
9. Container for yogurt
Each press of any button is accompanied by a beep confirming the command input. The end of cooking is also accompanied by a sound signal.
You can turn off the signal by simultaneously holding the TIMER button and the DISPENSER button.
This feature will be disabled after a single beep. To return the sound accompaniment of All presses, press the TIMER and DISPENSER buttons simultaneously
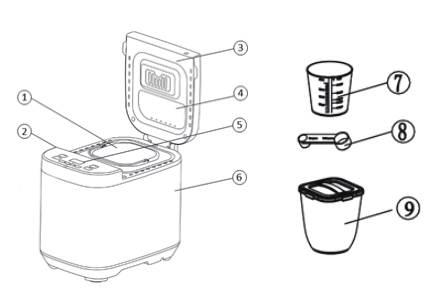
1) LCD
• Display for choosing the weight of the loaf: small - 500g, large - 750g
• Remaining baking time in minutes
• Selected bread crust color: light, medium, dark
• Selected program number
2) MENU
Load the desired baking programs. The program number and the corresponding baking time will appear on the LCD. Each press of the button (accompanied by a short beep) changes the program.
3) HOUR and MINUTE Baking delay time.
Press the HOUR and / or MINUTE buttons continuously to adjust the delay time.
4) START / STOP
To start and stop the current program or reset the "Timer". To complete the operation and reset the preset settings, press the "START / STOP" button for 2 seconds until you hear a beep.
Note: Do not press the START / STOP button if you want to check the condition of your bread.
5) SHORT
Used to select a baked crust color: Light, Medium, Dark. Press the button to position the arrow opposite the desired color. Crust color selection is available only for programs
1,2,3,4,5,6,7.
6) WEIGHT
Used to select the size of the loaf "500g" or "750g". Please note that the baking time depends on the size of the loaf you have chosen. Press the button until the display shows the desired weight. Weight selection is available only for programs 1,2,3,4,5, b, 7.
7) DISPENSER
You can add additional ingredients to the dispenser in advance.
The DISPENSER function is activated by pressing the DISPENSER button. The light indicating the start of this program comes on. After 5 minutes, the automatic addition of ingredients will begin.You can turn off the DISPENSER function if you press this button again within 5 minutes and the light indication of this operating mode will go out
8) Program number
The program number is displayed on the LCD in the upper left corner.
9) Memory function
If during the cooking process the mains power supply was disconnected for less than 10 minutes, then when the power supply resumes, the bread machine will automatically start the selected cooking program without pressing the START / STOP button. If more than 10 minutes pass, the program will not be saved and will have to be restarted.
10, Sight glass
You can watch the baking process through the window.
Turning on the Midea BM-220DS-SS bread maker
Make sure all accessories and parts are present and check that they are intact.
ATTENTION: to connect the oven to the mains, a socket with an earthing contact must be provided!
ATTENTION: the socket must be in the immediate vicinity of the bread maker, it must be freely accessible so that, if necessary, the oven can be disconnected from the mains immediately!
Insert the power plug into a power outlet. At the same time, a sound signal will sound and the display will show the indication: “1”, “3:00” (where “1” is the program number, “3:00” is the program execution time). The colon between "3" and "00" will not flash. The arrows will point to Medium and 750g. These are the default settings.
Adding additional ingredients
The dispenser is a handy function that makes the baking process automatic. It is better to put such products as chocolate and cheese in a baking dish right away, and candied fruits, sausages, dried fruits, nuts, seeds, flakes are better to put in a dispenser as they should be dry.
• Precisely calculated volume - the filling only needs as much as the dispenser fits. This is especially true for cheeses, ham, etc., otherwise there may be a problem due to excess quantities. The bread may not bake and rise or come out too well.
• Ingredients do not break / break - if you put all at once, then the components are mixed for a longer time with all the resulting negative moments.
Place additional ingredients in the dispenser or directly in the baking dish (depending on the type of ingredients) and press the DISPENSER button, a beep will sound and the corresponding indicator will light up.
Dry and insoluble ingredients
Place additional ingredients in the raisins and nuts dispenser and set up the bakery. Dried fruits
Cut into cubes about 5 mm. Sugar sprinkled ingredients may stick and not fit.
Nuts
Grind finely. Nuts mask the taste of gluten, so avoid over-adding them.
Sunflower seeds
Using large, hard seeds can scratch the coating of the dispenser and the bread pan.
Herbs
Use up to 1-2 teaspoons of dried herbs. For fresh herbs, follow the directions in the recipe.
Ham
Occasionally, fatty ingredients may stick to the dispenser and not fit into the bread pan.
Without dispenser
Wait for the beep, then add the required ingredients to the bakery mold. Wet / viscous ingredients, soluble ingredients Place these ingredients together with others in the mold.
Fresh and alcohol-based fruits
Use the amount strictly according to the recipe, as the water in the ingredients can affect the quality of the bread.
Soft cheese, chocolate
These ingredients should not be placed in the raisins and nuts dispenser as they may stick to the dispenser and not fit into the mold.
Setting a snooze time
The delayed start function allows food to be cooked at the desired time interval up to 13 hours (including the cooking time). Do not use this mode if the recipe involves the use of perishable food. Delayed start mode is available only for programs
1,2,3,4,5,6,7. To set delayed start mode, do the following:
1. Make sure the ingredients are loaded exactly as per recipe, program number, bread weight and crust color are selected.
2. Press the TIMER button, then press the HOUR and MINUTE buttons to set the time after which you
would like to receive already baked bread (up to 1 pm). Then press the START button to start the mode.
Note that the set cooking delay also includes the duration of the set program. That is, at the end of the delay cycle, you will receive ready-made hot bread. First select the baking program, weight and crust color, and then set the time you need by increasing or decreasing it by pressing the buttons, HOUR changes the time by 1 hour and MINUTE changes the time by 10 minutes. The maximum cooking delay is 13 hours.
For example, it is now 20:30. You want the bread to be ready at 7:00 the next day, i.e. after 10 hours and 30 minutes. Select the baking program, crust color, loaf size, press the TIMER button, then, by pressing the HOUR and MINUTE buttons, the time on the display is 10:30. Then press the START / STOP button to start the delay program. A countdown will begin (flashing colon) and the display will show the remaining time. The bread will be ready by 7:00 in the morning, then the bread machine will keep it hot for an hour.
Note
3. In programs 8-14, you cannot set the delayed cooking and set the crust color.
4. When selecting the delayed cooking mode, do not use perishable ingredients: eggs, fresh milk, fruits, onions, etc.
5. In program "13" (Baking), by pressing the MINUTE button, you can change the baking time from 10 to 60 minutes in 1 minute increments.
BEFORE BAKING
For a successful baking process, please consider the following factors:
• Remove the bread pan before placing the ingredients in it.
• If there are more ingredients, it could cause a fire due to heating of the heating elements.
• Always place the ingredients in the order shown in the baking dish.
• All ingredients should be at room temperature to maintain optimal yeast dough growth.
• Measure the exact amount of ingredients. Even a slight deviation from the amount indicated in the recipe can affect the baking result.
Before the first launch
• Wash all accessories according to the Cleaning and Care section. Wipe dry and reassemble all parts.
• Plug in the breadmaker.
• By pressing the MENU button, select program “13” (Baking) and run it with an empty dish for 10 minutes, then wipe again.
• Before using for the first time, we recommend greasing a new baking dish and a kneader paddle and heating for about 10 minutes to protect the non-stick coating. This procedure must be repeated periodically. The bread maker is ready to use.
Warning!
Never use more ingredients. The dough can rise outside the normal range and get onto the heating elements, causing a fire.
Baking bread in the Midea BM-220DS-SS bread maker
Preparation
Observe the safety instructions in this manual. Place the bread maker on a firm, level surface.
Note
The maximum capacity of this bread maker is 750 grams, it is not recommended to use more ingredients. Add oil, water and other liquids first, then add sugar, salt, flour, yeast.
1) Remove the baking dish from the bread machine by turning it counterclockwise and pulling it up.
2) Place the kneading spatula in the bread pan. Make sure it is firmly in place.
3) Put the ingredients for your recipe in the prescribed order in a baking dish. First add liquids, sugar and salt, then flour, add yeast as the last ingredient.
Note
Make sure the yeast does not come into contact with salt and liquid.
4) Place the bread back in the tray of the appliance. Make sure everything is installed correctly.
5) Close the instrument cover.
6) Connect the plug to the outlet. A beep will sound and the display will show the program number and default duration.
7) Repeatedly press the MENU button until the display shows the number of the required baking program, according to the program table (each press is confirmed by a sound signal).
8) Select your desired bread color. The indication on the display will show whether light, medium or dark is selected.
9) Now you have the opportunity to set the end time of the selected program using the delay function. You can delay cooking with a maximum delay of up to 13 hours (including the time of the program itself).
Cooking yoghurt in the Midea BM-220DS-SS bread maker
1. Preparation for cooking
• Equipment preparation
Rinse thoroughly and pour boiling water over the yogurt container, lid inside and outside with hot water, then dry with a soft dry towel.
• Preparation of ingredients for making yoghurt
As a source of lactobacilli for the preparation of yoghurt, you can use a special yoghurt starter culture or yoghurt with live lactobacilli purchased from a store. Whole milk or pasteurized milk is also needed. For best results, all ingredients should be at room temperature. You can add fruit juices, berries, fruits, jams, chocolate, sugar 10
and other flavors.
Attention:
Buy yogurt that is refrigerated and contains live lactobacilli. Fermented milk drinks that are stored at room temperature are not suitable for making yoghurt. The number of live lactobacilli should be at least 106 CFU / ml.
When purchasing all ingredients, pay attention to their expiration date.
2. Preparation
• Mix milk and yoghurt in a 10: 1 yoghurt container (100 ml yoghurt per 1 liter of milk). First, mix the yogurt with a little milk, then pour in the remaining milk and use a whisk to stir the mixture evenly. Close the lid tightly.
• Place a covered yoghurt container in the bowl of the bread maker, place it correctly, then close the roof of the bread machine.
• Press the MENU button to select the Yoghurt program. Set the cooking time. Usually the process of fermenting yoghurt takes 8-10 hours. If the temperature of the milk and the environment is lower, fermentation may take longer. This model allows you to set the cooking time from 6 to 12 hours. As the cooking time increases, the yoghurt becomes thicker.
• Press the START / STOP button to start cooking, the time will count down on the display. Store yoghurt in the refrigerator after cooking.
Important safety instructions:
The yoghurt container can only be used in the Yogurt mode in the bread machine, otherwise the plastic container may melt. It is forbidden to use this container when cooking in other modes of operation of the bread maker.
3. Storage
• The resulting yoghurt with live lactobacilli can be consumed immediately after preparation. Yoghurt tastes better after cooling.
• After cooking, you can add any flavors to your homemade yogurt. Try adding fruit juice, fruit purees, drinks, chocolate, sugar, or other additives you like.
• Store ready-made yogurt in the refrigerator.
Cooking curd in the Midea BM-220DS-SS bread maker
Follow the instructions for making yoghurt using a special curd starter (available from your pharmacy or grocery store). Also, to increase the volume of the finished product, you can use a container for bread for cooking.See the fermentation time on the packaging of the curd starter, as a rule the time is 10-12 hours.
1. Put the fermented mixture over low heat in a water bath. Cook, stirring gently, for 15-20 minutes until curd clots form.
2. As soon as the slightly heated mass is stratified into cottage cheese and whey, set it aside until it cools completely.
3. Next, prepare a roomy dish, place a colander on it, cover it with a thick clean cotton cloth (a sieve is not suitable for such manipulation).
4. Pour the mixture onto the prepared cloth, tie it in a knot and hang it over the prepared container so that the separated whey can drain into it. As soon as the whey stops dripping, the curd is ready.
5. The resulting curd can be consumed immediately after cooking. The cottage cheese becomes more tasty after cooling.
6. After cooking, you can add any flavoring fillers to your homemade cottage cheese: jam, sugar, herbs, spices, dried fruits or other additives at your discretion.
7. Store the finished cottage cheese in the refrigerator.
Baking programs in Midea BM-220DS-SS bread maker
Select the required program by pressing the MENU button. The corresponding program number is displayed on the LCD. The baking time depends on the selected combination of program settings. See the "Cooking time" table.
Program 1: Classic bread
For white and mixed breads, mainly wheat flour or rye flour. The bread is dense.
Program 2: French bread
For white yeast bread made from fine flour. Usually the bread is soft with a crispy crust. Not suitable for baked goods requiring butter, margarine or milk.
Program 3: Whole Grain Bread
For durum breads that require long kneading and growing (eg wheat flour and rye flour). The bread will be leaner and heavier.
Program 4: White bread
Kneading, lifting and baking bread, the process takes place in a short period of time.
Program 5: Baking
For breads with additives such as syrups, shredded coconut, raisins, dried fruit, chocolate or sugar. Due to the longer lifting phase, the bread will be light and airy.
Program 6: Lean dough
Kneading, lifting, and baking in a very short time. But the bread is tough.
Program 7: Gluten Free Baking
Using programs:
Programs N21, 2 and 3 should be used to prepare gluten-free breads and muffins. Only one weight option is possible for each of these programs. Gluten-free bread is suitable for people who are allergic to the gluten contained in several types of grain (wheat, barley, rye, oats, etc.). It's important to avoid touching gluten-free foods and regular breads by making sure the bread bowl and knife are thoroughly washed and the yeast you are using is gluten-free.
Gluten Free Bread Mixes:
There are special mixes for making gluten-free bread. These blends can be found at your supermarket, specialty store, or online.
Not all gluten-free blends work the same way. Therefore, you may need to try the recipe several times to get the best results. You can try adjusting the amount of liquid in the dough (the muffin dough should be thinner than the bread dough).
Program 8: Desserts
The program is recommended for preparing chocolate and milk desserts. Includes mixing of ingredients followed by heating. The delayed start function is not available. Selection of product weight and manual time adjustment are not provided.
Program 9: Unleavened dough
Program for kneading unleavened dough used to make noodles, dumplings, etc., without further baking. The device works only in batch mode. The delayed start function is not available.Selection of product weight and manual time adjustment are not provided.
Program 10: Yeast dough
For making yeast dough for bread, pizza or cakes. The program kneads and raises the dough without baking.
Program 11: Jam
For processing fresh fruits and preparing products such as preserves, apple mousse, jams, etc. The indicated quantities must not be exceeded, as the jam must be boiled in the baking chamber until cooked.
Program 12: Cupcake
Cupcake baking program. Suitable for ready-made cupcake mixes. Includes quick kneading and baking. You can choose the color of the crust. The delayed start function is not available. Selection of product weight and manual time adjustment are not provided.
Program 13: Baking
Program for baking only. Can be used to finish insufficiently baked bread or to bake from raw dough. The bread will be kept warm for an hour after baking. This prevents moisture build-up.
Program 14: Yogurt
Terminate this function early by pressing the START / STOP button for 2 seconds, until a beep sounds. To turn off the device, disconnect it from the power supply.
In programs 1, 2, 3, 4, 5 and 6, a beep will sound during cooking. Shortly thereafter, add ingredients such as fruits or nuts.
If you have set the Timer, you can put all the ingredients in the bread pan at the beginning. In this case, however, the fruits and nuts must be cut into small pieces.
Running the program
Now start the program with the START / STOP button.
The program automatically runs various programs. You can check the time through the window of your bakery machine. Condensation may sometimes appear during baking. The lid of the device can be opened during mixing.
Note
Do not open the appliance lid while baking. This can interfere with baking bread.
End of the program
When the baking process is complete, a beep sounds and the display shows the default program and time. At the end of the program, the appliance automatically switches to heating mode for 60 minutes. In this mode, warm air circulates inside the appliance. You can deactivate the function by keeping the START / STOP button pressed until a beep sounds.
Warning!
Before opening the cover of the device, remove the plug from the socket. When the device is not in use, it must not be connected!
Always use oven mitts or oven mitts to avoid scalding yourself when removing the bread from the mold. Hold the baking dish tilted and shake gently until the bread slips out.
Note
Do not use metal objects that could scratch the non-stick coating. After removing the bread, immediately rinse the baking dish with warm water. This prevents the dough from sticking to the kneading paddle.
Tip: If you take out the kneading spatula immediately after the final dough, the bread will remain intact without the notch from the spatula.
• Briefly press the START / STOP button to interrupt the baking process or disconnect the plug from the socket.
• Open the lid of the appliance and take out the bread. You can take the flour dough with your hands and remove the kneading spatula.
• Change the dough and close the lid of the appliance.
• Insert the plug back into the socket and press the START / STOP button. The baking program continues. Let the bread cool for 15-30 minutes before eating.
Recommendations for choosing products
1. Wheat baking flour
It has a high gluten content (it contains a lot of protein, which is necessary for the formation of gluten, which determines the structure and elasticity of the bread), and therefore the bread turns out to be high and elastic, and does not settle after baking. Well, since there is more gluten in this flour than usual, you can use it for baking large breads and better internal structure.Wheat bread flour is the most important ingredient in the bread baking process.
2. Fine flour
The flour made by mixing carefully selected soft and durum wheat varieties is suitable for making quick bread or muffins.
3. Whole wheat flour
It is made from crushed wheat grains, including bran and gluten. Whole wheat flour is heavier and more nutritious than regular flour. Breads made with whole wheat flour are usually smaller. Many recipes recommend mixing bakery flour and whole wheat flour for best results.
4. Coarse flour
A high-fiber flour variety, very similar to whole grain flour. It allows the bread to rise a lot, therefore it is recommended to use it in combination with a lot of bread flour.
5. Flour for baking muffins
It is made by grinding a variety of soft wheat, which contains few proteins. Used for baking muffins. Different flours differ from each other. The absorption capacity of flour, or in other words, how well the bread made from it will rise depends very much on where the wheat was grown, in what conditions, how it was ground, how it was stored. You can buy and compare flavors from different manufacturers and choose the one that gives you the best taste and result.
6. Corn and oat flour
Corn and oatmeal are made by grinding corn and oats, respectively. This flour is usually used as an additive to regular flour to give the resulting bread a specific taste and texture.
7. Yeast
The yeast induces the fermentation process, producing carbon dioxide, giving the bread volume and structure. To provide nutrition for yeast, carbohydrates are needed from sugar.
• 1 tsp. dry yeast = 3/4 tsp fast acting yeast
• 1.5 tsp. dry yeast = 1 tsp fast acting yeast
• 2 tsp. dry yeast = 1.5 tsp fast acting yeast
Store yeast in the refrigerator as high temperatures are harmful to microorganisms. Check their expiration date before use. Put the leftover yeast in the refrigerator as soon as possible. Often, dead yeast is the reason why the bread does not rise. In the following way, you can check if your yeast is dead, fresh or not:
1) Pour half a cup of warm (45-50 ° C) water into a measuring cup
2) Put 1 teaspoon of white sugar in a measuring cup and stir, then add 2 teaspoons of yeast.
3) Place the measuring cup in a warm place for 10 minutes. Do not shake the water.
4) The foam should rise to the level of 1 cup. Otherwise, the yeast is either dead or unusable.
8. Sugar
A very important ingredient that gives sweet taste and color to bread. White sugar is used by yeast as a nutrient medium for fermenting dough. Dark sugar, powdered sugar or cane sugar can be referred to as special additives.
9. Salt
Salt is used to add flavor and color to the crust. But it can also suppress the action of yeast. Don't use too much salt in your recipe. You can not use salt, then the bread will turn out to be larger in volume.
10. Eggs
Eggs are added to increase bread's nutritional value, size, texture, and flavor. Beat them thoroughly before placing in the dough.
11 Fat, oil and vegetable oil
The fat makes the bread soft and lasts longer. The oil that you take out of the refrigerator must be kneaded or cut into thin pieces, so that it is evenly mixed.
12. Baking powder
Baking powder is most commonly used for Quick Bread Baking and Cupcake Baking.When using it, it does not take time for the dough to rise, and for the yeast to give the bread an airy or soft structure, in this case, a chemical principle is used for the same purposes.
13. Soda
Same as baking powder. Often used in conjunction with it.
14. Water and other liquids
Water is a wonderful ingredient for baking bread. It is worth mentioning that most often water is used with a temperature of 20-25 ° C. But the water can be hot. So, for example, to make bread according to the Fast baking program, you need to use water at a temperature of 45-50 ° C to raise the bread. Instead of water, you can use fresh milk or 2% milk powder diluted with water. Milk will improve the taste of the bread and the color of the crust. Some recipes use juices to add flavor: apple, orange, lemon, etc.
Cleaning and maintenance
Unplug the bread maker and let it cool completely before cleaning.
Use only liquid detergents for washing. It is not recommended to use aggressive detergents, gasoline, oven detergents and other agents that can scratch or damage the surface to be cleaned. Open the lid, and firmly holding the baking dish with your hands, turn it counterclockwise and pull it upwards to remove it from the bread maker.
To remove any remaining ingredients and crumbs from the lid, cabinet and cooking cabinet, wipe with a damp cloth and then wipe dry.
Do not immerse the bread maker in water or pour water into the cooking compartment!
Wipe the outside of the baking dish with a damp cloth. Rinse inside with water and dishwashing liquid. Do not immerse the baking dish in water.
The baking dish is covered with a non-stick coating. Do not use metal tools for cleaning that could damage the non-stick coating. Don't worry if the non-stick coating changes color over time. This can be caused by exposure to steam, moisture, food, acids and mixtures of ingredients, rather than wear or defects in the device. These changes are not dangerous and do not affect the operation of the device.
If the blade does not come off the shaft, pour warm water into the mold and let stand for about 30 minutes. Now you can easily remove the blade. Wipe it gently with a damp cotton cloth. WARNING: The baking dish and kneader paddle must not be washed in the dishwasher.
Wipe the inside and outside of the lid and sight glass with a slightly damp cloth.
Wipe gently with a soft, damp cloth. Do not use abrasive products to clean the surface of the case, as you can scratch its shiny surface.
The bread maker must be kept clean and dry.
|


