|
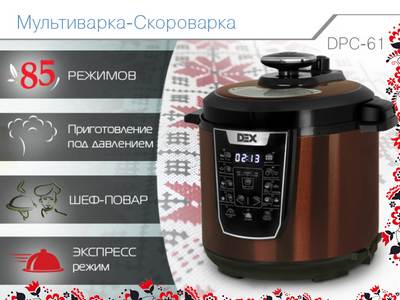
Technical characteristics of the multicooker Dex DPC-61
Color Bronze with black
Power, W 1000
Backlit LED display
Microprocessor control +
Pressure Cooking +
Number of modes under pressure 3
Number of programs 17
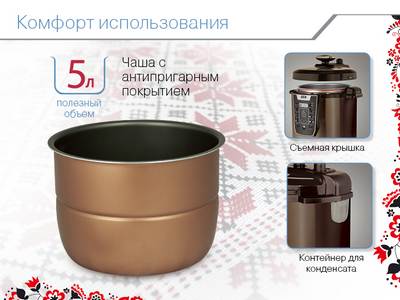
Bowl volume, l 6 (useful - 5)
Non-stick bowl coating +
Bowl wall thickness, mm 2
Cord length, m 1.3
Cooking programs
Steam program / Steam / Steamer +
Fry program (in models: DMC-55, DMC-70, DMC-71 it is possible to set the cooking temperature on your own) 15 temperature modes 100-170 ° С (step 5 ° С)
Quenching program +
The "languor" program +
Program "Baking" / "Cupcake" +
Program "Groats" / "Rice-Groats" +
Pilaf program +
Milk porridge program +
Soup / First courses program +
Aspic program +
Pizza program +
Program "Jam" +
Yoghurt program +
Legumes program +
Express program +
Program "Manual mode" / "Multi-cook" / "Chef" (independent setting of the cooking temperature) 29 temperature modes 30-170 ° С (step 5 ° С)
Warm-up / Warm-up program +
Possibility of individual setting of cooking time in programs +
Delayed start up to 24 hours
The function of keeping the finished dish hot - "Auto-heating" +
Dex multicooker recipes
Accessories (included)
Spatula +
Measuring glass +
Wall-mounted steamer +
Recipe book +
Features:
Sound signal +
Safety valve +
Overpressure automatic relief system +
Overheating automatic shutdown +
Removable instrument cover +
Removable inner top cover +
Condensate collection container +
Detachable cord for easy storage +
Logistic data
Package dimensions (cm) WxHxD 32x36,5x32
Package Weight (kg) 5.7
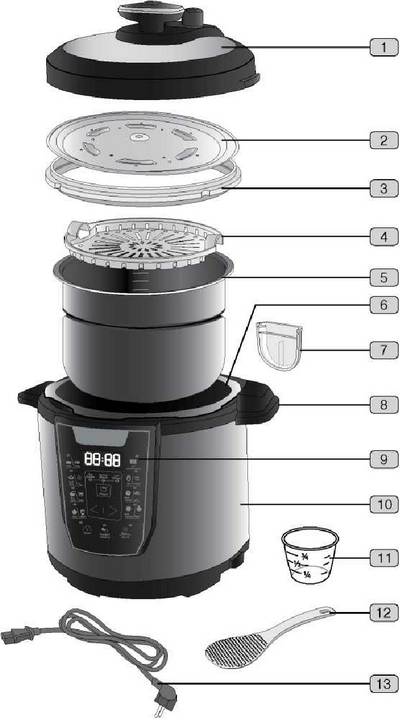
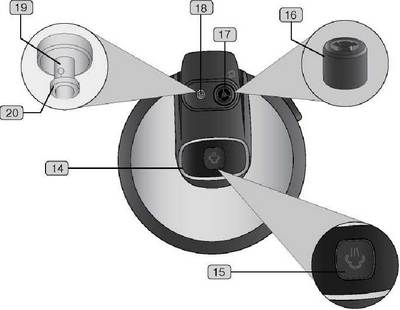
1 Appliance cover
2 Internal removable cover
3 O-ring of inner removable cover
4 Wall-mounted steamer
5 Cooking bowl
6 Working chamber of the device
7 Removable condensate container
8 Side carry handles
9 Control panel
10 Instrument housing
11 Measuring glass
12 scapula
13 Power cord
14 Appliance cover handle
15 Steam release button
16 Removable part of the steam release valve
17 Steam release valve (safety valve)
18 Lockout valve
19 Locking valve movable pin
20 O-ring lock valve
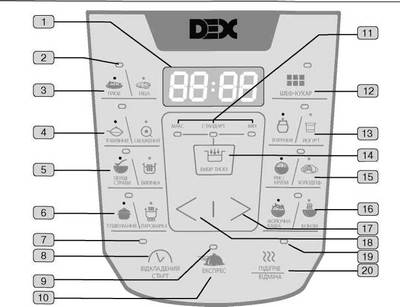
1 Display
2 Cooking program indicator *
3 Program selection button PLOV / PIZZA
4 BROWNING / FRYING program selection button
5 FIRST COURSES / BAKING program selection button
6 STEAMING / STEAMING program selection button
7 Delayed start indicator
8 Button for selecting the "Delayed start" function
9 EXPRESS program indicator
10 EXPRESS program selection button
11 Indicators for pressure cooking modes: "MAX" (maximum), "STANDARD", "M1H" (minimum)
12 CHEF program selection button
13 JAM / YOGHURT program selection button
14 Button "VIB1R VISKU" - selection of cooking modes under pressure
15 Program selection button RICE CEREALS / COLD
16 Program selection button DAIRY / BEANS
17 Button for increasing the value of the temperature, cooking time
18 Button for decreasing the value of temperature parameters, cooking time
19 Indicator for the HEATING program / Auto-heating function
20 Button for selecting / canceling the HEATING program, canceling the "Auto-heating" function, canceling the set cooking parameters, canceling the start or interrupting the cooking program process, red indicator light - the program on the right side of the button is selected
Dex multicooker recipes
Using the DEX DPC-61 multicooker-pressure cooker, cooking your favorite dishes will be even easier and twice as fast, and the presence of 85 modes will make your daily menu as diverse as possible! At the same time, the dishes will be both tasty and healthy, since cooking under pressure not only significantly reduces the cooking time, compared to traditional methods of heat treatment, but also preserves the original taste, vitamins and other useful and nutritional properties of the products to the maximum!
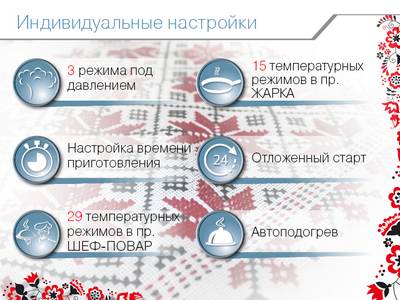
3 modes of operation of the device under pressure, 17 well-thought-out automatic programs, the "CHEF-COOK" program with the function of individual settings and 29 temperature modes, 15 temperature modes in the "Frying" program will allow you to easily get any methods of heat treatment of products, namely: frying, boiling, stewing, steaming, steaming, baking, baking bread or other pastries, preparing dishes for baby and diet food, homemade yoghurts, cottage cheese and a variety of desserts, as well as making delicious jam. The universal "EXPRESS" program with the function of quick start cooking under pressure - will facilitate the process of daily preparation of traditional dishes. Also, DEX DPC-61 will provide a wide range of additional features: proofing of dough, pasteurization of liquid products, sterilization of dishes, delayed start of cooking up to 24 hours, maintaining the temperature of ready meals and heating cold dishes.
For the safety of the user, the DEX DPC-61 is equipped with an automatic pressure relief system, and the lid of the appliance is designed in such a way as to provide maximum protection, even under very high pressure inside the multicooker-pressure cooker. Excess condensate during cooking is removed into a special removable container, which is provided in the package. In addition, DEX DPC-61 is equipped with a capacious removable bowl with a high quality non-stick coating with a useful volume of 5 liters and a set of additional accessories.
You will appreciate the very convenient, highly automated control of this model of a multicooker-pressure cooker. Just load the necessary products into the bowl, set the required program by pressing the button and after 5 seconds the multi-cooker-pressure cooker will automatically switch to the heating process and the execution of the cooking program, and after the dish is ready, the multi-cooker-pressure cooker will automatically switch to the "Standby" mode or "Auto-heating".
This model of multicooker-pressure cooker provides everything you need to make the daily cooking process for your whole family absolutely simple and comfortable, and the modern design of the DEX DPC-61 with color LED-backlit display and control panel indication will be a pleasant addition and perfectly emphasize the interior of your kitchen!
General cooking tips
• Exit to operating parameters / start of timing: In all programs, the countdown starts after the device reaches operating parameters, that is, after the pressure and temperature in the working chamber have reached the optimal values for the selected program. The time to reach the operating parameters may vary and depends on the number of products and the selected program. In the process of heating and reaching the operating parameters, the display shows the symbol of the "rotating snake".
• Cooking under pressure / without pressure: In this model of multicooker-pressure cooker, the choice of cooking mode under pressure / without pressure is only automatic and is controlled by the microprocessor of the device, depending on the selected cooking program, as well as the type of food and the amount of water / liquid. That is, it is impossible to forcibly enable or disable the pressure cooking mode!
During the operation of the device in automatic mode under pressure, the working chamber is sealed and the high pressure is maintained, the blocking valve on the lid rises, while the lid is automatically locked. Do not try to open the lid while cooking! Open the lid only after the end of the cooking program and steam release, when the lock valve on the lid has moved down (in the lower position) and the lid is unlocked.
In the automatic cooking mode of the multicooker-pressure cooker without pressure, the lid is not locked and opening the lid during operation is allowed. If it is necessary to open the lid during cooking, make sure that the device operates in no pressure mode and that the blocking valve is lowered (in the lower position), which means that the pressure under the lid is normal and you can open the lid.
Attention!
Do not use force to open the locked device cover!
To sauté or fry food in a little oil or broth is allowed only in the FRYING, CHEF-COOK programs and only with the lid open!
Steam release and lid release: To normalize the pressure in the working chamber and release steam, after the end of the cooking program under pressure, press the steam release button.
Before pressing the steam release button, let the appliance cool down for 2-3 minutes, otherwise hot liquid may escape from the steam release valve.
Be very careful when pressing the steam release button. Take care of your hands and face. Never place your hands and face over the steam release valve!

Delayed start function
Put the prepared food in the bowl of the appliance, program the multicooker-pressure cooker in advance and a hot breakfast, lunch or dinner for the whole family will be ready at the right moment!
The delayed start function is available for all automatic cooking programs, with the exception of the programs: HEAT, YOGHURT, EXPRESS, HEATING. This function allows you to set the time interval after which the selected program will start with the set cooking parameters. You can postpone the start of the program in the range from 15 minutes to 24 hours with a setting of 15 minutes.
Set the cooking program and the corresponding settings (cooking time, temperature / pressure). When the indicator of the selected program is flashing, press the DELAYED START button to set the delayed start time. The Delayed Start indicator on the control panel will flash.
5 seconds after the last action, after the delayed start function was set, the display will show the countdown until the start of the cooking program, and the corresponding indicators of the delayed start function and the selected program will light up on the control panel. After the countdown is complete, the delayed start indicator will stop flashing and the display will show the symbol “rotating
snakes ”, after which the heating process will begin. After the appliance reaches the operating parameters, the display will show the running time of the set automatic cooking program, and the corresponding indicator on the control panel will light up.
Attention!
In order for the dish to be ready on time, when setting up the Delayed Start function, it is necessary to take into account not only the cooking time of the dish, but also the time the device reaches operating parameters.
It is not recommended to postpone the start of the cooking program for a long time if the dish contains perishable food (eggs, fresh dairy products, meat, fish, etc.).
The function of keeping the temperature of ready meals "Auto-heating"
The heating turns on automatically after the end of the cooking program and can maintain the temperature of the finished dish in the range between 65-75 ° C - for 24 hours.After the end of the cooking program, an audible signal will sound, the indicator of the automatic program HEATING will light up, and the symbols "bb" will appear on the display.
The operation of the device will switch to the mode of keeping the temperature of the prepared dish hot (except for the programs: YOGHURT, FRYING, JAM). The temperature will be maintained between 65 ° C and 75 ° C.
After the device has switched to the mode of keeping the temperature of the finished dish, if necessary, the HEATING program can be turned off by pressing the "HEATING / CANCEL" button - the indicator will go out and the display will show the symbols of the standby mode "0000"
Attention!
In this model of multicooker-pressure cooker, the preliminary deactivation of the Auto-Heating function is not provided. Therefore, the dish you have prepared and the device connected to the network should not be left unattended and remember about safety precautions after finishing work with the device.
Despite the fact that the device can keep the dish hot for up to 24 hours, it is not recommended to leave the device in the "Auto-heating" mode for more than 2-3 hours. This can lead to a change in the taste of the food and a deterioration in the quality of the dish!
Warming function for cold food
This model of the DEX multicooker-pressure cooker has the function of heating cold food. If it is necessary to warm up the dish, after you have placed the bowl with the dish in the multicooker-pressure cooker, close and fix the lid, connect the device to the mains and press the "HEAT / CANCEL" button. The corresponding indicator and symbols on the display will light up. The WARMING program can maintain the temperature of the food within the range of 65-75 ° C for 24 hours. To cancel heating the dish, press the "HEATING / CANCEL" button again. Open the lid and disconnect the appliance from the power supply, then remove the bowl with the dish.
Description of cooking programs
PLOV (blue indication)
The program is recommended for cooking various types of pilaf.
There are 3 modes of operation of the device under pressure available for adjustment: "MAX" (Maximum), "STANDARD", "MIN" (Minimum). The default cooking time is 20 minutes. Cooking time setting range from 1 min. up to 2 hours, with an installation step of 1 min. After the end of the program, the device switches to the "Auto-heating" mode. The program supports the "Delayed start" function.
• Measure and prepare ingredients according to recipe. Take out the bowl and place the food you want in it.
• Wipe the bottom of the bowl and the heating element dry. Place the bowl with food in the working chamber of the appliance, make sure that the bowl is firmly in contact with the heating element.
• Close and secure the cover. Make sure the steam release valve is in the correct vertical position. Connect the device to the mains.
• After the symbols “0000” appear on the display - set the PLOV program by pressing the “PLOV / PIZZA” button. The indicator of the set program starts flashing (blue) and the display shows the default cooking time.
• With an interval of no more than 5 seconds after the last action, set the cooking time using the <I> buttons.
After 5 seconds after setting the parameters, the device will automatically go to the heating process, the lid will be locked and the cooking program will start (the display will count down the time).
• When the program time has elapsed, an audible signal will sound, the symbols will appear on the display and the device will switch to the automatic heating mode.
• To cancel “Auto-heating” press the “HEATING / CANCEL” button - the indicator will go out and “0000” will appear on the display.
• If the lock valve on the lid is up (in the up position) - press the steam release button to unlock the lid.
• Open the lid and disconnect the appliance from the power supply, then remove the bowl with the finished dish.
Attention!
Before cooking pilaf, it is recommended to rinse the rice thoroughly under running water until transparent (in a separate container).
PIZZA (red indication)
The program is recommended for preparing different types of pizza.
The default cooking time is 15 minutes. Time setting range
cooking from 1 min. up to 2 hours, with an installation step of 1 min. After finishing
When the program is running, the device switches to the "Auto-heating" mode. Program
supports the "Delayed start" function.
• Measure and prepare ingredients according to recipe. Take out the bowl and place the food you want in it.
• Wipe the bottom of the bowl and the heating element dry. Place the bowl with food in the cooking compartment of the appliance, make sure that the bowl is in close contact with the heating element.
• Close and secure the cover. Make sure the steam release valve is in the correct vertical position. Connect the device to the mains.
• After the symbols "0000" appear on the display - set the PIZZA program by double pressing the "PLOV / P1TSA" button. The indicator of the set program will start flashing (red) and the display will show the default cooking time.
• With an interval of no more than 5 seconds after the last action, set the cooking time using the <I> buttons or leave the default settings.
• After 5 seconds after setting the parameters, the appliance will automatically switch to the heating process and then to the cooking program (countdown on the display).
• At the end of the program time, a beep will sound, the display will show the symbols "bb" and the device will switch to automatic
heating dishes.
• To cancel the "Auto-heating" press the "ON/OFF" button - the indicator will go out and the symbols "0000" will appear on the display.
Attention!
Be careful, before opening the cover, make sure that the blocking valve is in the down position, which means the pressure under the cover is normal, and only then you can open the cover.
The automatic PIZZA program must only be used for its intended purpose and is not recommended for cooking other foods with added water / liquid, or for roasting foods containing moisture (vegetables, fruits, etc.).
STEALING (blue indication)
The program is recommended for cooking stewed meat, baked milk, etc.
There are 3 modes of operation of the device under pressure available for adjustment: "MAX" (Maximum), "STANDARD", "MIN" (Minimum). The default cooking time is 5 hours. The cooking time setting range is from 1 hour to 10 hours, with a setting step of 10 minutes. After the end of the program, the device switches to the "Auto-heating" mode. The program supports the "Delayed start" function.
• Measure and prepare ingredients according to recipe. Take out the bowl and place the food you want in it.
• Wipe the bottom of the bowl and the heating element dry. Place the bowl with food in the cooking compartment of the appliance, make sure that the bowl is in close contact with the heating element.
• Close and secure the cover. Make sure the steam release valve is in the correct vertical position. Connect the device to the mains.
• After the symbols “0000” appear on the display - set the BROKEN program by pressing the “BREAKER / LUBRICATED” button. The indicator of the set program starts flashing (blue) and the display shows the default cooking time.
• With an interval of no more than 5 seconds after the last action, set the cooking time using the <I> buttons.
• After 5 seconds after setting the parameters, the appliance will automatically go to the heating process, the lid will be locked and the cooking program will start (countdown on the display).
• When the time of the program has expired, a beep will sound, the display will show the symbols "bb" and the device will switch to the automatic heating of the dish.
• To cancel “Auto-heating” press the “HEATING / CANCEL” button - the indicator will go out and “0000” will appear on the display.
• Open the lid and disconnect the appliance from the power supply, then remove the bowl with the finished dish.
FRY (red indication)
The program is recommended for frying, meat, poultry, seafood, sautéing and roasting vegetables, as well as deep fat cooking.
The program provides 15 temperature modes. The default cooking temperature is 160 ° C. Cooking temperature setting range is from 100 ° С to 170 ° С, with an installation step - 5 ° С. The default cooking time is 15 minutes. Cooking time setting range from 1 min. up to 1 hour, with an installation step of 1 min.
The program does not support the Delayed Start and Auto Heating functions.
• Measure and prepare ingredients according to recipe. Remove the bowl and add the required amount of refined cooking oil.
• Wipe the bottom of the bowl and the heating element dry. Place the bowl in the working chamber of the appliance, make sure that the bowl is firmly in contact with the heating element.
• Leave the cover open. Connect the device to
electrical network.
• After the symbols "0000" appear on the display - set the FATTING program by double pressing the "BREAKER / GREASE" button. The indicator of the set program will flash (red) and the display will show the default cooking temperature.
• With an interval of no more than 5 seconds after the last action, set the cooking temperature using the <I> buttons or leave the default settings, after 5 seconds the display will show the default cooking time. Set the cooking time using the <I> buttons or leave the default settings.
• After 5 seconds after setting all parameters, the device automatically switches to the heating process. Immediately, as soon as the cooking program has started (the display is counting down the time), place the required food in the preheated bowl.
• When the program has run out, a beep will sound, the display will show the symbols "0000" and the device will go into standby mode. Disconnect the appliance from the power supply, then remove the bowl with the finished dish.
Attention!
In order to avoid overheating of the oil, it is not recommended to use the FRYING program for more than 30 minutes.
It is recommended to use refined, unflavored oil for frying.
FIRST COURSES (blue indication)
The program is recommended for preparing various types of broths, first courses, compotes, drinks.
There are 3 modes of operation of the device under pressure available for adjustment: "MAX" (Maximum), "STANDARD", "MIN" (Minimum). The default cooking time is 30 minutes. Cooking time setting range from 1 min to 2 h, with a setting step of 1 min. After the end of the program, the device switches to the "Auto-heating" mode. The program supports the "Delayed start" function.
• Measure and prepare ingredients according to recipe. Take out the bowl and place the food you want in it.
• Wipe the bottom of the bowl and the heating element dry. Place the bowl with food in the cooking compartment of the appliance, make sure that the bowl is in close contact with the heating element.
• Close and secure the cover. Make sure the steam release valve is in the correct vertical position. Connect the device to the mains.
• After the symbols "0000" appear on the display, set the FIRST COURSES program by pressing the FIRST COURSES / BAKING button. The indicator of the set program starts flashing (blue) and the display shows the default cooking time.
• With an interval of no more than 5 seconds after the last action, set the cooking time using the <I> buttons.
• After 5 seconds after setting the parameters, the appliance will automatically go to the heating process, the lid will be locked and the cooking program will start (countdown on the display).
• When the time of the program has expired, a beep will sound, the display will show the symbols "bb" and the device will switch to the automatic heating of the dish.
• To cancel “Auto-heating” press the “HEATING / CANCEL” button - the indicator will go out and “0000” will appear on the display.
• If the lock valve on the lid is up (in the up position) - press the steam release button to unlock the lid.
• Open the lid and unplug the appliance from the mains, then remove the bowl with the finished dish.
BAKERY (red indication)
Recommended for baking bread, biscuits, casseroles, yeast dough or puff pastry.
The default cooking time is 60 minutes. Cooking time setting range from 1 min. up to 2 hours, with an installation step of 1 min. After the end of the program, the device switches to the "Auto-heating" mode. Program
• Measure and prepare ingredients according to recipe. Take out the bowl and place the food you want in it.
• Wipe the bottom of the bowl and the heating element dry. Place the bowl with food in the cooking compartment of the appliance, make sure that the bowl is in close contact with the heating element.
• Close and secure the cover. Make sure the steam release valve is in the correct vertical position. Connect the device to the mains.
• After the symbols "0000" appear on the display - set the BAKING program by double pressing the FIRST COURSES / BAKING button. The indicator of the set program will start flashing (red) and the display will show the default cooking time.
• With an interval of no more than 5 seconds after the last action, set the cooking time using the <I> buttons or leave the default settings.
• After 5 seconds after setting the parameters, the appliance will automatically switch to the heating process and then to the cooking program (countdown on the display).
• When the time of the program has expired, a beep will sound, the display will show the symbols "bb" and the device will switch to the automatic heating of the dish.
• To cancel “Auto-heating” press the “HEATING / CANCEL” button - the indicator will go out and “0000” will appear on the display.
• Open the lid and unplug the appliance from the mains, then remove the bowl with the finished dish.
Attention!
Be careful, before opening the lid, make sure that the blocking valve is in the down position, which means the pressure under the lid is normal and only then can the lid be opened.
To avoid overdrying and loss of taste, after making bread and other baked goods, it is recommended to immediately turn off the “Auto-heat” function with the “HEAT / CANCEL” button.
The automatic BAKING program must only be used as intended.
EXTINGUISHING (blue indication)
The program is recommended for stewing vegetables, meat, poultry, seafood, as well as multi-component dishes, works with the addition of water or other liquid.
There are 3 modes of operation of the device under pressure available for adjustment: "MAX" (Maximum), "STANDARD", "M1H" (Minimum). The default cooking time is 30 minutes. Cooking time setting range from 1 min. up to 2 hours, with an installation step of 1 min. After the end of the program, the device switches to the "Auto-heating" mode. The program supports the "Delayed start" function.
• Measure and prepare ingredients according to recipe. Take out the bowl and place the food you want in it.
• Wipe the bottom of the bowl and the heating element dry.Place the bowl with food in the cooking compartment of the appliance, make sure that the bowl is in close contact with the heating element.
• Close and secure the cover. Make sure the steam release valve is in the correct vertical position. Connect the device to the mains.
• After the symbols "0000" appear on the display - set the EXTINGUISHING program by pressing the "STEERING / STEAMER" button. The indicator of the set program starts flashing (blue) and the display shows the default cooking time.
• With an interval of no more than 5 seconds after the last action, set the cooking time using the <I> buttons.
• After 5 seconds after setting the parameters, the appliance will automatically go to the heating process, the lid will be locked and the cooking program will start (the display will count down the time).
• When the time of the program has expired, a beep will sound, the display will show the symbols "bb" and the device will switch to the automatic heating of the dish.
• To cancel “Auto-heating” press the “HEATING / CANCEL” button - the indicator will go out and “0000” will appear on the display.
• If the lock valve on the lid is up (in the up position) - press the steam release button to unlock the lid.
STEAMER (red indication)
The program is recommended for steam cooking: vegetables, fish, meat, poultry, vegetarian dishes, baby and diet meals.
There are 3 modes of operation of the device under pressure available for adjustment: "MAX" (Maximum), "STANDARD", "MIN" (Minimum). The default cooking time is 12 minutes. Cooking time setting range is from 1 min. up to 2 hours, with an installation step of 1 min. After the end of the program, the device switches to the "Auto-heating" mode. The program supports the "Delayed start" function.
• Measure and prepare ingredients according to recipe. Remove the bowl, pour 600-1000 ml of water into the bowl, place the wall-mounted steamer inside the bowl above the water, evenly distribute the required food on the top of the wall-mounted double boiler.
• Wipe the bottom of the bowl and the heating element dry. Place the bowl with food in the cooking compartment of the appliance, make sure that the bowl is in close contact with the heating element.
• Close and secure the cover. Make sure the steam release valve is in the correct vertical position. Connect the device to the mains.
• After the symbols “0000” appear on the display - set the STEAMER program by double pressing the “STEERING / STEAMER” button. The indicator of the set program starts flashing (red) and the display shows the default cooking time.
• With an interval of no more than 5 seconds after the last action, set the cooking time using the <I> buttons.
• After 5 seconds after setting the parameters, the appliance will automatically go to the heating process, the lid will be locked and the cooking program will start (the display will count down the time).
• When the time of the program has expired, a beep will sound, the display will show the symbols "bb" and the device will switch to the automatic heating of the dish.
• To cancel “Auto-heating” press the “HEATING / CANCEL” button - the indicator will go out and “0000” will appear on the display.
• If the lock valve on the lid is up (in the up position) - press the steam release button to unlock the lid.
• Open the lid and unplug the appliance from the mains, then remove the bowl with the finished dish.
blocked), yet without pressure. It should be borne in mind that when cooking in the CHEF-COOK program, if the user has set the cooking temperature up to 100 ° С - the device operates in a pressureless mode and the lid is not locked if the temperature is set above 100 ° С, and the dish is cooked with the lid closed with the addition of water / liquid or food containing moisture (vegetables,fruit, etc.) - the appliance automatically switches to pressure cooking mode, the blocking valve lifts and the lid is blocked.
The CHEF-COOK program provides 29 temperature modes. The default cooking temperature is 30 ° C. The temperature setting range is 30-170 ° С, with an installation step of 5 ° С. The default cooking time is 5 minutes. Cooking time setting range from 5 min. up to 12 hours, with an installation step - 5 min. After the end of the program, the device switches to the "Auto-heating" mode. The program supports the "Delayed start" function.
• Measure and prepare ingredients according to recipe. Take out the bowl and place the food you want in it.
• Wipe the bottom of the bowl and the heating element dry. Place the bowl with food in the cooking compartment of the appliance, make sure that the bowl is in close contact with the heating element.
• Close and secure the cover. Make sure the steam release valve is in the correct vertical position. Connect the device to the mains.
• After the symbols "0000" appear on the display - install the CHEF-COOK program by pressing the "CHEF-KUKHAR" button. The indicator of the set program starts flashing and the display shows the default cooking temperature.
CHEF
The program is multifunctional and is designed to cook almost any dish in accordance with the temperature and cooking time specified by the user. The program works as in automatic mode under pressure (cover
• With an interval of no more than 5 seconds after the last action, set the cooking temperature using the <I> buttons or leave the default settings,
• After 5 seconds the display will show the default cooking time. Set the cooking time using the <I> buttons or leave the default settings.
• 5 seconds after all parameters have been set, the appliance will automatically switch to the heating process and then to the cooking program (countdown on the display).
• When the time of the program has expired, a beep will sound, the display will show the symbols "bb" and the device will switch to the automatic heating of the dish.
• To cancel heating press the button "ПЩ1Г1В / В1ДМ1НА" - the corresponding indicator will go out and the symbols "0000" will appear on the display.
• If the lock valve on the lid is up (in the up position) - press the steam release button to unlock the lid.
Attention!
Be careful, before opening the cover, make sure that the blocking valve is down (in the down position), which means the pressure under the cover is normal and the cover can be opened.
Saute / fry food in a small amount of oil or broth is allowed only with the lid of the appliance open.
JAM (blue indication) ^
The program is recommended for making preserves, jams, marmalades, etc.
The default cooking time is 90 minutes. Cooking time setting range from 1 min. up to 4 hours, with an installation step of 1 min. The program does not support the "Auto-heating" function; after the program finishes, the device goes into standby mode. The program supports the "Delayed start" function.
• Measure and prepare ingredients according to recipe. Take out the bowl and place the food you want in it.
• Wipe the bottom of the bowl and the heating element dry. Place the bowl with food in the cooking compartment of the appliance, make sure that the bowl is in close contact with the heating element.
• Leave the cover open. Connect the device to
electrical network.
• After the symbols "0000" appear on the display - set the JAM program by pressing the "COOKING / YOGHURT" button. The indicator of the set program starts flashing (blue) and the display shows the default cooking time.
• With an interval of no more than 5 seconds after the last action, set the cooking time using the <I> buttons or leave the default settings.
• After 5 seconds after setting the parameters, the appliance will automatically switch to the heating process and then to the cooking program (countdown on the display).
YOGURT (red indication)
With the help of the YOGURT program, you can prepare various tasty and healthy yoghurts, cottage cheese, kefir and other fermented milk products at home.
The default cooking time is 6 hours. Cooking time setting range from 5 hours to 24 hours, with a setting step of 10 minutes. The program does not support the Delayed Start and Auto Heating functions.
• Measure and prepare ingredients according to recipe. Take out the bowl and place the food you want in it.
• Wipe the bottom of the bowl and the heating element dry. Place the bowl with food in the cooking compartment of the appliance, make sure that the bowl is in close contact with the heating element.
• Close and secure the cover. Make sure the steam release valve is in the correct vertical position. Connect the device to the mains.
• After the symbols "0000" appear on the display - set the YOGHURT program by double pressing the "COOKING / YOGHURT" button. The indicator of the set program starts flashing (red) and the display shows the default cooking time.
• With an interval of no more than 5 seconds after the last action, set the cooking time using the <I> buttons or leave the default settings.
• After 5 seconds after setting the parameters, the appliance will automatically switch to the heating process and then to the cooking program (countdown on the display).
• When the program has run out, an audible signal will sound, the display will show the symbols "0000" and the device will go into standby mode. Open the lid, unplug the appliance from the power supply, and then remove the bowl with the finished dish.
Attention!
When preparing yoghurts and other fermented milk products, it is not recommended to open the lid of the device until the end of the program.
To prepare yoghurts, use fresh natural yoghurt without flavors or preservatives as a starter (100 g of yogurt per 1 liter of milk) or dry bacterial starter (ingredient ratio in accordance with the manufacturer's recommendations).
If you use unpasteurized, whole (rural) milk for the preparation of dairy products, you must first boil it.
After completing the cooking process, yoghurt must be refrigerated for at least 4 hours. Prepared yogurt should be stored in the refrigerator for no more than 7 days.
RICE / CEREALS (blue indication)
The program is recommended for boiling rice, buckwheat, crumbly cereals from different types of one- or multi-component cereals, as well as for cooking pasta.
There are 3 modes of operation of the device under pressure available for adjustment: "MAX" (Maximum), "STANDARD", "MIN" (Minimum). The set default cooking time is 15 minutes. Cooking time setting range from 1 minute to 2 hours, with a setting step of 1 minute. After the end of the program, the device switches to the "Auto-heating" mode. The program supports the "Delayed start" function.
• Measure and prepare ingredients according to recipe. Take out the bowl and place the food you want in it.
• Wipe the bottom of the bowl and the heating element dry. Place the bowl with food in the cooking compartment of the appliance, make sure that the bowl is in close contact with the heating element.
• Close and secure the cover. Make sure the steam release valve is in the correct vertical position. Connect the device to the mains.
• After the symbols "0000" appear on the display - set the RICE / CEREALS program by pressing the "RICE COOL / COLD" button.The indicator of the set program starts flashing (blue) and the display shows the default cooking time.
• With an interval of no more than 5 seconds after the last action, set the cooking time using the <I> buttons.
• After 5 seconds after setting the parameters, the appliance will automatically go to the heating process, the lid will be locked and the cooking program will start (the display will count down the time).
• When the time of the program has expired, a beep will sound, the display will show the symbols "bb" and the device will switch to the automatic heating of the dish.
• To cancel the "Auto-heating" press the button "ON/OFF" - the indicator will go out and the symbols "0000" will appear on the display.
• If the lock valve on the lid is up (in the up position) - press the steam release button to unlock the lid.
• Open the lid and unplug the appliance from the mains, then remove the bowl with the finished dish.
Attention!
Before cooking rice and other cereals, it is recommended to thoroughly rinse it under running water until transparent (in a separate container).
COOLER (red indication)
The program is recommended for preparing blanks for jellied meat, jellied meat, etc.
There are 3 modes of operation of the device under pressure available for adjustment: "MAX" (Maximum), "STANDARD", "M1H" (Minimum). The default cooking time is 3 hours. Cooking time setting range from 30 minutes to 4 hours, with a setting step of 1 minute. After the end of the program, the device switches to the "Auto-heating" mode. The program supports the "Delayed start" function.
• Measure and prepare ingredients according to recipe. Take out the bowl and place the food you want in it.
• Wipe the bottom of the bowl and the heating element dry. Place the bowl with food in the cooking compartment of the appliance, make sure that the bowl is in close contact with the heating element.
• Close and secure the cover. Make sure the steam release valve is in the correct vertical position. Connect the device to the mains.
• After the symbols "0000" appear on the display - set the COLD program by double pressing the "RICE COOL / COLD" button. The indicator of the set program starts flashing (red) and the display shows the default cooking time.
• With an interval of no more than 5 seconds after the last action, set the cooking time using the <I> buttons.
• After 5 seconds after setting the parameters, the appliance will automatically go to the heating process, the lid will be locked and the cooking program will start (the display will count down the time).
• When the time of the program has expired, a beep will sound, the display will show the symbols "bb" and the device will switch to the automatic heating of the dish.
• To cancel "Auto heating" press the button "П1Д1Г1В / ВЩМ1НА" - the indicator will go out and the symbols "0000" will appear on the display.
• If the lock valve on the lid is up (in the up position) - press the steam release button to unlock the lid.
• Open the lid and unplug the appliance from the mains, then remove the bowl with the finished dish.
MILK Porridge (blue indicator)
The program is recommended for the preparation of milk porridge from all types of cereals, as well as for the preparation of milk vermicelli.
There are 3 modes of operation of the device under pressure available for adjustment: "MAX" (Maximum), "STANDARD", "M1H" (Minimum). The default cooking time is 30 minutes. Cooking time setting range from 1 min. before
2 hours, with an installation step of 1 min. After completing the program, the appliance
goes into the "Auto-heating" mode. The program supports the function
Delayed start.
• Measure and prepare ingredients according to recipe. Take out the bowl and place the food you want in it.
• Wipe the bottom of the bowl and the heating element dry.Place the bowl with food in the cooking compartment of the appliance, make sure that the bowl is in close contact with the heating element.
• Close and secure the cover. Make sure the steam release valve is in the correct vertical position. Connect the device to the mains.
• After the symbols "0000" appear on the display - set the MILK PROGRAM by pressing the button "MILK PORSE / BEANS1". The indicator of the set program starts flashing (blue) and the display shows the default cooking time.
• With an interval of no more than 5 seconds after the last action, set the cooking time using the <I> buttons.
• After 5 seconds after setting the parameters, the appliance will automatically go to the heating process, the lid will be locked and the cooking program will start (the display will count down the time).
• When the time of the program has expired, a beep will sound, the display will show the symbols "bb" and the device will switch to the automatic heating of the dish.
• To cancel the "Auto-heating" press the button "ON/OFF" - the indicator will go out and the symbols "0000" will appear on the display.
• If the lock valve on the lid is up (in the up position) - press the steam release button to unlock the lid.
• Open the lid and unplug the appliance from the mains, then remove the bowl with the finished dish.
Attention!
The quality and properties of milk and cereals, depending on the origin, variety and manufacturer, may differ, which sometimes affects the final result of the finished dish.
Recommendations for preparing milk porridge:
The DAIRY porridge program is intended for preparing porridge from pasteurized milk of low fat content. To avoid milk boiling away and get the desired result, it is recommended to do the following before cooking:
• Thoroughly rinse all whole grains (rice, buckwheat, millet, etc.) until the water is clear and clear.
• Lubricate the inside of the multicooker-pressure cooker bowl with butter before cooking.
• Observe the proportions when measuring the ingredients (according to the recipes from the recipe book included in the package). Decrease or increase the amount of ingredients only proportionally.
• When using whole milk or milk with a fat content of more than 2.5% - it is necessary to dilute the milk with drinking water in a 1: 1 ratio
BEAN (red indication)
The program is recommended for cooking peas, beans, lentils and other legumes.
There are 3 modes of operation of the device under pressure available for adjustment: "MAX" (Maximum), "STANDARD", "M1H" (Minimum). The default cooking time is 40 minutes. Cooking time setting range from 1 minute to 2 hours, with a setting step of 1 minute. After the end of the program, the device switches to the "Auto-heating" mode. The program supports the "Delayed start" function.
• Measure and prepare ingredients according to recipe. Take out the bowl and place the food you want in it.
• Wipe the bottom of the bowl and the heating element dry. Place the bowl with food in the cooking compartment of the appliance, make sure that the bowl is in close contact with the heating element.
• Close and secure the cover. Make sure the steam release valve is in the correct vertical position. Connect the device to the mains.
• After the symbols “0000” appear on the display - set the BEAN program by double pressing the “MILK PORSE / BEAN1” button. The indicator of the set program starts flashing (red) and the display shows the default cooking time.
• With an interval of no more than 5 seconds after the last action, set the cooking time using the <I> buttons.
• After 5 seconds after setting the parameters, the appliance will automatically go to the heating process, the lid will be locked and the cooking program will start (the display will count down the time).
• When the time of the program has expired, a beep will sound, the display will show the symbols "bb" and the device will switch to the automatic heating of the dish.
• If the lock valve on the lid is up (in the up position) - press the steam release button to unlock the lid.
• Open the lid and unplug the appliance from the mains, then remove the bowl with the finished dish.
Attention!
Before cooking, peas and other legumes are recommended to be thoroughly rinsed under running water until transparent and soaked in a separate container for at least 3 hours.
EXPRESS
The EXPRESS program is a universal cooking program in automatic mode under pressure (the appliance lid is locked) with a quick start of the cooking program after setting the parameters. The program is recommended for daily preparation of traditional dishes (porridge, first courses, steamed dishes, legumes, etc.), as well as for quickly heating (boiling) first courses from the refrigerator. You can also use the EXPRESS program if you need to quickly bring a dish to readiness using a pressure program or to sterilize dishes (using Autoclave water or steam).
There are 3 modes of operation of the device under pressure available for adjustment: "MAX" (Maximum), "STANDARD", "M1H" (Minimum). The default cooking time is 2 minutes. Cooking time setting range is from 1 min. up to 2 hours, with an installation step of 1 min. After the end of the program, the device switches to the "Auto-heating" mode. The program does not support the Delayed Start function.
• Measure and prepare ingredients according to recipe. Take out the bowl and place the necessary food in it (for steam cooking, pour 600-1000 ml of water into the bowl, place the hinged steamer inside the bowl above the water, distribute the required food evenly on top of the hinged steamer).
• Wipe the bottom of the bowl and the heating element dry. Place the bowl with food in the cooking compartment of the appliance, make sure that the bowl is in close contact with the heating element.
• Close and secure the cover. Make sure the steam release valve is in the correct vertical position. Connect the device to the mains.
After the symbols "0000" appear on the display, install the EXPRESS program by pressing the "EXPRESS" button. The indicator of the set program starts flashing and the display shows the default cooking time. With an interval of no more than 5 seconds after the last action, set the cooking time using the <I> buttons.
• After 5 seconds after setting the parameters, the appliance switches to the heating process, the lid is locked and the program starts.
cooking (countdown on the display).
• When the time of the program has expired, a beep will sound, the display will show the symbols "bb" and the device will switch to the automatic heating of the dish.
• To cancel "Auto heating" press the button "П1Д1Г1В / ВЩМ1НА" - the indicator will go out and the symbols "0000" will appear on the display.
• If the lock valve on the lid is up (in the up position) - press the steam release button to unlock the lid.
• Open the lid and unplug the appliance from the mains, then remove the bowl with the finished dish.
Attention!
Do not use the EXPRESS program for cooking without adding water or other liquid with a volume of less than 2 measuring cups.
DESCRIPTION OF ADDITIONAL FEATURES
• Sterilization of dishes: In the DEX multicooker-pressure cooker, you can create both steam and water (medical) sterilization methods, which are quite fast, simple and effective. For feeding bottles, etc.for dishes and large objects, the water method is recommended (according to the autoclave principle):
1) Remove the bowl. Fill the feeding bottles with water, seal the lids and place in the bowl. Fill a bowl with water up to the neck of the bottles. Be careful - the water level should not exceed the maximum mark on the inner surface of the bowl. Place the bowl in the working chamber of the appliance, make sure that it is firmly in contact with the heating element.
2) Close the cover and fix. Make sure the steam release valve is installed in the correct vertical position. Connect the device to the mains.
3) In standby mode, by pressing the EXPRESS button, select the EXPRESS program. After the program indicator starts blinking, press the <I> buttons on the control panel to set the required sterilization time. After 5 seconds after setting the parameters, the device will automatically go to the heating process, the lid is locked and the process of executing the set program will begin (the display shows a countdown).
4) At the end of the program run time, the device will switch to automatic heating mode. To cancel "Auto heating" press the button "П1Д1Г1В / В1ДМ1НА".
5) If the lock valve on the lid is up (in the up position) - press the steam release button to unlock the lid. Open the cover, disconnect the device from the mains. Remove the bottles from the bowl and leave closed. In this form, they will be sterile for up to 12 hours. If necessary, pour out the water from the bottles and use them immediately, as directed.
Attention!
Before starting the sterilization process, make sure that the products for sterilization (dishes / other items) can withstand hot steam and high temperatures, and their sterilization is allowed by the manufacturer's recommendations.
|