|
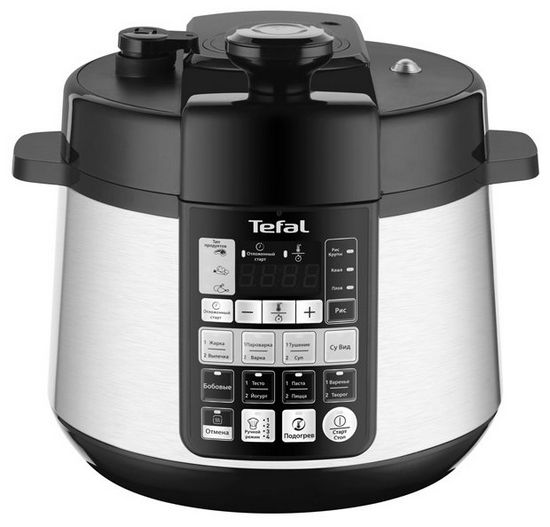
Technical characteristics of the multicooker Tefal CY621D32
2 year warranty
PRC country
Multi-cooker-pressure cooker
32 automatic modes
Spherical bowl - furnace effect
Security: 9 levels of protection
Manual mode with and without pressure
Bowl
Bowl volume 4.8 l
Bowl coating non-stick
Washing in a dishwasher. car Yes
Heating type 3D
Electronic control type
Number of automatic programs 32
Pressure Cooking Yes
Steam cooking Yes
Rice Mode Yes
Beans Mode Yes
Porridge Mode Yes
Cooking mode Yes
Soup Mode Yes
Pilaf mode Yes
Paste Mode Yes
Pizza Mode Yes
Frying mode Yes
Extinguishing mode Yes
Baking mode Yes
Curd mode Yes
Yogurt Mode Yes
Jam mode Yes
Auth. maintaining the pace. heating Yes
Keep warm Yes
Delayed start up to 24 hours
Display type graphic
Ind. cooking time Yes
Operating mode indication Yes
Case material metal / plastic
Power consumption 1000 W
Powered by 220 V Yes
Detachable Power Cord Yes
Flat Spoon Yes
Lattice for couples. processing Yes
Color black / silver
Weight 5 kg
Service information
Base color black
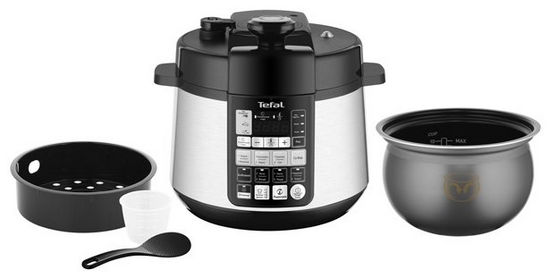
The device of the multicooker-pressure cooker Tefal CY621D32
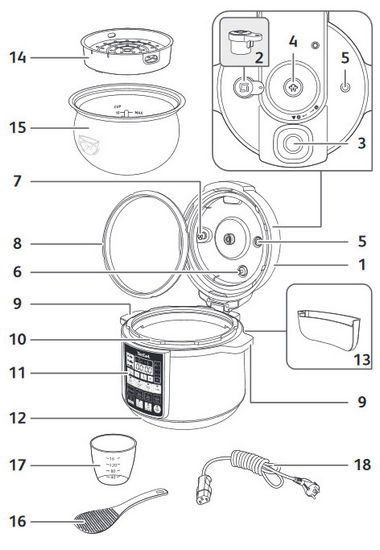
- Cap
- Pressure limiting valve
- Cover handle
- Condensate pressure relief button
- Spring loaded valve
- Float valve
- Pressure relief valve cover
- Sealing gasket
- Carrying handle
- Outer bowl
- Control Panel
- Base
- Collection container
- Steam basket
- Removable bowl
- The spoon
- Beaker
- Power cable
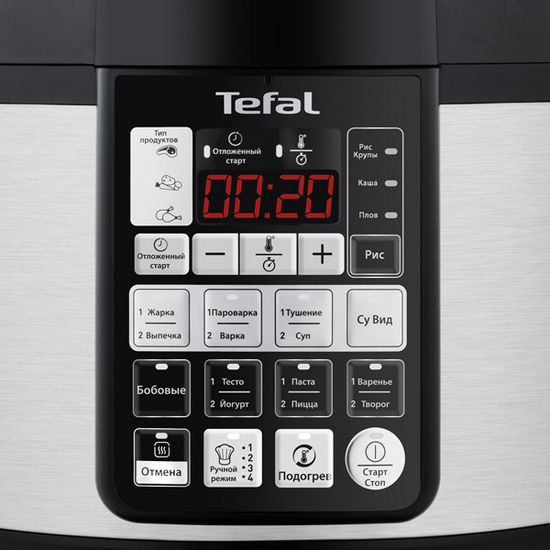
Tefal multicooker-pressure cooker control panel CY621D32
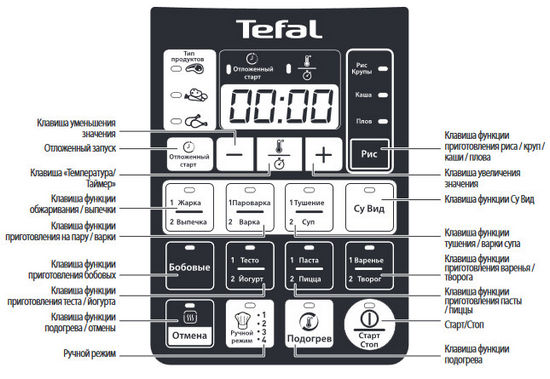
1. 17 main functions: "Delayed start", "-", "Temperature / Timer", "Frying / Baking", "Steamer / Boiling", "Legumes", "Dough", "Yoghurt", "Warm up / Cancel" , "Manual mode", "Start / Stop", "Reheat", "Jam / Cottage cheese", "Stew / Soup", "Rice / Cereals", "Porridge", "Pilaf", "+/-". A beep sounds when a key is pressed.
2. 36 types of cooking are available, including 4 individual modes.
3. In the modes "Baking", "Steamer", "Stewing", "Soup", "Frying", "Cooking", "Su Vid", you can select the type of food: "Vegetables, chicken, meat".
Tefal CY621D32 multicooker-pressure cooker manual
BEFORE FIRST USE
Remove the packaging and open the lid
- Remove the device from the packaging and place it on a flat surface. Save the warranty card and do not forget to read the operating instructions before using the device for the first time.
- To open the lid, grasp the lid handle, turn it counterclockwise and lift the lid - 1-2.
- Remove all packing material from the device: plastic bags, accessories (steam basket, rice spoon, measuring cup, condensation container), bowl and fork. - 3
- If the device has a promotional sticker, remove it before first use.
Cleaning
- Remove the cover from the device before cleaning. Unscrew the middle cover screw and push the small tab to separate the parts —4.
- Rinse the bowl, lid (including valves) with clean water and wipe the device with a damp cloth. Only accessories 5 and 6 can be washed in the dishwasher. Make sure all parts are completely dry before using the appliance.
USER MANUAL
Replace the condensate collection container - 7.
Unwind the power cord, connect it first to the device and then to a grounded outlet - 8.
Take out the bowl and place the ingredients in it
- Take out the bowl.
- Place the ingredients in the bowl.
- Make sure not to exceed the maximum level mark inside the bowl - 9.
Place the bowl in the device
- Wipe the outside of the bottom of the bowl and remove any food debris from the heating plate. Place the bowl in the device - 10.
- Do not use the device without a bowl installed.
Close and lock the cover
- Make sure the gasket is firmly seated in its base.
- Close the lid and turn the lid knob clockwise - 11-12.
- When the device is turned on, a beep sounds when the cover is locked or unlocked.
Install a pressure limiting valve
- Place the pressure relief valve in the desired location and insert until you hear a click. The valve should point downward. Valve mounting may be slightly loose - 13.
DEVICE FUNCTIONS
Power-on self-diagnosis (standby)
After connecting to the power source, the system starts self-diagnosis, a long beep sounds, the digital screen turns on, all indicators light up. After 1 second, the screen will display: the device is in standby mode.
Working hours
In standby mode, you can select one of the following cooking functions: "Roast / Bake", "Steamer / Boil", "Legumes", "Dough", "Yogurt", "Manual", "Rice / Cereals", "Porridge", "Pilaf", "Stew / Soup", "Sous Vid", "Pizza / Pasta", "Jam / Cottage Cheese", "Heating", "Heating". If a key has more than one function, press it once for the first function, twice for the second and three times for the third. - 14.
In the modes "Baking", "Steamer", "Stewing", "Soup", "Baking", "Cooking", "Su Vid", you can select the required type of food by pressing the □ or button, after which the corresponding indicator --15 will light up. If there is no selection, the type "Meat" is automatically selected.
When the required function and product type have been selected, the corresponding function indicator and the product type indicator light up. If you do not need to select other settings for the function, press the "Start" button to go to the cooking mode of the corresponding function. The corresponding function indicator will stop flashing and remain lit. If there is no confirmation, the device will return to standby after one minute.
Rice / Pilaf
Place the required amount of rice in the bowl using the supplied measuring cup (17). Fill the bowl with cold water up to the appropriate "CUP" mark on the bowl.
Note. Always add rice first, otherwise there will be too much water.
Recommendations for cooking different types of rice are given in the table below. For best results, it is recommended to use regular rice rather than instant rice, otherwise the rice will be stickier and may stick to the bottom. For other types of rice, such as brown or wild, the amount of water may vary.
- If you want to make 1 cup of white rice (for 2 small or 1 large serving), use 1 measuring cup of white rice and then add one and a half measuring cups of water. When cooking 1 cup of rice, some types of rice may stick to the bottom.
- If you want to cook 2 cups of white rice (for 4 small or 3 large servings), use 2 measuring cups of white rice and then add two measuring cups of water.
- The maximum amount of water with rice should not exceed the highest mark inside the bowl. The amount of water indicated may differ depending on the type of rice.
Yoghurt making function
Milk
Yoghurts according to all our recipes (except for separately indicated cases) are prepared using cow's milk. You can use plant-based milk, such as soy milk, as well as sheep or goat milk, but in this case the density of the yogurt will vary depending on the milk used.Unpasteurized milk or milk with a long shelf life, as well as all types of milk described above, are suitable for use in this appliance.
Choose whole milk, preferably UHT milk with a long shelf life. Unpasteurized (raw) milk and pasteurized milk should be boiled and then cooled and the skin removed.
- Sterilized milk with a long shelf life. UHT whole milk will make a thick yogurt. Skim milk will make the yogurt thinner. However, you can use skim milk and add one or two cans of milk powder.
- Pasteurized milk. Promotes a thicker yoghurt with a light film on top.
- Raw milk (farm). Such milk must be boiled before use. It is recommended to boil it for a long time. Using such milk without first boiling it can be dangerous. After boiling, let it cool down before using it in the device. Yoghurts prepared with raw milk are not recommended to be used as an enzyme for further yoghurt production.
- Milk powder: Using milk powder will make the yoghurt thicker. Follow the instructions on the milk manufacturer's packaging.
Enzymes
After boiling milk, wait until it cools down to room temperature before adding enzymes. Too high a temperature can destroy the properties of the enzymes.
As enzymes can be used:
- Store-bought natural yoghurt with the longest remaining shelf life: this way it will contain more active enzymes and the resulting yoghurt will be thicker.
- Freeze-dried enzyme. In this case, follow the instructions on the enzyme (yeast) packaging. Enzymes can be found in supermarkets, pharmacies, and health food stores.
- One of the freshly prepared yoghurts - it should be natural and freshly prepared. This is called cultivation. After five cultivation cycles, the yoghurt used loses active enzymes and therefore may cause a less dense consistency in the resulting yoghurt. In this case, you will need to start over with store-bought yogurt or freeze-dried enzyme.
Fermentation time
For fermentation, depending on the base ingredients used and the desired result, yoghurt will take from 6 to 12 hours.
Yoghurts can be stored in the refrigerator for up to 7 days.
Frying function
It is recommended to first pour in the oil and then add the ingredients, or place the oil and ingredients in the bowl at the same time.
It is not recommended to fry for more than 30 minutes to avoid overheating the oil.
Manual mode
- Thanks to this function, the user has freedom of choice regarding setting the cooking time and temperature, as well as the position of the lid.
- Remember that for pressure cooking, there must be liquid in the bowl and the temperature must be above the normal boiling point (100 to 120 degrees). In order for the cooking to proceed under pressure, the lid must be closed and locked. If the lid is left open or just closed but not turned, then cooking will proceed without pressure (as in a conventional multicooker).
- The last 4 cooking modes can be stored in the device memory. When using the function for the first time, the memory is empty and the device suggests a default time and temperature. You can also select an existing program and change its parameters.
Cooking under pressure.
- A multicooker-pressure cooker is an electric saucepan with a hermetically sealed lid and a special valve, and food is cooked in it under pressure, which significantly saves cooking time and makes hard foods soft (beef, tongue, jellied meat, legumes, peas, etc.).
- Pressure programs: steamer, cooking, stewing, soup, rice / cereals, pilaf, legumes, pasta (first part), porridge.
- The manual mode in this model can work both with pressure (when the lid is locked and the temperature reaches 100 ° C) or without (the lid can be opened or closed, but not locked).
- After selecting a program, the multicooker begins to gain pressure, and the time required for this depends on the amount of food and liquid in the bowl. The cover must always be closed and locked when doing this. When the appliance is hermetically sealed, the liquid inside is converted into steam as the temperature rises (which is why, when cooking with pressure, there must always be liquid in the bowl). Once the required pressure is reached, the locking system is activated and the lid cannot be opened, so all ingredients must be added at the beginning of cooking.
- When the pressure level required for cooking is reached, the device automatically switches to the cooking process and the set time counts down. Also, some liquid may escape from the pressure limiting valve during cooking.
- At the end of the pressure cooking process, the appliance switches to preheating mode. The symbol "b" will light up on the screen. To relieve pressure, follow the instructions in step 8: Opening the cover.
- During the initial operation of the pressure cooker, a small amount of steam may escape from under the lid. This is normal and occurs when pressure builds up. Also, during cooking, a small amount of steam may escape from the pressure limiting valve. It is normal to generate little steam during cooking as this valve acts as a safety valve.
Cooking and Heating Mode: Only the Heat / Cancel and Start / Stop buttons work, other functions are not available.
Heating mode When the automatic program counts down to 0, a beep sounds and the appliance switches to heating mode (except for the cooking functions, Pasta, Cottage cheese, Sous Vid, dough / yoghurt, frying and manual mode), the digital display shows “ B ”, and the indicator above the heating function key lights up.
After 24 hours, this function is automatically disabled and the device enters standby mode.
If you want to cancel automatic heating, this must be done before selecting a cooking program. The function can be canceled from any menu by long pressing the heating function key, after which a beep will sound and the corresponding indicator will light up and go out. You can also re-enable this function by long pressing the key, after which two beeps will sound, and the corresponding indicator will turn on and off. Remember that after the current cooking program has ended, the new automatic heating function will be activated when starting. Pressing the Heat / Cancel key in standby mode starts the heating function, the display shows, and the indicator lights up.
Time setting
- If you select the function before the start of the cooking process, you can change the cooking time: press the "Temperature / Timer" button once, then use the buttons] and set the required value. —16-17.
- When setting the time, the corresponding indicators light up.
Temperature setting
When using Manual mode and the frying function, press the Temp / Timer key twice, then use the O and keys to set the temperature. After the installation is complete, press the start key. -18
Setting delayed start
- When selecting a function, before starting the cooking process, you can press the delayed start button to set the switch-on delay time, and then use the □ and buttons to adjust the required time - 19-20. After the delayed start function has been activated, the corresponding indicator will light up. After the start of the cooking process, the indicator will go out.
- The delayed start time adjustment range is from 2 to 24 hours, the setting step is 10 minutes. When ready, press the start key —21.
- The Delayed Start function is not available for the Frying, Sous Vid, Dough, Yogurt, Curd, Pasta, and Manual programs. When you try to press the delayed start key in these modes, you will hear a double beep.
- Delayed start time does not include cooking time.
- In standby mode, a long press on the delayed start key turns off the sound of the device, another long press turns on the sound again.
- Start / Stop function for different modes
1. After entering all the required parameters, a short press on the button starts the selected cooking program. When the appliance enters the preheat mode, the display shows the symbol "c ;; h" (except for the programs "Baking", "Frying" and "Do it yourself", for which the time countdown starts immediately after pressing the start button) - 18. When the required temperature for cooking is reached, the device automatically switches to the cooking process and the preset time counts down.
In cooking mode, you can interrupt the cooking process by pressing again briefly to return the appliance to standby mode.
A short sound signal notifies about the start, and a long one - about the termination of work.
2. You can also stop the cooking process by briefly pressing the cancel button.
3. If the device is in standby mode, a long press on the "Start / Stop" button will completely turn off the device, in which the indicators and display go out. If the device is off, a short press on the key puts the device into standby mode.
Heating function
- The heating time can be adjusted using the □ and keys, then press the start key.
- The corresponding indicator comes on, the appliance enters the preheat mode and the digital display shows "c :: h". The countdown starts when the preheating temperature is reached.
Opening the cover
- Press the pressure relief button - 22. When steam escapes, keep your hands away from the pressure limiting valve.
- To open the lid, grasp the handle of the lid, turn it counterclockwise and lift the lid - 23 - 24. Carefully open the lid as the steam escaping from under it can be very hot.
- Unplug the power cord - 25.
CLEANING AND MAINTENANCE
It is recommended to clean the device after each use. Allow the device to cool down for at least 2 - 26 hours before cleaning.
Do not immerse the device in water or pour water into it, do not place the device, bowl and lid in the dishwasher - 27-28.
The accessories are dishwasher safe. - 29. Remove the bowl from the device, rinse it and wipe it dry thoroughly. Do not use a metal sponge to avoid damaging the non-stick coating - 30.
Remove the condensation container, rinse thoroughly with water and dry. - 31.
Remove pressure relief valve, rinse with water and dry - 32.
To clean the cover, detach it from the device and clean all of its components. First unscrew the middle cover screw and press the tab in the center to remove the cover - 33. - Separate the gasket from the cover. Holding the cover by the handle, pull the gasket up - 34.
- The float valve should be removed by removing the small silicone gasket and turning the cap - 35.
- The cover of the duct should be unscrewed for cleaning, and the duct itself should be regularly inspected for blockages - 36. - Press the inner part of the safety spring valve to check for blockages - 37.
- Then you can rinse the inside of the lid. Make sure that the cleaned components are completely dry before reinstalling.
Clean the case with a damp cloth and place the bowl inside the device - 38.Replace the cover - 39.
Use only the supplied bowl.
Do not pour water or put food directly into the device. If you accidentally submerge the device in water or spill water on the heating element (when the bowl was not in place), take the device to an authorized service center for repair.
Replace the gasket every 2 years.
|


