Admin
Fully

I am haunted by the topic of attempts and failures, I would like to dwell on it in more detail and try to consider the most common difficulties that novice bakers face. The topic is very extensive, but if we briefly talk about each problem, I think it will be interesting and useful for everyone who started and encountered. Today our topic is the appearance of bread, especially the crust and everything that can happen to it.

Bread crust - common difficulties

Let me remind you that the bread turns out to be ugly, low, torn, flat, rough, burnt, etc. for several reasons: due to low-quality raw materials (that is, flour and, for example, butter), unhealthy or unripe sourdough, and due to a violation of technology, when, on purpose or involuntarily, we deviate from the recipe. I know from myself that sometimes it is not easy to complete the recipe inside and out, without making any deviations and without making amendments, it is oh, how difficult it is, hands are itching to pour a spoon or two of flour or add water or add butter or milk. I still often sin with this: I didn’t use honey in Lithuanian custard and reduced sugar, in another one, on the contrary, I added a spoonful of honey. On the one hand, this is creativity and realization, but, on the other, excessive liberties can lead to an unpredictable result. Paradoxically, blindly following the recipe can also turn into tasteless bread.

For example, 
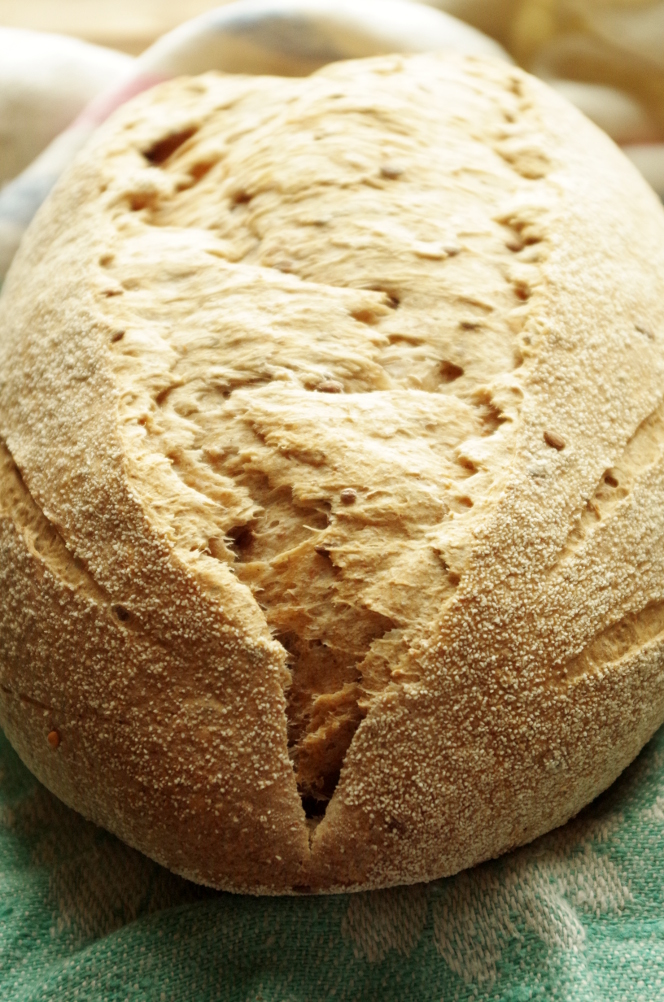
the most common problem with bread is crust breaks.

Bread crust - common difficulties

They are different and for different reasons, but the most “popular” is under-proofing. Despite the fact that almost every (any) recipe usually gives general recommendations regarding the time and temperature of fermentation / proofing / baking, we still have different conditions: everyone at home has different temperatures and humidity, different flours and, in the end, leaven, and it all affects how we work with the dough and how the bread is made. Recommendations are good and important, but if, for example, the proofing hour is indicated in the recipe, and your workpiece has not yet started to move, do not rush. Check if there are strong drafts, taste the dough (lick), if it is sour, if there is overheating or, on the contrary, excessive coolness, if the workpiece was well covered during fermentation. All of this can affect both the proofing process and the appearance of the dough and, accordingly, your assessment of the degree of proofing. I have already described ten times how this is done, but again, it will not be superfluous: in order to understand whether it is time to send the bread to the oven, gently press on the workpiece with your finger and see how quickly the groove is aligned. If the dough is elastic and quickly leveled out, the proofing is not over yet, if it is fluffy, moderately elastic, while pressing, internal air bubbles are felt, and the groove is not leveled out so quickly, then it's time to make cuts and send the bread to the oven.
During proofing, it is important to carefully cover the shaped piece with a bag or bath cap so that a crust does not form on the dough. Because of it, it is difficult to understand whether the dough has moved away, or has already stood, this can be judged only after baking

Another problem with the crust is when it is flat or opal, most often the reason is the stagnant dough, when the yeast has already done all its work, and the gluten has become sluggish and weakened.

Bread crust - common difficulties

Overstocking dough is easy to recognize: when you press on it with your finger, the dough practically does not resist and the dent does not even out.When laid out on a shovel, it may even settle a little and deflate, therefore, it is better not to make cuts on a stagnant workpiece, even if they are provided according to the recipe, this can lead to the top of the bread falling off. During baking, such bread does not increase in volume and does not become more fluffy, it remains the same as before baking, or settles slightly (or strongly). I have had this with bread more than once, I still baked. The bread, of course, turned out to be not so tasty, and often sour, so it was sent for crackers or feed for pigeons.
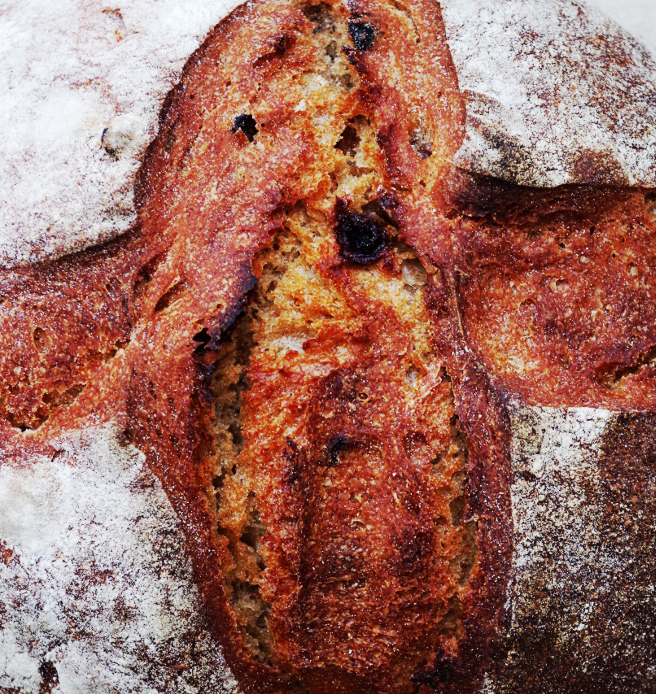
In the case of standing dough, it is also important that no windy crust forms on it during proving. If the top of the bread dries up during the proofing, it will not settle, but at the same time the crumb may settle under this crust, and then you will get such a copy, which I recently showed in this material. The settled crumb becomes dense, a strong temper is formed, the upper crust burns, the result is that the bread is completely inedible.
So that the next time the dough does not stand, reduce the proofing, pay attention to the room temperature, if it is above 30 degrees, then you should try to find a cooler place for fermentation and proofing of the dough. This place may well be a refrigerator, but then the proofing time will increase to 6-8 hours.

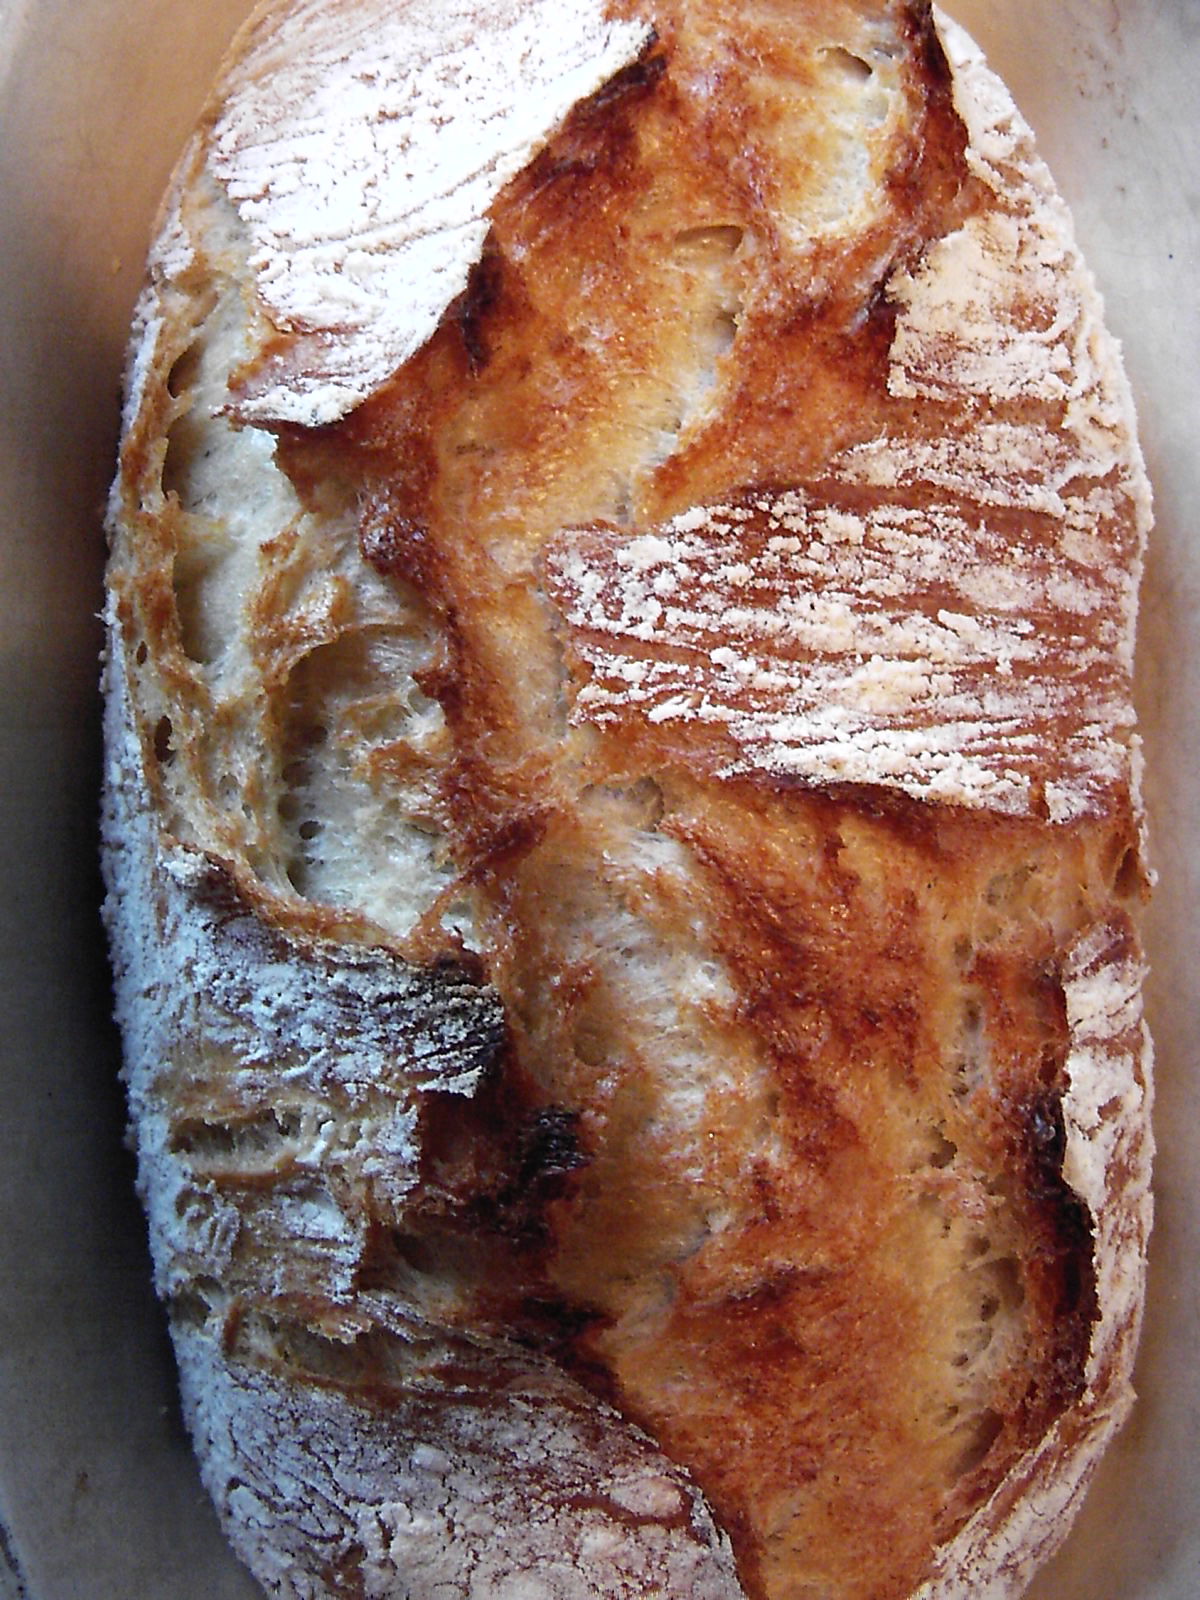
Gray coarse crust and crust breaks... Another reason why ugly crust explosions can occur on bread, and the crust itself can be pale, “gray” and rough is the lack of steam humidification.

Bread crust - common difficulties

Wheat bread baked without moisture in the first stage of baking has an ugly rough shape, often uneven, pale rind and torn cuts. The inside of the bread can be completely normal, with good crumb, but at the same time be, frankly, not handsome. It doesn't matter whether you wait for the full proofing, whether you have experienced this delicate moment - the feeling of bubbles under your finger, bread without steam will still come out of the oven with a torn whitish thick crust.
Way out - oven with steam: put a bowl of boiling water on the bottom of the oven or place a wet towel on a baking sheet, or put a layer of pebbles or pumice stone in a metal baking dish and sprinkle with water, or throw ice cubes on a hot baking sheet, or sprinkle water from a spray on the walls hot oven, or oven under the hood. There can be a lot of options, the main thing is that it works. In problematic perfumes, in which the bottom of the bread always burns, and the top remains pale, I advise you to use a cap - cover the bread in the first 15 minutes of baking with a metal, ceramic or other heat-resistant bowl or dish, or bake in a cauldron, roaster or in such a special set. You can read more about how the steam and the hood "work" in this article.

The bottom is burnt and the top is pale.

Bread crust - common difficulties

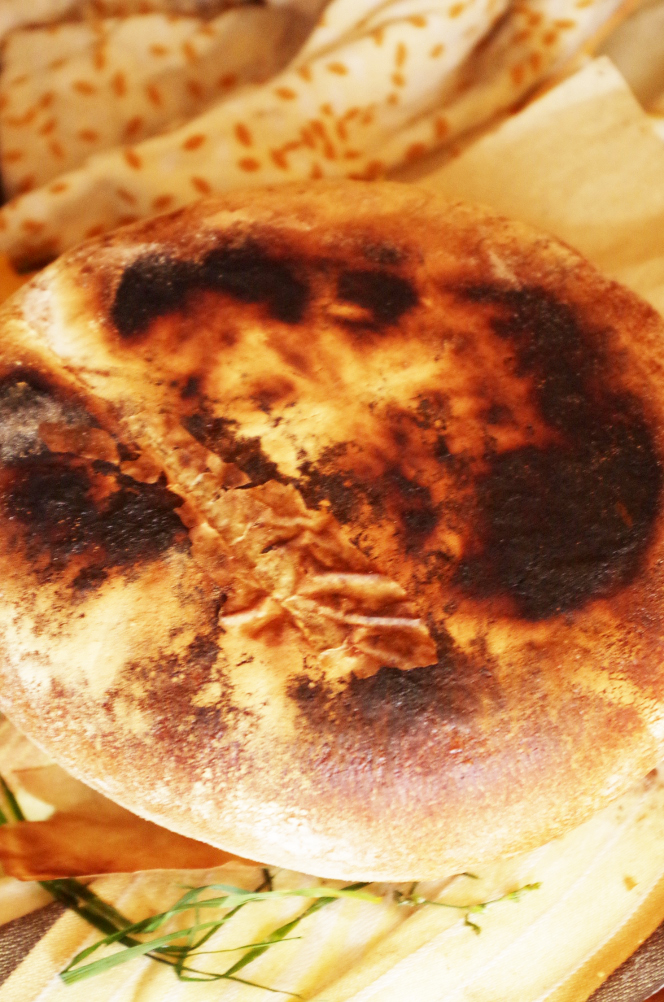
I just mentioned this problem, which mainly concerns gas ovens, and, moreover, regardless of the age of production and manufacturer. The top of the bread remains pale due to the oven not holding the heat and therefore the steam at the start of baking. With the door closed, the oven should be sufficiently airtight in those places through which hot air can escape, but most often it just "passes", so there is enough heat to fry the bottom of the bread, but not brown the top. Whether it is possible to do something with these places through which the temperature goes away, I do not know, but you can try to "tame" a capricious oven, leveling its shortcomings. The first thing that will help in such a situation is a baking stone. As it heats up, it accumulates heat, thereby leveling out uneven heating, and at the same time it gives enough heat, not allowing the bread to burn while it tries to brown. The second is the long heating of the oven. When it is all very hot, the bread in it is more likely to brown and bake faster and better. In addition, baking stone or cast iron needs at least 40 minutes to warm up well, I turn on my oven generally an hour before baking. The third is moisturizing at the beginning of baking, which I mentioned above.The presence of steam helps the starch and sugars of the crust to caramelize, which makes the bread redden even with low-quality heating.

The crust is fried and the bottom is pale.

Bread crust - common difficulties

But this problem is often found in electric ovens. No sooner had the bottom been baked, than the crust was already brown so that by the end of the baking it would clearly burn. In general, such "symptoms" also speak of uneven heating, only here the top heats up more than the bottom Sometimes such a problem can be with normal ovens if the stone is not hot enough .. This can be dealt with by similar methods as in the previous problem: place a stone on the grate and warm it up well. If the top still fries faster, you can cover it with foil.
At one time I had to bake in a microwave oven in convection mode, there the heating was on the side (convection) and on top (grill), and my bread consistently had a pale bottom crust, the bottom crust was bursting in diameter (due to the cold baking sheet I served as a lattice wrapped in foil), and the top turned out to be almost black and thick. In such “wild” conditions for bread, lowering the baking temperature worked well for me. I did not preheat the microwave to the maximum (250 degrees), but started baking at 200-220 degrees.

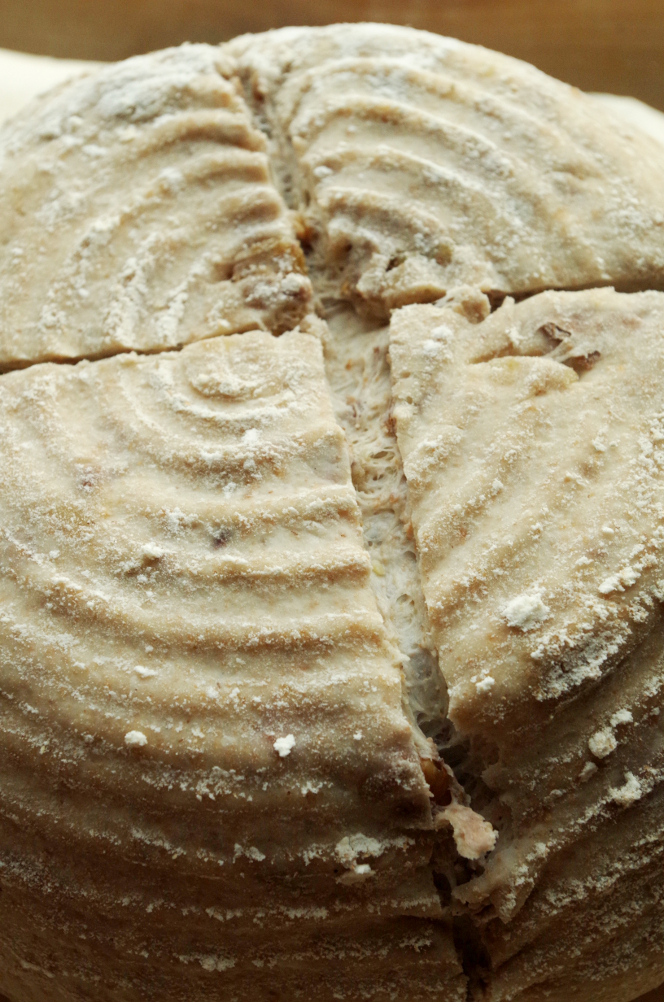
The crust is smooth, sometimes glossy, cuts are poorly visible.

Bread crust - common difficulties

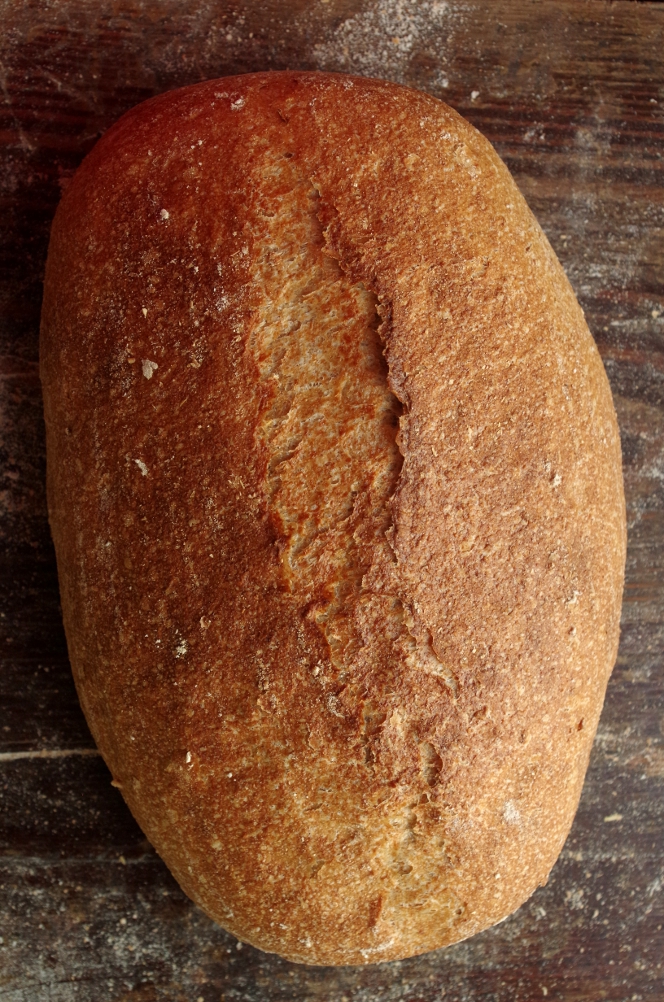
Such a picture is called the funny word "steam" - this is when there is too much steam. Most often this happens with those who bake bread under a hood and are late with taking out the hood by 3-5 minutes. With this method of baking, a couple of minutes is enough for the crust of bread to shine and "float", therefore, when baking under the hood, you need to be on the lookout. The next time you get beautiful spiky grooves along the cuts, remove the cap a couple of minutes earlier. And one more secret of beautiful cuts: before making a cut, let the dough stand for a few minutes, literally 5-10, and dry out a little.
By the way, if you start baking bread in a cold roaster, you will get dense bread and a hard shiny crust, which is also nothing good.
It happens that a glossy smooth crust without cuts is obtained, despite the fact that the cap was taken out on time and everything seemed to be done correctly. The problem here lies not in the excess of steam, but in the leaven, unable to raise the dough. Usually, such bread is coarse and hard, with a dense, poorly loosened crumb, it practically does not grow in the oven. It is necessary to correct this problem radically: depending on the initial data, change the feeding scheme, humidity and ripening temperature of the starter culture.

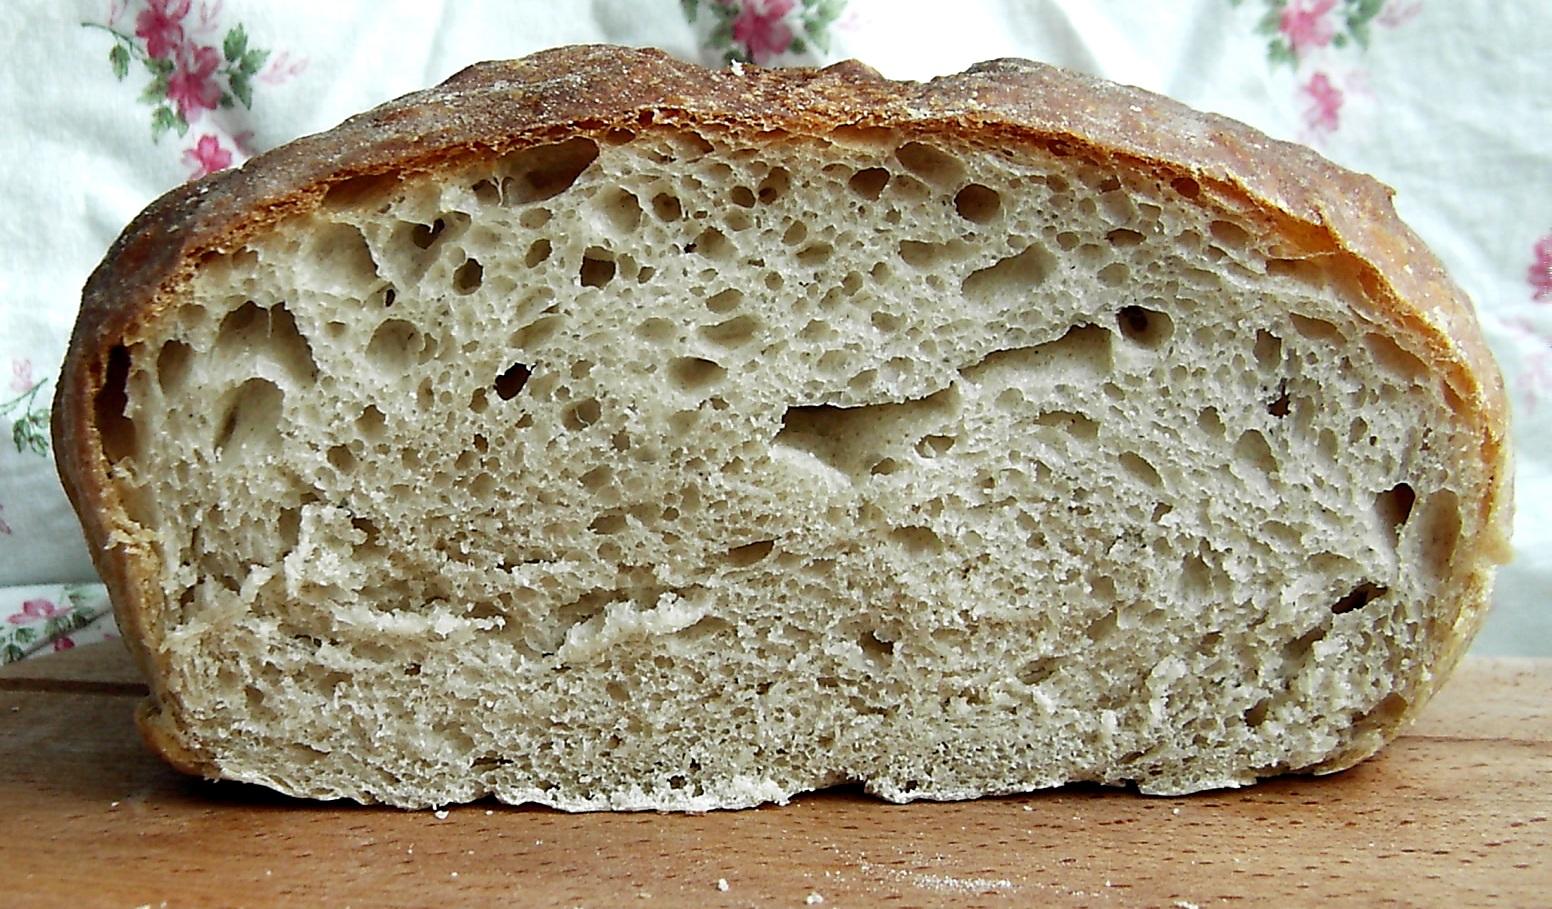
The bread blurred, the cut parted.

Bread crust - common difficulties

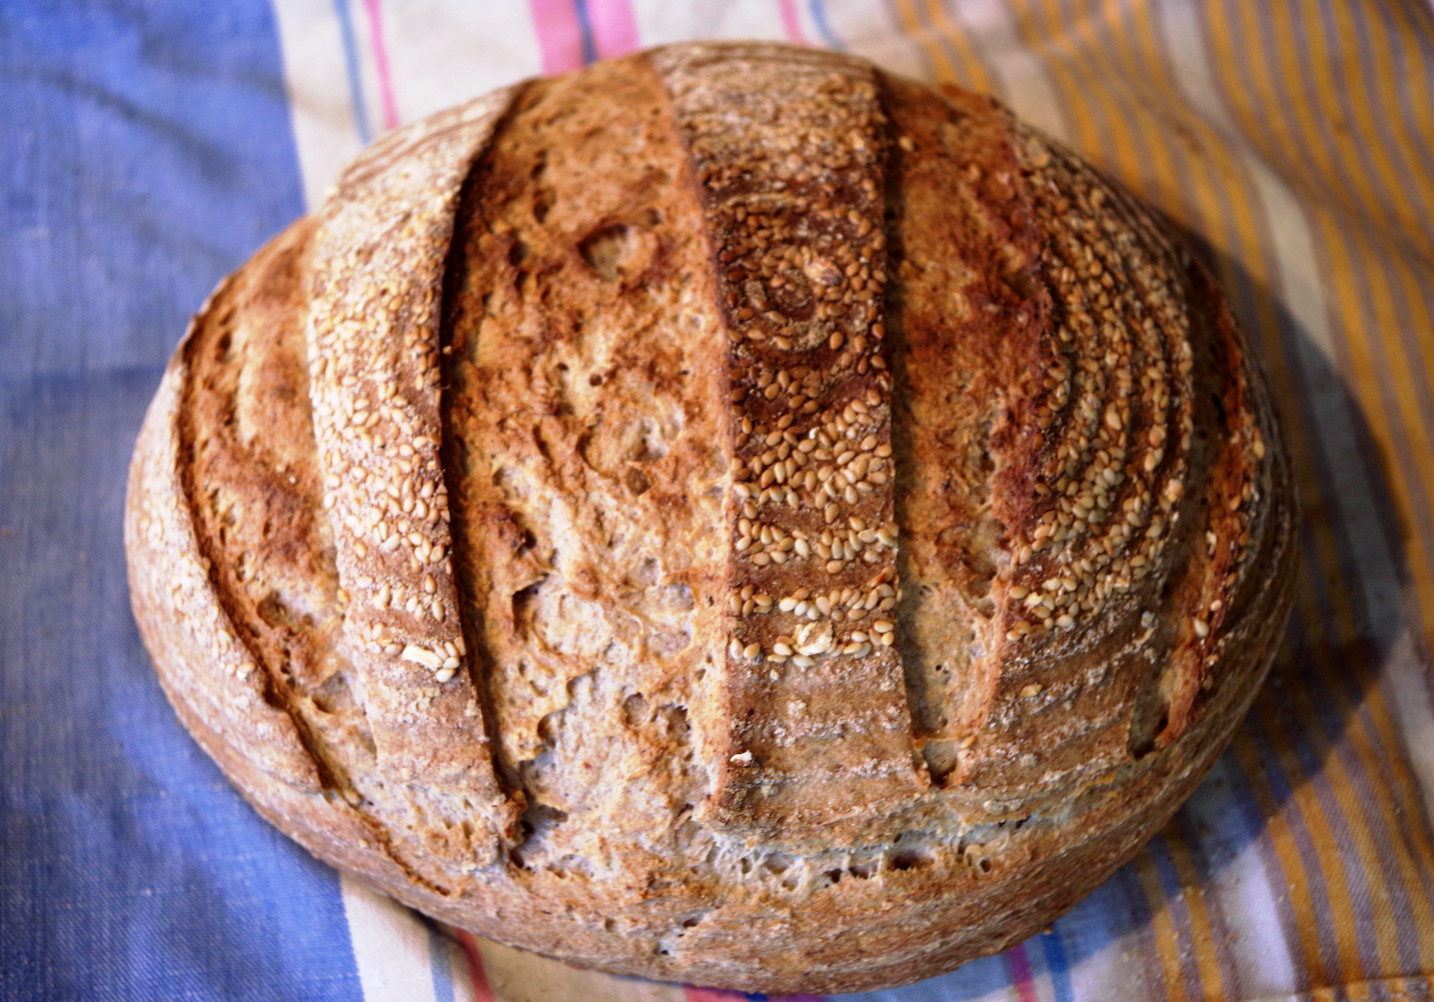
It would seem: the dough was kneaded until smooth, it rose during fermentation and proofing, while the bread floated in the oven. There can be several reasons: for example, excess moisture or incorrect kneading of wet dough. If there is a large amount of moisture in the dough, it is not necessary to add water during mixing immediately, but leaving 50-100 gr. to add gradually as you knead. In addition, it is known that American or Canadian flour takes much more water than ours, and the gluten in the flour there is stronger, so our bakers are advised to cut the amount of water in American and Canadian recipes by 10%. In addition, cuts are rarely made on bread made from wet dough, for example, all sorts of chabatts are never scored, and if you, without thinking, cut a piece of wet dough, it may well creep in the oven.
If the dough is not thin, but of medium consistency, then the reason for the flat bread may be poor molding or a poorly preheated oven. With a weak molding, the dough does not hold its shape well and easily spreads to the sides, and if the oven is also poorly heated, then flat bread is provided. Round or oval bread must be shaped so that the result is a dense piece with a well-stretched dough surface, but without breaks. By the way, if the gluten of the dough during kneading was well developed, the dough should not tear.During molding, in order to get a tightly formed blank, it is not at all necessary to crumple it and squeeze out all the bubbles, it is enough to twist the dough tightly and let it sit in special baskets.
The workpiece can also blur if the dough has stood still, I wrote about this above.

Cracks in the crust after cooling.

Bread crust - common difficulties

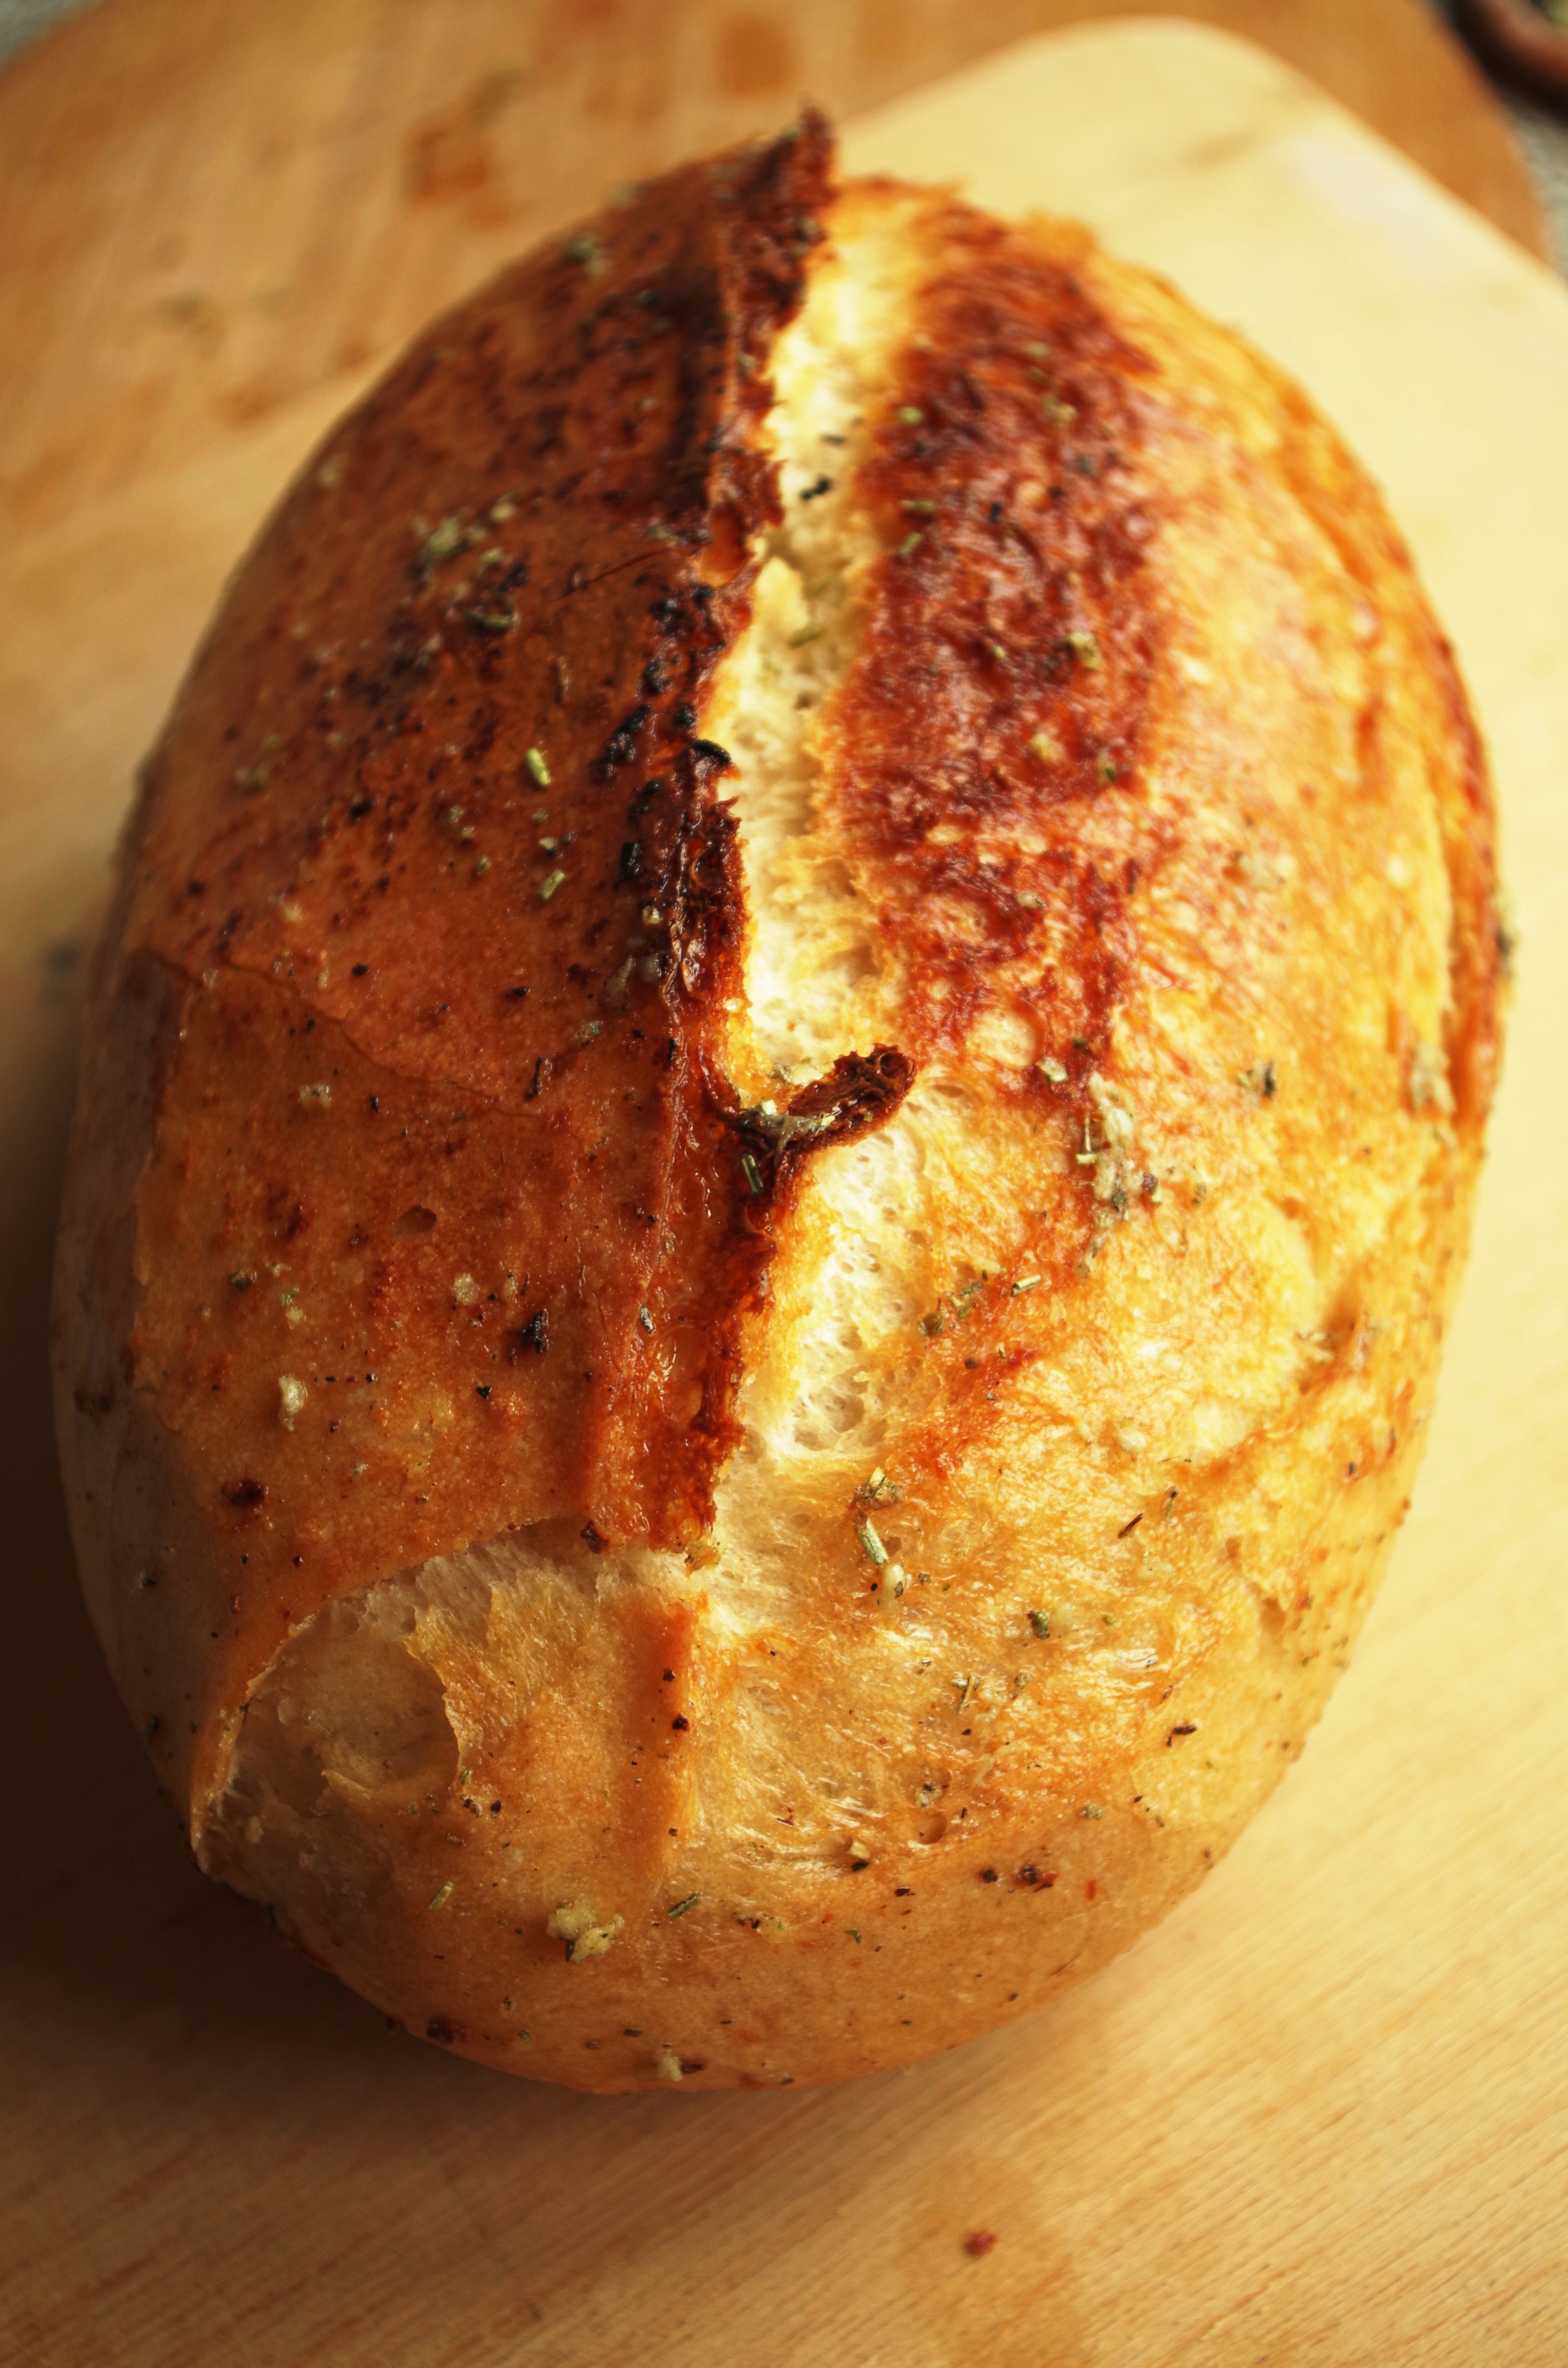
In general, I do not consider this a problem or a bug, but some people do not like it. This is even inevitable if you managed to bake a wonderful bread with a "singing" crust: when you take the bread out of the oven, you hear it crackle; when you cut it, the crust just explodes, it is ringing and prickly. But the cooled bread has cracks that look like peeling paint. This is due to temperature differences in the oven / kitchen or if the bread is immediately taken out of the oven and sprayed with water.

A source: 🔗 by Elena Zheleznyak
P.S. Related topic: Defects in bakery products, their causes and remedies https://Mcooker-enn.tomathouse.com/index.php@option=com_smf&topic=2209.0

Svetlana_Ni
Admin, Thank you for the article. I am also not indifferent to the theme of the appearance of bread. As always, thorough, detailed and very interesting. And most importantly for me with a serious approach. I bake bread spontaneously, so the sight of bread often upsets me. Often there are crust breaks, it would be necessary to analyze and experiment more, but there is not enough time. Again, the strength of gluten needs to be assessed in advance? Every time during the final spreading, there is no firm certainty whether the bread has been spread enough, I check it by pressing, but the speed of leveling the dent can probably be estimated from experience. If the dent doesn't line up, oops, it's too late to do anything. It is advised to focus on the sign of an increase in the dough by 2-2.5 times, and the rest will rise in the oven. So I figure it out by eye and immediately send the bread to the oven. Do you somehow assess the gluten content of flour, for example, if a new brand of flour? There are ways to wash out, etc.
Admin
Quote: Svetlana_Ni

Every time during the final spreading, there is no firm certainty whether the bread has been spread enough, I check it by pressing, but the speed of leveling the dent can probably be estimated from experience. If the dent doesn't line up, oops, it's too late to do anything. It is advised to focus on the sign of an increase in the dough by 2-2.5 times, and the rest will rise in the oven. So I figure it out by eye and immediately send the bread to the oven. Do you somehow assess what kind of gluten is flour, for example, if a new brand of flour? There are ways to wash out, etc.

There is such an expression among bakers: "you must be able to feel the dough" - and you need to do it with your hands and eyes

For me, several criteria for the readiness of the dough for baking are essential:
- even at the stage of kneading the dough, it is determined what the bread will be, hearth or in the form (very soft or steeper)
- proofing the test by eye, only up to a doubling, do not bring to cracks or stretch marks on the surface
- kneading the proofing dough at normal temperature, avoid high temperature and dough re-making.
And how to evaluate the gluten content of flour, if we have special devices. no?

Well, in general we look, see, feel, analyze, write down, remember ... and so on And read the materials in the Basics of Kneading and Baking section, you will still discover a lot of useful things
Svetlana_Ni
Thank you, Admin. Regarding "you need to be able to feel the dough" I agree with you without a doubt. But you can try to evaluate gluten without appliances. I tried a very interesting experiment. A certain weight of flour and water is taken and this piece of dough is washed out under water, in the end gluten remains in the hands, and then it is stretched until it breaks and they look along the ruler how much it stretched. And the color of the gluten is very clearly visible. After that, I stopped buying Nordic flour, her gluten is gray, unattractive, but it should be yellow. I thought the washout process was long, but it turned out to be nothing complicated, I even enjoyed the result. I will definitely read the basics of kneading and baking, you just need to tune in. so as not to waste
elvin
Admin, Good evening. Please help me with advice. I really like to bake loaves in the oven. They turn out to be tasty, beautiful, nostril. The crust of the loaves is thin and crispy immediately after baking. After it cools it becomes a little rubbery. I tried to bake according to different recipes, the result is the same. Please, tell me what is the mistake?
Admin

Try baking a loaf with milk or dough. There are enough such recipes, ask in the search on the forum "milk loaf"
elvin
Thank you! I always bake on a long dough, I really like such breads. Now I will try to bake with the addition of milk
nik28
Hello Admin! I saw a question about mint peel on the parallel forum, but unfortunately I did not find an answer. I also have such a problem, the bread comes out of the oven with an even, smooth shape, and then it will stand for 5 minutes and the crust will go into a pea or will fit. What could it be? Tell me please. Your advice is very necessary.
baker
Hello. Sorry for the offtopic, but I can't create a theme in sourdough rye bread, have any ideas why?
Maybe, in order not to disturb people in vain, can you advise a recipe for delicious rye bread with a minimum of components? Sourdough, flour, water, salt, and oil is optional, I would like it without it. I often see reviews about Darnitsky, I was looking, but either yeast in the recipe or wheat flour. Thank you.
Admin

You went to the wrong section where these questions are answered, including recipes for sourdough bread

Ask a question about the recipe try here Sourdough bread in the oven

All recipes for sourdough bread are in the section BREAD WITH LEAVE, from simple to complex, in the oven and in the oven - choose and bake.
https://Mcooker-enn.tomathouse.com/index.php@option=com_smf#22
elvin
Admin, Hello! I am again for help. I bought bread forms L-7, I decided to roll them in today, so to speak. The choice fell on this recipe
Custard Bread (Oven) (Gasha)

Bread crust - common difficulties
I pre-washed the molds, dried them, calcined them on a fire with salt, then smeared them with rast. oil and once again calcined to form an oil film. Before laying the dough, I also lubricated it with universal grease. The dough turned out to be very good, it squeaked when I was spinning the rolls. When the top crust was browned, I inserted a thermometer into the bun and brought the tempo in the bread to 94 degrees. The bread popped out of the mold perfectly. But .... the sides and bottom of the bread were pale, one might say white. There were no crust on the sides and bottom, because of this, the bread began to sag under its weight. At the same time, the bread is delicious, the crumb is baked. What did I do wrong, what is the mistake?
Well, I am attaching a photo for analysis of the flight. I want to note that in the photo he turned out to be rosy than in reality.
Bread crust - common difficulties
Mixer
Svetlana_Ni,
when evaluating flour gluten in this way, you forgot to take a couple more, three "steps")) -
weigh your test piece (ball) of dough "before" and "after", and then, making up the proportion, calculate the% content of this very gluten in flour. Or assess visually (or measure) the volume of the "ball" "before" and "after".
A good indicator of flour gluten (for those who are not in the know) is 28-30 percent, and the difference in volumes is about 1 / 4-1 / 3.
Also, do not forget to evaluate the structure of the resulting gluten. In addition to elasticity and "pulling", it should be homogeneous, like a good brand of gum, without any extraneous "inclusions" there, such as which in the distant 70s)) were brought by sailors from overseas (sentimental memories of a sweet childhood). Now there is no such gum, modern Orbit only humps ... ((/ don't count it as an advertisement /.
The color is "good" if the "experimental" gluten obtained in this way is not gray, but the color of "ivory" or ivory, as you like)). Ideal if it has an "amber" color.
And yet, as soon as the parameters have been "washed" and evaluated and "tested", let the poor sample rest for 10-15 minutes. If the flour is good, then the test sample after "soaking" will only improve its performance - both in color, and in uniformity, and in pulling ...
For example, at first I had a piece (the original piece of dough was somewhere around 90, I don’t remember exactly) after the "wash" it was stretched to 5-7 cm and torn. A structure with some dots, but the color is good - "cream", elephantine)) ..
After "laying" the color became very close to the color of amber, hardened resin (of course, opaque)). The structure is homogeneous - chewing gum from childhood)), the viscosity is as much as something by 20 cm.In calculating the same notorious indicator of gluten, which before (now I don't know, I haven't bought it in such a container for a long time) they indicated 50kg. bags, in numbers it turned out to be about 28-29%.
Of course, experts in the flour industry (is there such a thing?)), Will only chuckle when they read about this, but for us, ordinary people without test tubes and burners, this "error")) method will be at least some kind of tool in evaluating the raw material-flour at home.
I learned about this way to "blur" from Viktor Semenovich Belik (huh?), Long years of his life in good health!
What I wish you too!
PS> by the way, about the birds. V.S.Belik (huh?) Has a wonderful recipe for making wheat bread from military instruction from as early as 1974 !!! I called this bread for myself "Army", I bake it from time to time, it tastes like a yummy! Looks like then they not only made good chewing gum, but also baked excellently))).
If anything, I can share the recipe, please.
Albina
Tatyana, the topic is wonderful and from time to time it certainly needs to be viewed (it's just that the memory is not the same)
Admin
Quote: Mixer
If anything, I can share the recipe, please.

It is better to bake this bread and post the recipe with a photo on the forum, as an author's recipe
Zhannptica
Mixer, join Tanya) said "A", so write and "B". We are waiting for the recipe for the army)))
Mixer
Bread according to this recipe is baked (there is a photo), but you don't raise your hand to assign authorship (especially since the recipe was slightly modified by V.S.Belik). There is a proposal to title it "Army sample of 1974_ V. S. Belik" (I hope my uncle will not sue?). Where to upload? Here?
Admin
No need to take credit!
You need to bake bread YOURSELF, in your kitchen, take a photo of bread, including crumb, indicate the recipe - and this will be your own author's bread.
In the note, you can / should indicate the source of the recipe by which the bread was baked.

Only after that it will be possible to post the bread recipe on our forum, in the BREAD section
Mixer
I myself have already baked bread, and even in my kitchen, and you won't believe it, I even took a photo of bread, including crumb, and I'm ready to indicate the recipe
and already went to the BREAD section, but
just no where I have not found a button "add a recipe", help me say "B"!

Threat and in an easier way or how?
Albina
Mixer, we are already awaiting your recipe. Spread it out.
Admin
Much easier ...

Study the forum MENU carefully!

We go to the section YEAST BREAD
Find the RED button "new recipe" and fill out the form according to all the rules for posting recipes on the forum
https://Mcooker-enn.tomathouse.com/index.php@option=com_smf&topic=67.0

Bread crust - common difficulties

And you will have simple human happiness on the forum
Mixer
elvin,
The same L7 and the same problem (but with a different recipe). I dare to put forward an assumption, the bottom does not have enough "heat". Yesterday, when baking bread, I took this into account, shifted the tins to a lower level and "drove" mainly the lower "register" of the heating elements. The result improved, the top was baked, and the "sides" crunched. Next time, in your plans, you still have to move down the lower, and since the lower heating elements will be located closer, then I think it will be the very thing. Accordingly, I will turn on the "top-bottom" mode, I will not use the "only bottom" mode, it is fraught with burnout.
And without molds, on a pan, on medium rails in the "top-bottom" mode, the bread is baked amazingly.
Alas, such "cockroaches" in our email. ovens in combination with L7 aluminum forms. I just come to an understanding with her, which is what I wish for you.
adelinalina
Hello. I do not know which topic to look for the answer. But not so long ago I had a wild desire to cook rye bread with a crispy, tasty crust. Precisely molded bread (molded by hand, not with a brick). I myself did what I did (with the rye dough I am on you, although I am a pastry chef) did not work very well. I want just such a bread so that the crust almost crunches like a baguette. And perfect for sprat and egg sandwiches. I bake bread (and not only it) in an ordinary oven, for kneading, a dough mixer (kenwood). There are so many recipes here that I get lost I don't know which one to grab. Please advise.It is possible with pure rye and with the addition of wheat flour.
Admin
Quote: adelinalina
There are so many recipes here that I get lost I don't know which one to grab.

Nevertheless, it is better to choose bread from recipes on the forum, see a photo of the bread and then understand its intricacies. There are many such recipes for good hearth breads on the forum - look
Kesha
Tell me, I bake bread in accordance with GOST, after baking at 200-220 degrees for 45 minutes and even 1 hour, the bread is baked inside, but the crust is almost white and very hard, my mother compared it with the hardness of enamel, it’s unrealistic to bite through, it is cut like a bread knife ... If you cover with a wet towel, from which water flows, gradually the crust will soak and become softer.
Gas oven, bricks lie at the bottom for uniform heating, I start heating to 200 degrees an hour before placing the bread in the oven, I put a small saucepan on the bottom with boiling water for steam, today I even opened the oven and put a lot of water on the stones, at the beginning of baking and in the middle so that there are more steam. The result is the same.
In the oven, the spouse bakes pies, she makes the dough and purchased, the result is excellent, everything is baked with a normal crust.
Tatiana_79
Kesha,
Tell me, I bake bread in accordance with GOST, after baking at 200-220 degrees for 45 minutes and even 1 hour, the bread is baked inside, but the crust is almost white and very hard, my mother compared it with the hardness of enamel, it’s unrealistic to bite through, it is cut like a bread knife ... If you cover with a wet towel, from which water flows, gradually the crust will soak and become softer.

Have you solved the problem?
good day
Crown
Tatiana_79, almost three years have passed, the situation must have been resolved during this time.
And the reason for the thick crust is the low baking temperature and poor heating of the hearth. One hour for the complete heating of the bricks is very little, experts write about 30-40 minutes for each cm of stone thickness. And at the maximum, not 200 *.
Jule
Good day!
For the first time I bake baguettes entirely by hand and with live yeast. Kneaded the dough with handles, baked in the oven. Alas, the joy was overshadowed by too hard crust Where I messed up, tell me, please!
Crown
JuleHow long did they bake, maybe they just overexposed, and gave steam? The baguette is relatively small and does not require long baking.
Jule
Crown, I put a frying pan with water on the bottom of the oven and sprinkled water on the walls from the spray bottle. Baked for 25 minutes.
elvin
Jule, I will tell you my algorithm for baking bread. I warm up the oven well (along with an empty water container) at the maximum temperature. Having made cuts on the bread, I quickly put it in the oven, pouring a cup of boiling water into a hot water container. I quickly close the oven door. After 10 minutes I let off steam from the oven and bake the bread. The crust is always thin and crispy. Good luck

All recipes

New recipe

© Mcooker: Best Recipes.

map of site

We advise you to read:

Selection and operation of bread makers