|
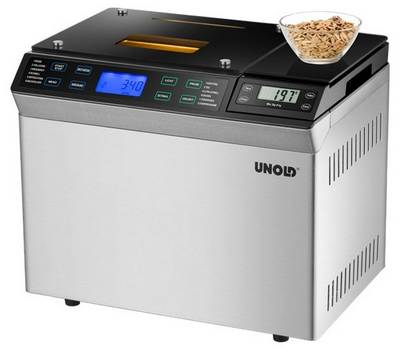
Technical characteristics of the Garlyn Home BR-1000 bread machine
Power 550 W
Baking weight adjustment Yes
Temperature maintenance Yes, up to 1 h
Maximum baking weight 1000 g
Baking form Loaf
Timer Yes, up to 15 h
Choice of crust color Yes
Programs: White Bread, French Bread, Whole Grain Bread, Quick Bread, Pastry, Sandwich, Gluten Free Bread, Kneading, Yogurt, Dessert, Yeast Dough, Jam, Cupcake, Baking, Homemade
Dispenser Yes
Power cord length 1.2 m
Case material Stainless steel
Dimensions 355x240x302 mm
Weight 5.27 kg
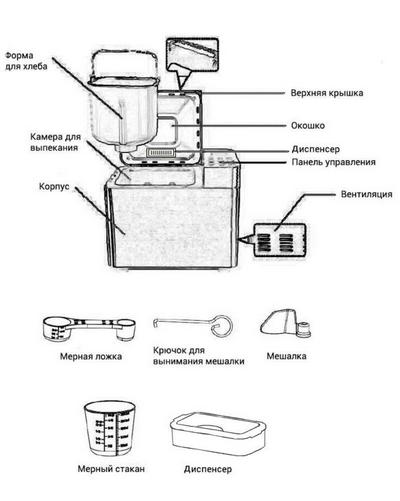
Equipment
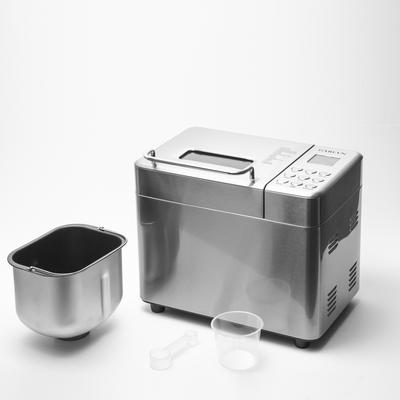
□ Bread Maker Garlyn BR1000
□ Stirrer
□ Measuring glass
□ Measuring spoon
□ Stirrer removal hook
□ User manual
Description of the characteristics of the Garlyn Home BR-1000 bread machine
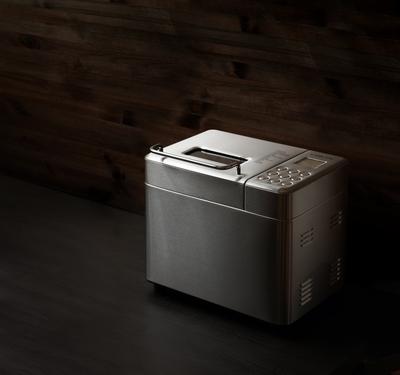
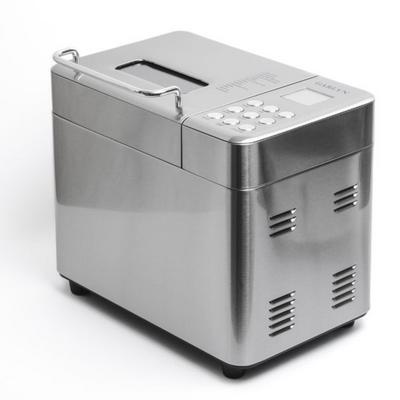
The functional and productive GARLYN Home BR-1000 bread maker will delight you with its capabilities, ease of operation, reliability and stylish design.
With 550 watts of power, this model can handle a variety of tasks with ease.
15 preset modes are created to prepare a variety of baking and desserts. With GARLYN Home BR-1000 you can make a variety of breads including Borodino, rye, gluten-free, yeast-free and many others. Cupcakes, sweet baked goods, homemade jams and even yoghurt can all be prepared with ease using this appliance. And the "Home" mode allows you to customize all stages of the cooking process.
A separate advantage is the ability to knead any type of dough (both yeast and yeast-free). This feature will help save a huge amount of time spent on cooking, for example, homemade pizza or dumplings.
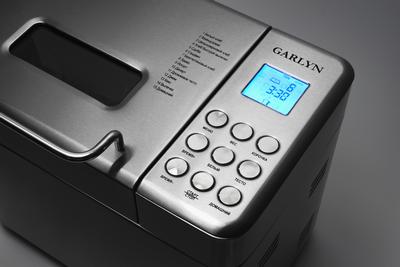
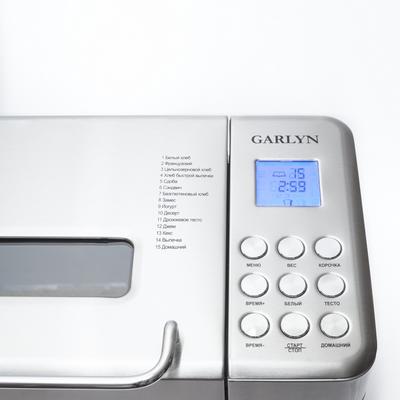
Using the control panel, you can also set the size of the loaf: 500 g, 750 g, 1000 g. In addition, the bread maker is equipped with a function to select the crust color.
For added convenience, the GARLYN Home BR-1000 has a built-in timer so you can delay the start of a program by up to 15 hours. If you want to have a fresh, warm loaf for breakfast, just load the necessary ingredients in the evening and program the device to prepare bread by the time you wake up. At the same time, the bread maker is quiet enough that it allows it to function without disturbing your sleep. And at the end of cooking, the device automatically turns on the heating mode, maintaining the high temperature of the finished baked goods for an hour after the end of cooking.
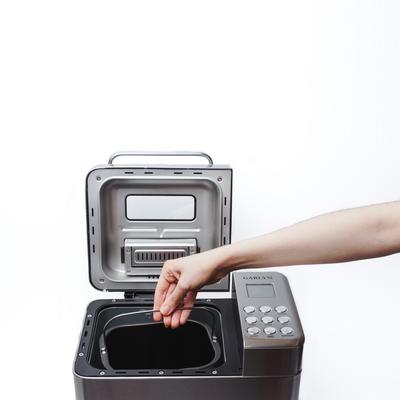
A convenient lid located in the upper part of the body is equipped with a viewing window, thanks to which you can observe the cooking process. Next to the cover there is a control panel equipped with a built-in display that displays all the necessary information.
The body of the GARLYN Home BR-1000 itself is made of stainless steel, which guarantees the device additional protection and, therefore, durability.
The bread maker comes with a recipe book that includes many traditional and original dishes.
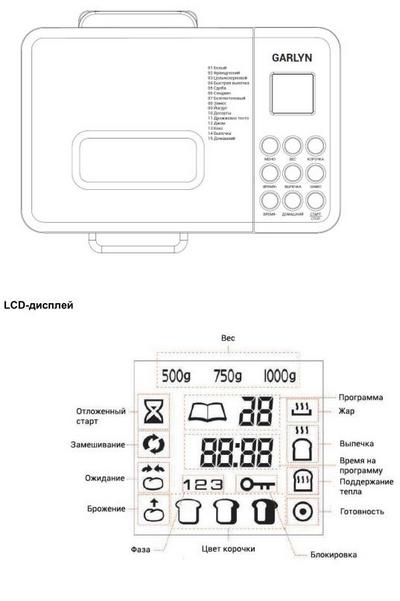
List of programs
1. White bread
The White bread program allows you to bake white bread and wheat-rye bread. Mainly used single-grade flour.
2. French
For baking white yeast bread from fine flour. The result is a crispy, fluffy bread. This program is not suitable for bread recipes containing butter, margarine or milk.
3. Whole grain bread
For baking bread with fruit juice, raisins, coconut flakes, dried fruit, chocolate or sugar. Due to the longer rise of the dough, the bread is lighter and fluffier.
4. Quick Bread
The kneading, rising and baking times are shorter than with the White Bread program. The bread has a thicker consistency. Quick Bread is baked with baking powder and baking powder under the influence of moisture and heat. To create the perfect quick-bake bread, first place the liquid ingredients in the bread pan, then add the dry ingredients to the bread pan. During the first mixing of yeast-free dough, dry ingredients can accumulate in the corners of the mold. Use a rubber spatula to remove any lumps of flour.
5. Baking
For baking bread with fruit juice, raisins, coconut flakes, dried fruit, chocolate or sugar. Due to the longer rise of the dough, the bread is lighter and fluffier.
6. Sandwich
Program for making sandwiches.
7. Gluten Free Bread
For gluten-free bread and bakery mixes. Due to the gluten-free flour, mixing liquid ingredients takes longer. The rise time of the dough also depends on the type of gluten-free flour.
8. Kneading
The program allows you to thoroughly mix flour and liquid ingredients.
9. Yogurt
Program for lifting and preparing yoghurt.
10. Dessert
Kneading and baking with a high fat and protein content.
11. Yeast dough
The program is intended for kneading and raising any yeast dough, for example, dough for buns, pizza, etc. Baking is done in a conventional oven. The program is not suitable for baking.
12. Jam
The program is designed for making fresh fruit jam and orange jam. Do not increase the indicated amount of ingredients and make sure that the mass does not flow out of the mold and into the baking chamber. If not, stop the device immediately and carefully remove the bread pan. Cool slightly and wash the mold thoroughly.
13. Cake
Kneading, lifting and baking. For the dough to rise, you need to add baking soda or baking powder.
14. Baking
For additional baking of bread in case the dough is not baked or the crust is too pale. The program is not intended for kneading.
15. Home
Making the most delicious breads according to your requirements.
Ingredients
1. Bread flour
Bread flour is one of the most important ingredients in bread baking. Recommended for most types of yeast bread. Contains a large amount of gluten (for this reason it is also called high-gluten flour), which allows you to get fluffy bread that does not shrink in volume. Flour properties vary by region. The gluten content is higher than the flour for making dough, so bread made from this flour is usually larger in volume.
2. Flour for making dough products
Does not contain baking powder. Suitable for baking bread with the quick baking program. Bread flour is more suitable for baking yeast bread.
3. Whole grain flour
It is made from whole wheat grain. Bread made with or with this flour contains more fiber and nutrients. Whole-grain flour is heavier than regular flour by weight, as a result, bread from such flour is smaller in volume and more dense.
4. Coarse flour (rye flour)
This flour contains a lot of fiber. Coarse flour is similar in properties to whole grain flour. To obtain a larger volume, after the dough has risen, it is necessary to add more bread flour to it.
5. Self-rising flour
Contains baking powder. Most often used for making muffins. Do not use self-rising flour with yeast.
6. Corn and oat flour
Corn and oatmeal are made by grinding corn and oatmeal. Flour of these varieties is added as ingredients in baking dietary “coarse” bread to improve the flavor and texture of the bread.
7. Sugar
Supports the yeast fermentation process, gives the bread flavor and color. An essential ingredient for raising dough. Typically white sugar is used. Some recipes may use brown sugar, powdered sugar, and cotton sugar.
8. Salt
Salt adds flavor and browns to the crust and controls yeast activity. Never add too much salt. However, without adding salt, the bread volume will be larger.
9. Baking powder
Used for lifting quick baked breads and muffins. When using a baking powder, it does not take time to rise the dough. The baking powder is involved in a chemical reaction and creates air bubbles that make the bread softer.
10. Soda
Same action as baking powder. Can be used with baking powder.
11. Eggs
Eggs will help improve the structure of the bread, making it more nutritious and larger in volume. Eggs should be mixed with liquid ingredients.
12. Yeast
Yeast is a living organism that multiplies in dough. Store yeast in the refrigerator to keep it fresh. The hydrocarbons contained in flour and sugar are used as a nutrient medium for yeast. A variety of yeasts are commercially available for use in breadmaking recipes: breadmaker yeast (preferred), active dry yeast, and rapid rise yeast.
When exposed to sugar and water at the appropriate temperature, the yeast produces carbon dioxide and causes the dough to rise.
• 1 s.l. dry yeast = 3 tsp dry yeast
• 1 s.l. dry yeast = 15 ml yeast
• 1 tsp. dry yeast = 5 ml
Check the expiration date and shelf life of the yeast before use. After opening the yeast package, place the remainder in the refrigerator. If the yeast is not fresh, the dough will not rise.
TIP: Check if your yeast is fresh.
Pour 1 cup (237 ml) warm water (45-50 C) into a measuring cup.
Add 1 tsp. (5 ml) sugar and stir. Add 1 tbsp. (15 ml) yeast.
Place the measuring cup in a warm place for 10 minutes. Do not stir.
The fresh yeast will begin to bubble and swell. If it doesn't, the yeast has gone bad.
13. Fat, butter and vegetable oil
Butter makes bread softer and keeps it fresh for longer. Before adding butter to liquid ingredients, melt the sludge and cut it into small pieces.
14. Water and other liquids (always first in the order of adding ingredients)
The most important ingredient in bread making. Water should be at room temperature 20-250 C. Milk is added to improve the flavor of the bread. When using Delay Start, never cook with dairy recipes.
The sequence of adding ingredients
The sequence of adding ingredients must be followed: liquid ingredients first, then dry ingredients. Yeast should be added last. Yeast can only be put on dry flour. The yeast should not come into contact with salt. Never use perishable food (milk, eggs) for delayed start.
All additional ingredients are added automatically using the filling dispenser.
Accurate measurements
TIP: Accurate measurements are the key to making delicious bread successfully. Weigh the ingredients carefully and add to the bread pan in the order indicated in the recipe. It is highly recommended to use a measuring spoon to obtain the correct amount. beaker.
Measuring liquid ingredients
It is necessary to measure the amount of water, milk and other liquids using a measuring glass with clear marks and a spout. Place the glass on a flat surface and check the liquid level. After measuring the cooking oil, wash the measuring cup thoroughly.
Measuring dry ingredients
Using a spoon, gently fill the measuring cup with flour or other ingredient under the knife. Never scoop dry ingredients directly from the container, as this can add an extra teaspoon to the desired amount of food. Never knock on the bottom of the measuring cup.
TIP: Stir the flour before measuring it to air it. To measure a small amount of ingredients (salt or sugar), use a measuring spoon, brushing the slide with a knife.
Preparation for operation
Before using for the first time, wash and dry the bread pan and stirrer.
1. Check that the package is complete and not damaged.
2. Clean all parts according to the CLEANING AND MAINTENANCE guidelines.
3. Set the baking mode (without any ingredients) for 10 minutes. Then let the bread maker cool and clean all removable parts again. A slight odor and / or smoke may appear upon first use. It is absolutely normal, after the first or second use, the smell / smoke will disappear. Use the device in a well ventilated area.
4. Dry all parts and re-assemble the device. The bread maker is now ready for use.
NOTE: do not use metal utensils, which can damage the non-stick coating of the bread pan.
CAUTION: The breadmaker may vibrate while kneading. Always place the appliance in the middle of the table to avoid dropping it.
Making bread
1. Remove the bread pan by lifting it by the handle and slowly turning it counterclockwise.
2. Slide the blade onto the pivot.
3. Carefully measure out the correct amount of ingredients.
4. Place the ingredients listed in the recipe in the order shown in the bread pan. The sequence of adding ingredients must be followed: first the liquid ingredients, sugar and salt, then flour. Yeast is added last.
NOTE: Make a small indentation in the flour with your finger and add the yeast to it. Make sure the yeast does not come into contact with salt or water.
LAST: Yeast. Must be kept separate from liquid ingredients. SECOND: Dry ingredients (sugar, salt, baking powder, flour)
FIRST: Liquid ingredients at room temperature
TIP: Before cooking, measure out the right amount of ingredients, including additives (nuts, raisins).
5. For baked goods with toppings (nuts, dried fruits, etc.), place the additional ingredients in the removable dispenser located on the inside of the lid of the appliance in advance. During the cooking process, at one of the final kneading steps, the dispenser will automatically add additional ingredients to the dough.
6. Insert the oven dish into the inside of the appliance by turning it counterclockwise. Close the cover. NOTE: the bread pan must be firmly fixed in the bread maker to mix the ingredients and knead the dough.
7. Connect the device to a power outlet. After a beep, the display will show the first program 1, set by default.
8. Press the MENU button to select the desired program.
9. Press the WEIGHT button to select the weight: 500, 750 or 1000 g (the WEIGHT button is not active in programs 8-15).
10. Press the BROWN button to select the degree of browning: light, medium or dark (the BROWN button is not active in programs 8-9, 11-12).
11. If necessary, use the delayed start function. Press the + and - buttons to select the delayed start time
NOTE: Do not use the delayed start function when baking pastries containing dairy products, eggs, etc.
12. Press the START / STOP button to start the program. You will hear a beep and the display will show the numbers "3:10". The colon between “3” and “10” will soon stop flashing and the indicator will light up. The stirrer will start mixing the ingredients. With delayed start, the agitator will start working after the specified time.
13. At the end of the program, you will hear 10 beeps. Keep Warm Mode will be activated for 1 hour.To cancel the Keep Warm Mode press and hold the START / STOP button for 3 seconds. Unplug the power cord and using gloves to open the cover.
14. Let it cool slightly before taking out the bread. Using the mittens, turn the bread pan counterclockwise, then remove the pan by pulling its handle up. ATTENTION! The bread is very hot! Be careful!
15. Turn the bread pan over on a metal wire rack or clean surface and shake the bread out of it. If the bread cannot be removed, run a non-stick non-stick spatula along the inner walls of the pan.
16. Allow the bread to cool for 20 minutes before cutting. To keep the bread in shape, it is recommended to cut it with an electric or serrated knife.
17. If there is an agitator in the bread, carefully remove it with a spatula. The bread is hot! Never reach the mixer with your hands. After use, and also when the device is not in use, unplug the power cord.
NOTE: At room temperature, bread can be stored in a plastic bag for no more than three days. Bread can be stored in the refrigerator for up to 10 days.
Extracting bread
The bread pan and baking chamber will be hot. Always use oven gloves! Using the mitts, turn the bread pan counterclockwise, then remove the pan by pulling its handle up. Shake the pan gently to remove the bread. Let the bread cool on a metal wire rack for 10 minutes. Use a knife to cut the bread. If there is an agitator in the bread, carefully remove it with a spatula.
Cleaning and care
Unplug the power plug before cleaning. Do not immerse the cord, power plug, or enclosure in water or any other liquid. Allow the appliance to cool completely before cleaning.
1. Cleaning the agitator. If it is difficult to remove bread from the mixer, pour some water into the bread pan and let it soak for one hour. Wipe off the stirrer gently with a damp cloth. It is allowed to wash the stirrer and bread pan in the dishwasher.
2. Cleaning the bread pan. Remove the bread pan by turning it counterclockwise and lifting it by the handle. Wipe the mold inside and out with a wet rag. Do not use abrasive detergents, which can damage the non-stick coating. The mold must dry completely before installing.
NOTE: It is allowed to wash the stirrer and bread pan in the dishwasher. The outside of the bread pan may be discolored. This is normal.
3. Cleaning the housing and cover. Allow the appliance to cool down after use. Use a damp cloth to wipe down the lid, housing, baking chamber and viewing window from the inside. Do not use abrasive detergents that can damage the polished finish.
Never place the case in water for cleaning.
NOTE: It is not recommended to disassemble the cover for cleaning.
4. Before packing the instrument for storage, make sure it is completely cool, clean and dry, and the lid is closed.
Bread maker Garlyn Home BR-1000 - reviews and discussion
|