|
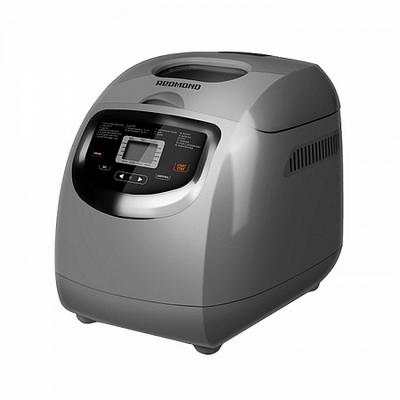
Technical characteristics of the Redmond RBM-1914 bread machine
Power 600 W
Voltage 220-240 V, 50 Hz
Protection against electric shock class I
Baking dish capacity 3 l
Baking weight 500/750/1000 g
Electronic control type
Body material. metal and plastic
Baking dish coating non-stick
LCD monochrome
Non-volatile memory 15 minutes
Overall dimensions 355 × 240 × 302 mm
Net weight 4.3 kg ± 3%
Power cord length 1.2 m
Maintaining the temperature of ready meals (auto heating) up to 1 hour
Delayed start up to 15 hours
There is a choice of crust color
Add ingredients by sound signal
Number of programs: 19
- classic bread
- express
- baking
- French bread
- whole wheat bread
- Borodino bread
- gluten free bread
- dessert
- yeast-free dough
- yeast dough
- milk porridge
- cake
- jam
- yogurt
- bakery products
- soup
- extinguishing
- bread with additives
- Rye bread
Package Contents: Bread Maker
- Baking dish
- Beaker
- Scoop
- Beaker
- Kneading paddle
- Kneading paddle extraction hook
- Book of recipes
- Manual
- Service book
12 months warranty

Description of the Redmond RBM-1914 bread machine
The REDMOND RBM-1914 bread maker is an irreplaceable helper in any kitchen. With this kitchen gadget, you will quickly master the intricacies of home baking, even if you have little experience. As you prepare the dough, follow the recommendations in the recipe book, choose one of 19 automatic programs and don't forget about the additional options. The breadmaker will adjust the temperature and cooking time by itself, knead the dough, wait until it is allowed to stand, bake the bread correctly and even give the crust the desired color - light, medium or dark.
Thanks to the REDMOND RBM-1914 bread maker, you will eat homemade bread without flour improvers and other harmful ingredients. The device can work with different types of flour - wheat, rye, whole grain, gluten-free or corn, and also bakes bread with delicious additives - dried fruits, nuts, ham and chocolate chips.
With a bread machine, you will not waste time kneading and proving dough for homemade dumplings, rolls or samsa. This kitchen gadget is able to technologically competently prepare yeast and yeast-free dough without further baking.
The window in the lid of the bread maker makes it possible to observe how the dough is kneaded and strained and how the bread is baked.
The REDMOND RBM-1914 bread machine provides programs for boiling milk porridge and soups, stewing vegetables and meat, making desserts, yoghurts and jams. Thanks to these advanced functions, the device partially replaces a multicooker or yogurt maker.
Bake bread for a large family or small loaves for breakfast. Choose the weight of the finished bread yourself - 500, 750 or 1000 grams. If the appliance switches off accidentally, you do not have to worry about how to correctly complete the bread baking program. Thanks to the non-volatile memory, the breadmaker retains the settings for another 15 minutes and automatically resumes operation when plugged into the network.
Bread maker device Redmond RBM-1914
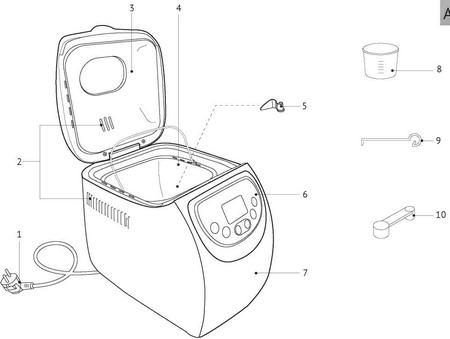
1. Power cord
2. Ventilation holes
3. Cover with inspection window
4. Baking dish
5. Kneading paddle
6. Control panel
7. Instrument body
8. Measuring glass
9. Hook for removing the kneading paddle
10. Measuring spoon
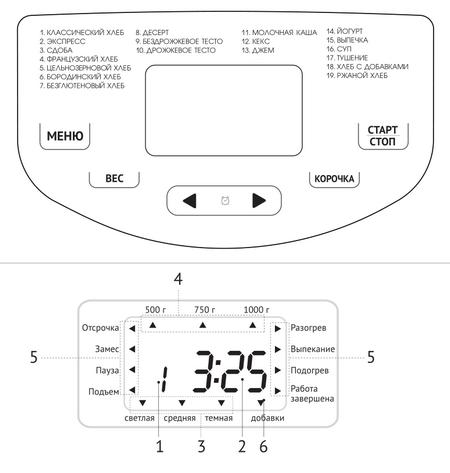
Control Panel
1. Menu button - selection of an automatic cooking program. The selected program number is shown on the display.
2. "Weight" button - selection of the weight of the finished product. The default weight is 750g.
3. Button ▲ - increase the delayed start / cooking time.
4. Button ▼ - decrease the delayed start time / cooking time.
5. Button "Crust" - a button for choosing the color of the crust of the product ("Light", "Medium", "Dark"). By default, the "Medium" parameter is selected.
6. Button "Start / Stop" - start the cooking program / pause the cooking program / interrupt the cooking program and return to standby mode.
7. Display.
AZ display device
1. Number of the cooking program
2. Display for cooking time / delayed start time
3. Indicator of the selected crust color
4. Baking weight indicator
5. Cooking phase indicator
6. "Additives" indicator
Non-volatile memory
The REDMOND RBM-1914 bread machine has a non-volatile memory. In the event of a power outage while a cooking program is running, the settings are saved in the appliance's memory for 15 minutes. When the power supply is restored, the program will automatically resume. If there is no power supply for more than 15 minutes, the settings are reset. When reconnected to the mains, the appliance goes into standby mode.
If the recipe contains dairy, meat or other perishable products, unplug the appliance and let it cool down. Remove the baking dish, clean it and start over the recipe using fresh ingredients. When cleaning, strictly follow the instructions in the “Care of the Instrument” section.
If the ingredients used were not perishable, you can restart the cooking program (if the baking process has not started) or bring the product to readiness using the BAKE program without changing food. Check the readiness of the product through the inspection window, interrupt the program if necessary.
Please note that if the program is restarted, the quality of the baked bread may not be as desired.
Setting the cooking time
In the Bread Maker REDMOND RBM-1914, you can independently set the cooking time for the programs "MILK Porridge", "JAM", "YOGHURT", "BAKING", "SOUP", "STEWING" and "DESSERTS". Press the ▲ and ▼ buttons to change the cooking time after selecting a program. The increment and possible range of cooking times depend on the selected cooking program. Press and hold the desired button to quickly change the time. When the maximum (minimum) value is reached, the time setting will continue from the beginning (end) of the range.
Delaying the start of the program
The "Delay start" function allows you to set the time interval at the end of which the bread should be ready (taking into account the program run time). You can set the time in the range from 10 minutes to 15 hours in 10-minute increments.
The Delay start function is not available in the MILK Porridge, JAM, YOGHURT, BAKING, SOUP, STEWING and DESSERTS programs.
To change the delay start time after selecting an automatic program, press the ▲ and ▼ buttons. Press and hold the desired button to quickly change the value. When the maximum (minimum) value is reached, the time setting will continue from the beginning (end) of the range. When this function is being configured and operating, the ^ indicator next to Delay will flash on the display.
c Note that when setting the time for the Delay start function, the same buttons are used as when setting the cooking time. However, while the delay start time is being set, the time value indicator on the display does not flash.
It is not recommended to use the Delay start function if the recipe contains perishable food (eggs, fresh milk, meat, cheese, etc.).
Maintaining the temperature of ready meals (automatic heating)
The "Auto-heating" function turns on automatically at the end of the program and can maintain the temperature of the finished dish for up to 1 hour.
The self-heating prevents moisture absorption and helps keep the garment soft for some time.However, for best results, it is recommended to remove the bread immediately after the end of the cooking process.
c The auto-preheat function is not available when using the SOFT BREAK, YEAST Dough, MILK Porridge, JAM, YOGHURT, BAKING, SOUP, STEWING and (DESSERTS) programs.
General procedure for using automatic programs
1. Place the dough paddle on the rod in the baking dish. Make sure the connection is tight. Lubricate the mold and blade with oil.
2. Measure out the required ingredients according to the selected recipe and place them in the bowl. When baking bread and making dough, prepare the main and additional ingredients according to the recipe. All foods should be at room temperature (25-35 ° C) unless otherwise specified in the recipe. Place the main ingredients in the bread pan in the order shown in the recipe.
3. Gently insert the baking dish into the heating chamber of the breadmaker by turning it slightly counterclockwise. The mold should connect to the drive shaft evenly, without distortions. Lock the shape by turning it clockwise until it stops. Close the cover with the viewing window.
First place liquid ingredients (water, milk) and / or eggs in the mold. The water should be at room temperature, as too high a water temperature will negatively affect the rise of the dough. When using the Delay start mode, use only milk powder, otherwise the milk may curdle before cooking.
Add yeast or baking powder last. These components must not come into contact with liquids, otherwise fermentation will start too early: the result is tough, hard and coarse bread. The yeast should not come into contact with salt. It is recommended to make a hole in the flour pile and place yeast or baking powder in it.
4. Connect the breadmaker to the mains. The appliance will beep and go into standby mode: the display will show the program number (default is 1) and
time of her work.
5. Using the "Menu" button select a cooking program, its number will appear on the display.
If necessary, change the cooking time or set the delayed start time.
In the case of using a program with the ability to manually adjust the cooking time, the first press of the Start / Stop button after setting the time value will confirm the entered values. Pressing the Start / Stop button again will start the program.
7. Use the "Weight" button to set the weight of the finished product. Follow the directions in the recipe book and the amount of ingredients in the bowl. The baking weight indicator will move at the top of the display. The choice of product weight is not available in all programs.
8. To select the desired shade of the product crust (light, medium, dark), press the "Crust" button. The crust color indicator will move at the bottom of the display. The default is Medium. The choice of crust color is not available in all programs.
9. Press the "Start / Stop" button. The timer starts counting down the cooking time. Pay attention to the appearance of the dough during the first 5 minutes of mixing. It should make a round, even lump. If a lump does not form, the ingredients are not mixed correctly. If the program provides for the addition of additional ingredients during the cooking process, you will be alerted by a sound signal when the ingredients are added. The ▼ indicator next to Additives on the control panel will flash.
In order to temporarily stop the execution of the program without resetting the settings, press the "Start / Stop" button. The time will flash on the display. To continue the program, press the “Start / Stop” button again.
The lid of the bread maker can only be opened during kneading (you can hear the sound of a running motor).Opening the lid during dough rising or baking will reduce the quality of the finished product.
10. The end of the cooking program will be indicated by an acoustic signal. After
this, depending on the selected program, the appliance will go into auto-heating mode or standby mode.
I. To interrupt a program or auto-heating mode, press and hold the Start / Stop button.
12. At the end of cooking, unplug the breadmaker from the power supply.
Extracting finished bread
1. Open the cover of the instrument. Using oven mitts, take a mold for
by the handle and turn counterclockwise, then remove from the heating chamber.
ATTENTION! Remember that at the end of the cooking process the bread, baking dish and heating chamber are very hot! be careful, use oven mitts to avoid burns! Do not place a hot bread pan on a tablecloth, plastic or other heat-sensitive surfaces that could catch fire or melt!
2. Turn the baking dish upside down and remove the finished bread from the baking dish and place on a wire rack or dish. Leave to cool for 20 minutes.
3. After the baking dish and the appliance have cooled down, clean them according to the section “Taking care of the appliance”.
ABOUT
The design of the bread maker provides that after removing the baked goods from the bowl, the kneading paddle must remain on the shaft inside the mold. If this does not happen and it remains in the bread, this is not a defect. Remove the blade using the supplied hook.
Slicing and storing bread
Use an electric or special serrated knife to cut the bread. Store bread in sealed packaging (in an airtight plastic bag or plastic container) at room temperature for no more than 3 days. For long-term storage (up to 1 month), place the bread in a sealed container in the freezer. Since homemade bread does not contain preservatives, it can dry out and spoil faster than industrially prepared bread.
Purpose and features of automatic cooking programs
1. Program "CLASSIC BREAD"
Used to bake classic white bread. The program includes kneading, proving the dough and baking bread. An audible signal will indicate when additional ingredients have been added. You can select the weight of the product and the color of the crust, the delayed start and auto-heating functions are available. There is no manual time adjustment.
2. "EXPRESS" program
Used for quick baking of white bread. Add to dough for white
additional bread 1/2 teaspoon of yeast, based on the weight of 1000g baked goods. The program includes kneading with heating, proofing and baking. An audible signal will indicate when additional ingredients have been added. You can select the weight of the product and the color of the crust, the delayed start and auto-heating functions are available. There is no manual time adjustment.
3. Program "SDOBA"
Recommended for baking muffins. The program includes kneading, proofing and baking. The time of adding additional ingredients will be reported by
sound signal. You can select the weight of the product and the color of the crust, the delayed start and auto-heating functions are available. There is no manual time adjustment.
4. Program "FRENCH BREAD"
Used to bake light French bread with a crispy crust. Provides long-term kneading and proofing of the dough. The program includes kneading, proving the dough and baking bread, and an audible signal will indicate when additional ingredients are added. You can select the weight of the product and the color of the crust, the delayed start and auto-heating functions are available. There is no manual time adjustment. LQ) French bread gets stale quickly, so it's best not to store it for more than a day.
5. The "WHOLE GRAIN BREAD" program
Since the flour used for this bread is heavier, the program preheats the ingredients for 5 minutes before kneading the dough and leaves the dough to “sit” for a longer time. Grain flour loaves are usually smaller and denser.
The program includes kneading, proving the dough and baking bread. An audible signal will indicate when additional ingredients have been added. You can select the weight of the product and the color of the crust, the delayed start and auto-heating functions are available. There is no manual time adjustment.
6. Program "BORODINSKY BREAD"
Recommended for making Borodino bread. The program includes kneading, proofing and baking bread. An audible signal will indicate when additional ingredients have been added. You can select the weight of the product and the color of the crust, the delayed start and auto-heating functions are available. There is no manual time adjustment.
7. "GLUTEN-FREE BREAD" program
For baking gluten-free bread. The program includes heating the ingredients, kneading, proving the dough and baking bread. An audible signal will indicate when additional ingredients have been added. You can select the weight of the product and the color of the crust, the delayed start and auto-heating functions are available. There is no manual time adjustment.
Gluten (gluten) is a protein found in cereals that gives flour its high baking properties. It is thanks to him that the dough acquires firmness and elasticity. However, for some people, gluten is contraindicated.
8. Program "DESSERTS"
Recommended for preparing various desserts. The time can be adjusted in the range from 30 minutes to 2 hours in 10 minute increments. The default cooking time is 1 hour 40 minutes. Delay start and auto heat functions are not available.
9. The program "NO-LEAST Dough"
Program for kneading and proving yeast-free dough without further baking. Delay start function is available. Manual adjustment of the cooking time, the ability to select the weight of the product and the auto-heating function are not available.
10. "YEAST Dough" program
Program for kneading and proving yeast dough without further baking. Delay start function is available. Manual adjustment of the cooking time, the ability to select the weight of the product and the auto-heating function are not available.
11. Program "MILK Porridge"
Program for boiling porridge with milk and water. The time can be adjusted in the range from 20 minutes to 1 hour 50 minutes with a setting step of 5 minutes. The default cooking time is 40 minutes. Delay start and auto heat functions are not available.
12. Program "KEKS"
Recommended for baking muffins with various fillings. The program includes quick kneading, proofing and baking. An audible signal will indicate when additional ingredients have been added. You can choose the color of the crust, the delay start and auto-heating functions are available.
13. Program "JAM"
It is used for making jams, jams, toppings for baking, waffles and ice cream, ketchup, all kinds of spices, as well as for preparing a number of products for home canning. The cooking time can be adjusted in the range from 10 minutes to 1 hour and 20 minutes with a setting step of 5 minutes. The default cooking time is 40 minutes. Delay start and auto heat functions are not available.
14. Program "YOGURT"
Program for preparing various types of yoghurt. The time can be adjusted in the range from 1 hour to 12 hours in 1 hour increments. The default cooking time is 8 hours. Delay start and auto heat functions are not available.
15. Program "BAKING"
The program is recommended for baking biscuits and other products from ready-made dough, as well as for finishing unbaked product. There are no kneading and proofing stages in this program.The time can be manually adjusted in the range from 10 minutes to 1 hour 30 minutes with a setting step of 5 minutes. The default cooking time is 1 hour. The delayed start and auto-heating functions, as well as the ability to select the weight and color of the product crust, are not available.
16. Program "SUP"
Recommended for making soups and broths. The program includes cooking without stirring. The time can be adjusted in the range from 20 minutes to 1 hour 20 minutes with a setting step of 5 minutes. The default cooking time is 1 hour. Delay start and auto heat functions are not available.
17. Program "EXTINGUISHING"
Recommended for stewing meat and vegetables. The program includes cooking without stirring. Time adjustment is possible in the range from 20 minutes to 2 hours with
installation step in 5 minutes. The default cooking time is -1 hour. Delay start and auto heat functions are not available.
18. Program "BREAD WITH ADDITIVES"
Recommended for baking bread with various additives. The program includes kneading, layering and baking bread. You can select the weight of the product and the color of the crust, the delay start and auto-heating functions are available. There is no manual time adjustment.
19. "RYE BREAD" program
Recommended for baking rye bread. The program includes kneading, proving the dough and baking bread. You can select the weight of the product and the color of the crust, the delay start and auto-heating functions are available. There is no manual time adjustment.
General tips for baking bread
Features of the main ingredients
Flour contains gluten (gluten), on which such properties of the dough as elasticity and firmness depend. The gluten content is one of the criteria for determining the quality of flour.
Wheat flour differs in varieties:
• extra is used for the manufacture of confectionery and bakery products of the highest quality;
• the highest grade has high baking properties, is well absorbed by the body, used to prepare all types of dough, as well as sauces and flour dressings;
• grit is rarely found on the market and is used to make yeast dough with a high fat content (for cakes, etc.). Possesses low baking properties, for uncomfortable yeast dough not
used;
• the first grade is used for making uncomfortable products; baked goods made from such flour slowly turn stale;
• the second grade contains particles of crushed grain shells, is used for baking white and black bread (mixed with rye flour), for making gingerbread and some types of cookies;
• wallpaper flour - a type of flour of the coarsest grinding, contains a lot of bran, is rich in vitamins, micro-and macroelements, is used in dietary nutrition; bread from it turns out to be dense and heavy, special baking conditions are required. This kind of flour is also often found under the names "whole grain", "grain", "wholemeal", etc.
Flour contains the least amount of minerals and fiber, but it has a high digestibility and is used for baking top quality bakery and confectionery products. Low-grade flour is less digestible by the body, but contains more minerals and fiber contained in the bran (grain shell) Sometimes flour is additionally fortified with vitamins, minerals and baking improvers (dry gluten, etc.) Commercially available flour with added baking powder, as a rule used for making cakes. Rye flour contains a lower percentage of gluten, and therefore is more often used in a mixture with wheat. Available in three varieties: seeded, peeled and wallpaper.
Corn flour and tatkno are produced by grinding corn and oat grains and are added as ingredients in baking diet bread to improve the flavor and structure of the product.
Yeast, when interacting with sugar and water, ensures the proofing of the dough.Dry fast-acting yeast ("instant") is best suited for use in a bread machine. After opening the packaging, store the yeast in the refrigerator and use it as soon as possible. Before use, yeast that has been stored in the refrigerator must be brought to room temperature, as chilled yeast has low activity.
Cinnamon destroys the structure of the yeast dough, so it is not recommended to add it when kneading. During the baking process, a characteristic smell of cinnamon appears,
however, it disappears in finished products.
Butter and fat enhance the flavor of the bread, making it mint. It is recommended to use butter in bakery: it helps to retain moisture and keeps the bread fresh for longer. If necessary, butter can be replaced with margarine or
other fats. For best results, these ingredients should be at room temperature.
Dairy products improve the taste of bread, affect the color of finished products. Milk
gives the crust softness, and the texture - "velvety", inhibits the process of staling. When using delayed start, add milk powder as fresh milk can spoil.
Baking powder is used to make breads and cakes very quickly. The baking powder makes the product airy and soft, while there is no time for proving the dough
required. As a baking powder, soda is used (to enhance the effect - with citric or acetic acid), food additives or special mixtures (baking powder, etc.).
Sugar in small amounts (about 1095) accelerates the growth of yeast, gives the bread flavor and color, and provides softness. An excess of sugar, on the other hand, inhibits the growth of yeast and delays fermentation. Sugar can be replaced with honey or molasses.
Salt improves the structural properties of the dough and the taste of the finished product. Unsalted dough has a weak consistency. At the same time, excess salt impairs the taste of the dough and interferes with its rise (salt inhibits the activity of the yeast).
Herbs and spices can be added at the very beginning of the kneading process along with the rest of the ingredients. Ginger, oregano, parsley, basil and other similar additives give the bread flavor and enhance its appearance. Use a small amount of herbs and spices (1-2 teaspoons) so that the smell is not too harsh.
Some ingredients (for example, leeks) contain a lot of liquid, so the amount of liquid needed to knead the dough should be reduced.
Garlic absorbs the activity of the yeast, so it can be sprinkled or grated on finished bread, but not added to the dough.
Eggs improve the flavor and color of the bread, making it softer.
Additional ingredients. For making bread, you can use dried fruits, nuts, ham, cut into small pieces, grated cheese, chopped chocolate. Do not add more ingredients than indicated in the recipe, or the bread may not rise. Be careful with fresh fruits and nuts as they contain extra liquid (juice and oil). This must be considered when adding the rest of the liquid ingredients.
You can buy ready-made bread mixes in the store. Use mixtures designed for baking products weighing 500-750 g.
Dough consistency
If the dough sticks too much to the sides of the working container, dust the sides with flour. If the dough is too dry, add a tablespoon of warm water. Use a wooden or plastic spoon to remove any ingredients stuck to the sides of the container. Do not use metal objects for this - they can damage the non-stick coating of the mold. Do not leave the lid open longer than necessary.
Features of the baking process
Many factors affect the taste and texture of bread made in a bread machine:
the nature of the ingredients, the temperature in the kitchen, the atmospheric pressure.When using your own bread recipe, strictly follow the recommendations for setting food and program selection in this manual. Measure the ingredients exactly by weight. Using recipes from cookbooks for other bread makers, target the weight of the finished bread at 500,750 or 1000 grams. Fill the working container to no more than a quarter, or in extreme cases, no more than a third of its volume. Otherwise, during the rise, the dough can overflow over the edges of the mold into the heating chamber, fall on the heating element and clog the drive, which, in turn, will damage the appliance.
Caring for the device
Before cleaning the appliance, make sure that it is unplugged and completely cooled down. Thoroughly clean the inside of the mold and appliance after each use.
ATTENTION! Do not immerse the appliance body and power cord in water or other liquids. The bread machine and its parts are not dishwasher safe
Open the lid and remove the baking dish by turning it slightly counterclockwise by the handle and pulling it up.
Remove the kneading paddle. If the paddle does not come off the axle, fill the baking dish with warm water and leave for a while. It will soften
the dough is stuck and the paddle comes off easily.
Wash the measuring jug, measuring spoon, baking dish and kneading paddle in hot water and a mild detergent. If the inside of the mixing paddle is heavily soiled, put it in hot water for a while and then gently clean it.
Clean the inside and body of the product with a soft, damp kitchen
with a napkin or sponge. A gentle cleaning agent may be used. In order to avoid possible smudges from water and streaks on the case, we recommend wiping its surface dry. Remove the detergent completely with a damp sponge or cloth, otherwise it may further affect the taste of the baked goods.
DO NOT use abrasive detergents and sponges with a hard or abrasive coating, as well as chemically aggressive substances when cleaning the bread maker and its parts.
Make sure all parts are dry before reusing the bread maker or before storing it.
Using the baking dish
The baking dish and kneading paddle have a non-stick coating to prevent stains and make bread easy to remove. To avoid surface damage, follow the instructions below.
1. Do not use metal or sharp devices (such as a knife or fork) when removing bread from the container.
2. Before slicing a loaf of bread, make sure there is no kneading paddle inside it. If the paddle is inside, wait until the bread has cooled down, and only then remove the paddle with a special hook. Be careful when handling the kneading paddle as it can be hot.
3. Use a soft sponge when cleaning the baking dish and paddle. Do not use any abrasive substances (such as scouring powders) or hard sponges.
4. Hard, coarse or coarse ingredients (such as wholemeal, sugar, nuts, or seeds) can damage the non-stick coating of the cooking container. When using a lot of ingredients, divide them into small portions. Stick to the recommended volumes and order
the actions indicated in the recipes.
With regular use of the mold, full or partial discoloration of its internal non-stick coating is possible. This in itself is not a sign of a defect in shape.
Storage and transportation
Clean and completely dry all parts of the appliance before storing and reusing. Store the device in a dry, ventilated place away from heating appliances and direct sunlight.
During transportation and storage, do not expose the device to mechanical stress, which can damage the device and / or damage the integrity of the packaging.
The packaging of the device must be protected from water and other liquids.
|