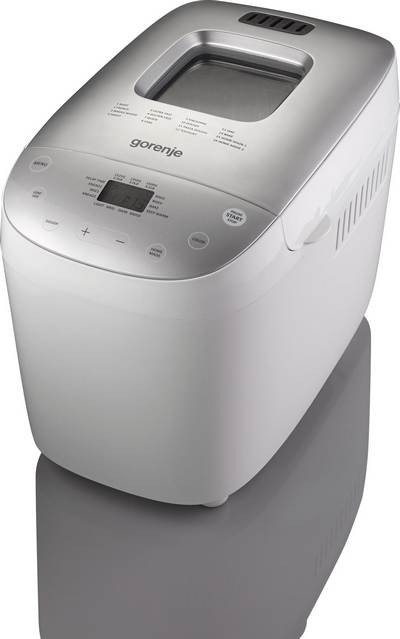
Gorenje BM1600WG. Description and characteristics of the bread maker |
|
Technical characteristics of the Gorenje BM1600WG bread machineRemovable non-stick baking dish
Description of the Gorenje BM1600WG bread makerBefore first use Check the baking dish and clean the inside. Do not use sharp objects or scrape! The baking dish has a non-stick coating. Grease the mold with oil and place in the oven to warm up for 10 minutes. Ventilate the room if an unpleasant odor develops. Clean the form again. Place the kneading paddle on the axle in the baking dish.
Electrical connection The appliance must only be connected to a properly installed 230 V ~ 50 Hz safety socket. When the appliance is plugged into an electrical outlet, a beep will sound and the display will show “3:00”. The colon between the numbers "3" and "00" will not flash continuously. The appliance is ready for use, the default program is 1, but the program has not started yet. Functions and operation
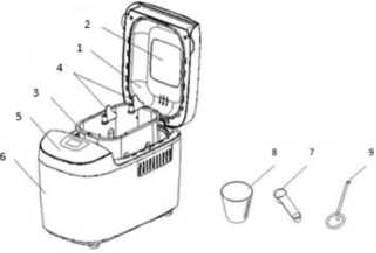
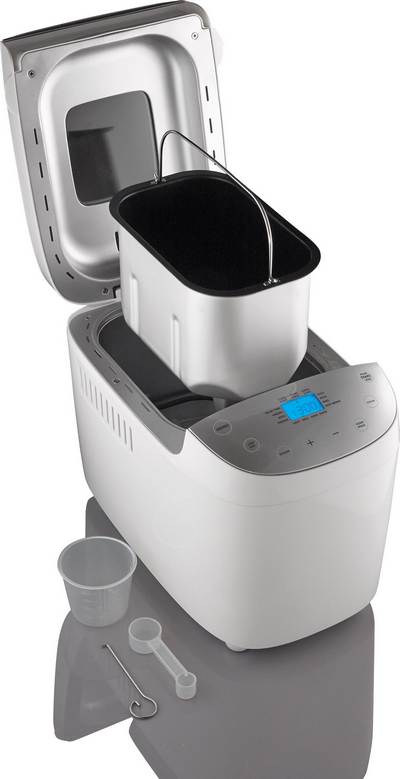
1. Cover 2. Observation window 3. Baking dish 4. Kneading blade 5. Control panel 6. Case 7. Measuring spoon 8. Measuring glass 9. Hook
Control PanelStart / stop Starts and stops the selected program. Press the START / STOP button to start the program. A short beep will sound and two dots on the time display will flash, then the program will start. After starting the program, all buttons except START / STOP will be inactive. To stop the program, press and hold the START / STOP button for about 3 seconds. After the beep sounds, the program will turn off. Pause If, after the start of the program, the START / STOP button is pressed, the program will be interrupted, but the setting will be saved in the device memory and the program time will flash on the display. To resume the program, press the START / STOP button.
Menu (Menu)Designed to select programs. The program changes with each press (accompanied by a short beep). Intermittent key presses on the LCD the display will cycle through 16 programs. Select a program. The 16 menu programs are described below. 1. Regular bread (Basic) Kneading and raising the dough, baking regular bread. Add additional ingredients to enhance the flavor. 2. French pastries (French) Kneading and raising the dough, baking bread with a longer rise. Bread baked in this setting will have a crisper crust and a fluffier crumb. 3. Whole wheat Kneading and raising dough, baking whole wheat bread.It is not recommended to use the Delay start function, as this may impair the baking quality. 4. Sweet Baking Kneading and raising dough, baking muffins. Add additional ingredients to enhance the flavor. 5. Express baking (Ultra Quick) Kneading and raising the dough, baking bread in a very short time. Breads baked in this setting are usually smaller and have a coarse crumb than those baked in the Quick Bake program. 6. Gluten free baking Kneading and raising the dough, baking gluten free bread. 7. Quick bake It is not recommended to use the LOAF and TIME functions for this program. Kneading and raising the dough, baking bread in a shorter time than with the Normal Bread program. Bread baked in this setting is usually smaller and has a firm crumb. 8. Cake (Sake) Kneading, raising the dough and baking with baking soda or baking powder. 9. Kneading Mixing flour and other ingredients. 10. Dough Kneading and raising without baking. Remove the dough and use to bake rolls, rolls, pizza, etc. 11 Pasta dough Kneading. 12. Yoghurt (Yoghurt) Preparation of yoghurt. 13. Jam (Jam) Making jam and confiture. Cut the fruit into cubes before placing it in the baking dish. 14. Bake Bake only without stirring or raising. Also used for continuous baking with your settings. 15. Home made 1 Allows the user to set their own parameters for the kneading, raising, baking and heating steps. 16. Home made 2 Allows the user to set their own parameters for the kneading, raising, baking and heating steps.
HOME MADE a) Press and hold the HOME MADE button on the screen for 2 seconds. KNEAD 1 will appear on the screen. Then + and - set the time in minutes, by pressing the HOME MADE button, confirm the set time for this step. b) RISE 1 will appear on the screen. Then + and - set the time in minutes. The time will increase faster if the button is held down. Confirm the set time by pressing the HOME MADE button. c) Set other steps in the same way. After finishing programming, press the START / STOP button to exit the setup menu. d) Press the START / STOP button to start the job. COLOR This button selects the crust color: light (LIGHT), medium (MEDIUM) or dark (DARK). The RAPID function shortens the program. BUKHANKA (LOAF SIZE) Pressing this button selects the size of the loaf. The total cycle time may vary depending on the size of the loaf. DELAY START ("+, -") If you want the device to turn on later, this button sets the duration of the delay. By pressing the "+" button, set the time when the bread should be cooked. The delay time must include the duration of the cooking program, that is, when the delay time has elapsed, the bread will be ready. First select the program and the color of the bread, then press the "+" button to increase the delay start time. Each press of the button adds 10 minutes. The maximum delay start time is 15 hours. Example The time is 8:30 pm and you want the bread to be baked by 7:00 am the next morning. The delay start time should be 10 hours 30 minutes. Select the program, the size of the loaf and then press the "+" button until the time is 10:30. Activate the delayed start by pressing the START / STOP button. The dots flash on the display and the time counts down. Fresh hot bread will be waiting for you at 7:00 am. you do not immediately take the bread from the bread maker, it will be warmed up for another 1 hour. Attention! When programming the delayed start, do not use perishable food such as eggs, fresh milk, fruits, onions.
HeatingWithin an hour after baking, the bread can be automatically reheated to keep it warm. To remove the bread during a heating program, first switch off the program with the START / STOP button. MemoryIf the power is cut off while baking bread, the program will continue automatically if the power supply resumes within 10 minutes, even if the START / STOP button is not pressed. If there is no power for more than 10 minutes, the data is not saved in memory, so you need to throw out the old and put new ingredients in the baking dish, knead the dough again and restart the bread maker. However, in case the dough does not start Ambient temperatureThe appliance is designed to operate over a wide temperature range, but breads baked in very warm or very cold rooms may vary in size. The recommended room temperature range is 15 ° to 34 ° C. Display warnings1. If the display shows "HHH" after pressing the START / STOP button, the room temperature is very high. In this case, stop the program execution. Open the lid and leave the device to cool for 10-20 minutes. 2. If the display shows “LLL” (except for the “Bake” program) after pressing the START / STOP button, the room temperature is very low (5 beeps). Switch off the signal with the START / STOP button. Open the lid and leave the appliance for 10-20 minutes to warm to room temperature. 3. If the display shows "E E0" or "E E1" after pressing the START / STOP button, the temperature sensor is faulty. Contact the service center Baking bread1. Place the baking dish in working position and turn clockwise until it clicks. Secure the kneading arm. To prevent the dough from sticking to the kneading paddle and to make it easy to separate the paddle from the bread after baking, grease the paddle with heat-resistant margarine before placing it. 2. Place the ingredients in the baking dish in the order shown in the recipe. It is recommended to add water and other liquids first, then add sugar, salt and flour, and add yeast and baking powder last. Yeast or baking powder Dry ingredients (flour, sugar, etc.) Water or other liquid Note: The maximum amount of flour and yeast is indicated in the recipe. 3. Make a small hole on the surface of the flour and pour the yeast into it, making sure that the yeast does not mix with the liquid and salt. 4. Carefully close the cover and plug the power cord into an electrical outlet. 5. Press the MENU button to select the desired program. 6. Press the COLOR button to select the desired crust color. 7. Press the LOAF button to select the desired loaf size (1125, 1350, or 900 g). 8. Press the "+" (Delayed start) button to set the Delayed start. You can skip this step if you want to start the bread maker immediately. 9. Press the START / STOP button to start the device. 10. The execution of programs 1-7 is accompanied by a sound signal. He indicates the need to add ingredients. Open the lid and add the ingredients. During the baking process, steam may escape through the holes in the lid. This is normal. 11. After baking is complete, ten beeps will sound in sequence. To end the program and remove the bread, press and hold the START / STOP button for 2 seconds. Open the lid and use the oven mitts to turn the baking dish counterclockwise and remove it from the appliance. Note The baking dish and bread can be very hot! Be careful. 12 Let the baking dish cool before removing the bread. Then, using a non-stick spatula, carefully separate the bread from the baking dish at the edges. 13. Turn the baking dish over a wire rack or clean counter and then gently shake until the bread falls out. 14. Allow the bread to cool for about 20 minutes before slicing.It is recommended that you cut the bread with an electric slicer or with a bread knife rather than a fruit knife or a regular kitchen knife, as the bread may lose its shape. 15. If at the end of the program you do not switch off the appliance and press the START / STOP button, the bread will be automatically reheated for an hour, and then 10 beeps will sound. 16. Unplug the power cord from the outlet when not in use or after completing baking. Note: Before slicing bread, remove the kneading paddle from the bread using the hook. The bread is hot, so do not remove the kneading arm with your bare hands. Tip If you haven't eaten all of your bread, it is a good idea to store it in an airtight plastic bag or in a bread bin. Bread can be stored at room temperature for three days. For longer storage, pack the bread in a plastic bag or container and refrigerate. With this storage, the bread is good for 10 days. Home-baked bread has a shorter shelf life than store-bought bread. Quick bakingYeast-free bread is made with the addition of baking powder or baking soda, which become active under the influence of heat and liquid. To achieve high quality fast baking, it is recommended to first pour the liquid into the bottom of the baking sheet and then add the dry ingredients (flour, sugar, salt). During the initial kneading phase of the quick bake dough, dry ingredients may clump in the corners of the pan. Stir the dough constantly so that the flour does not clump. Cleaning and storageUnplug the appliance before cleaning. 1. Baking dish Wipe the inside and outside with a damp cloth. Do not use sharp objects or abrasive products. The baking dish is not dishwasher safe. 2. Kneading arm If the kneading arm cannot be removed from the axle, pour water into the baking dish. 3. Cover and sight glass The cover and the device are cleaned inside and outside with a damp cloth. |

| Gorenje BM910WII. Description and characteristics of the bread maker | Comparison of Gorenje bread makers |
|---|
New recipes