|
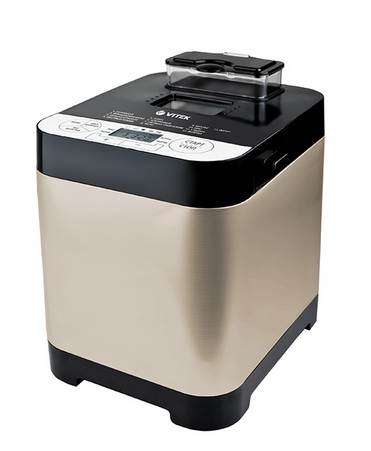
Technical characteristics of the VITEK VT-1999 bread machine
Power 500 W
Maximum baking weight 750 g
Special programs jam, muffin, wheat bread, wholemeal bread
Additional functions selection of crust color, timer, baking weight adjustment, dispenser, dough kneading, accelerated baking
Loaf baking form
Number of baking programs 13
Number of kneaders 1
Memory reserve in case of power failure 10 min
Features yogurt
The home bread maker is designed for baking bread, muffins, jam and yoghurt.
VITEK VT-1999 bread maker device
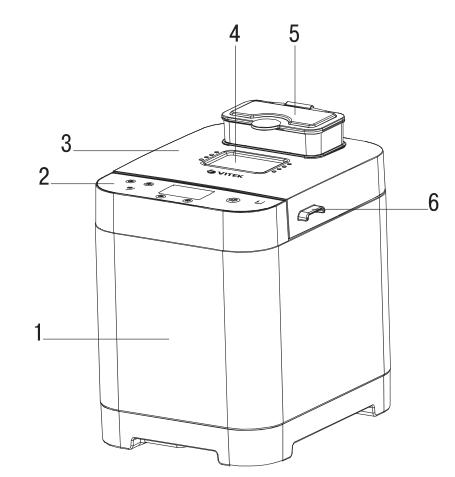
1. Case
2. Control panel
3. Cover
4. Observation window
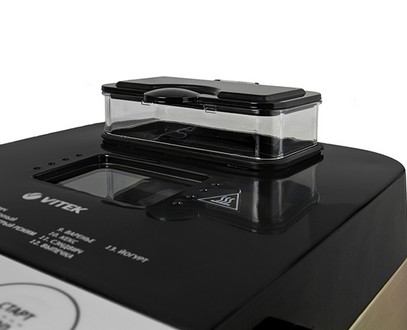
5. Container for automatic addition of ingredients
6. Handle
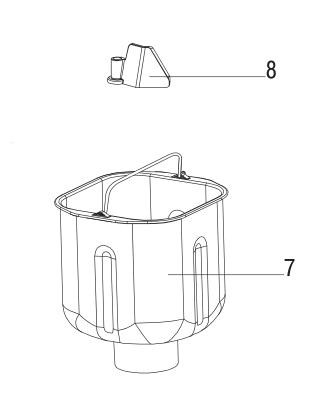
7. Baking dish
8. Kneading paddle
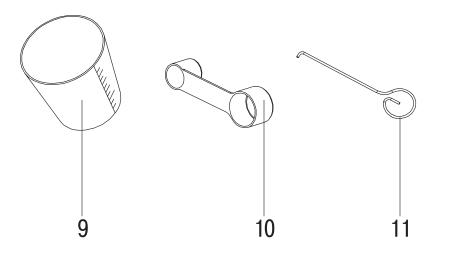
9. Measuring glass
10. Measuring spoon
11. Blade extraction hook
VITEK VT-1999 bread machine control panel and display
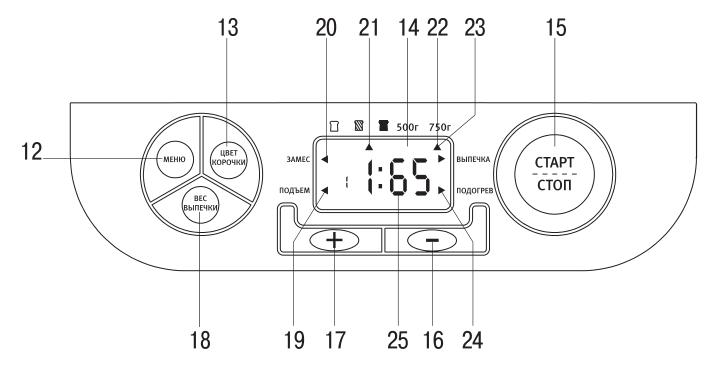
12. Button for selecting the automatic program "MENU"
13. Button for selection of crust color "SHORT COLOR"
14. Display
15. ON / OFF button "START / STOP"
16. Button to decrease the delay time "-"
17. Button for increasing the delay time "+"
18. Button for setting the weight "BAKING WEIGHT"
19. Symbol for proving (raising) dough
20. Symbol for mixing dough
21. Symbol for selection of crust color
22. Symbol for baking weight selection
23. Baking symbol
24. Heating mode symbol
25. Digital readout of remaining run time / delay time
26. Baking program number
Operation of the VITEK VT-1999 bread maker
Before first use
After transporting or storing the device at a low temperature, keep it at room temperature for at least three hours.
- Unpack the device and remove any stickers that might interfere with device operation.
- Check the integrity of the device, if there is any damage, do not use the device.
- Grasp the automatic addition container (5) and remove it from the lid (3).
- Open the cover (3) by grasping the handles (6).
- Lift and grip the baking dish handle (7), turn the handle counterclockwise and remove the baking dish (7).
- Rinse container (5), mold (7), paddle (8), measuring cup (9), measuring spoon (10) and hook (11) with warm water using a neutral detergent, then dry thoroughly.
- Wipe the body of the bread maker (1) and lid (3) with a soft, slightly damp cloth, then wipe dry.
- Place the baking dish (7) in place and turn it clockwise until it stops, place the kneading paddle (8) on the shaft in the baking dish (7).
- Close the lid (3) and place the container (5) in it.
- Place the device on a flat, dry, heat-resistant and stable surface. The distance to the nearest surfaces should be at least 20 cm.
- The bread maker is ready for use.
Note:
- The bread maker is designed to operate over a wide range of temperatures, however, excessively high or low room temperatures will affect the rising of the dough and therefore the size and density of the bread. The most optimal room temperature is from +15 to + 34 ° С.
Control panel (2)
By pressing the buttons on the control panel (2) you can select the required automatic program, set the delayed cooking time, and control the entire baking process on the display (14). Each press of the control panel buttons is accompanied by a sound signal.
Automatic programs (button 12) "MENU"
By pressing the button (12) you can select an automatic program,
grams is indicated on the display (14) by the symbol (26).
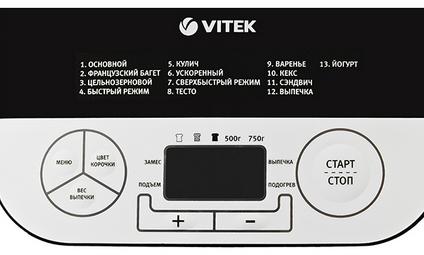
There are 13 automatic programs in total:
1. "BASIC"
Includes all stages of bread making: kneading dough, proving (raising) the dough and baking, you can also add the required ingredients by placing them in the container (5) to improve the taste of the finished baked goods.
2. "FRENCH BAGUETTE"
It takes a longer time to make the bread, and the bread has a large spongy crumb and a crispy crust.
3. "WHOLE GRAIN"
Bake healthy bread with fine and coarse flour. It is not recommended to use the delay function when baking such bread, as this may lead to undesirable results.
4. "FAST MODE"
Bread is baked faster than in the BASIC program, but bread is usually smaller in volume and with a denser texture.
5. "KULICH"
Add baking powder or baking soda to the sweet dough and make delicious baked goods.
6. "ACCELERATED"
Baking in no time. Typically, the bread is smaller and denser in texture compared to the FAST MODE program. Use baking powder or baking soda for baking. If, during the initial kneading, dry ingredients accumulate in the corners of the mold (7), turn on the pause mode by pressing the START / STOP button (15), knead the dough with a plastic kitchen spatula. Start the program by pressing the "START / STOP" button (15).
7. "SUPER FAST MODE"
Making bread in one hour. Use baking powder or baking soda for baking. The bread is smaller and has the tightest crumb.
Attention! After selecting automatic programs 7 and 8, pour water at a temperature of 48-50 ° C into the baking dish (7) (measure the accuracy of the water temperature with a kitchen thermometer). The water temperature plays a decisive role in fast and ultra-fast bread preparation: too low a water temperature will prevent the dough from rising on time, and too high will kill the yeast.
8. "DOUGH"
The bread maker kneads the dough and lets it rise. Use the dough to further prepare homemade cakes (pies, pizzas, etc.).
9. "JAM"
Make aromatic homemade jams, jams, or confiture. Pre-cut the fruits for making jam, jam or confiture.
10. "KEKS"
Program for making sweet pastries. While the program is running, a mode is provided for adding additional ingredients that can improve the quality and aroma of baked goods.
11. "SANDWICH"
Program for baking bread with a light texture and a thin crust.
12. "BAKING"
The bread maker works like a regular electric oven. The program excludes the modes of kneading and raising the dough. The program is used to bake ready-made dough or to brown baked bread.
13. "YOGURT"
Only low heat, you can independently set the yoghurt preparation time from 6 to 12 hours in 30 minute increments (default time: 8 hours).
Choice of crust color (button 13)
You can choose one of three colors for the crust of the finished bread.
- By pressing the button (13) the required crust color is selected, the selected crust color is indicated on the display (14) by the symbol (21).
Note: this function is not available for programs 8, 9, 10, 11, 13.
Start / stop (button 15)
- Pressing the button (15) starts the selected automatic program, while on the display (14) the dividing points in the digital time readings (25) will flash.
- By pressing the button (15) again, the "pause" mode is activated, while on the display (14) the digital indications of the remaining operating time (25) flash. To continue the program, press the button (15) again.
- Resetting the automatic program. To reset the automatic program, press and hold the button (15) for three seconds, a beep will sound and the set program will be reset.
- While the automatic program is running, the remaining buttons on the control panel (2) are locked.
Delay time buttons (16, 17)
You can program in advance by what time the automatic program will end.
- Use the control panel buttons (2) to select the required automatic program (12), crust color (13) and weight (18).
- After that, by pressing the buttons (16) "-" and (17) "+", set the delay time (note, when setting the delay time, take into account the running time of the automatic program). The delay time will be shown on the display (14) with numerical values (25).
Note: the maximum delay time is 13 hours, the setting step is 10 minutes.
Example:
If it is now 20:00, you have set the automatic program "1" "BASIC" and you want the freshly baked bread to be ready by 7 am the next day, set the delay time with the buttons (16, 17) to 8 hours (program time "1" " BASIC "- 3 hours). - After setting the delay time, press the "START / STOP" button (15), on the display (4) the dividing dots in the remaining operating time (25) will flash and the countdown will begin until the automatic program starts.
- To cancel the delay, press and hold the "START / STOP" button (15) for three seconds, a beep will sound.
Note:
- The delay function is not available for programs "fast" (6), "super fast" (7), "jam" (9), "baked goods" (12), "yogurt" (13).
- Do not use the delay function with perishable food such as milk, eggs, fruit, etc.
Selecting the baking weight (button 18)
Depending on the amount of ingredients placed in the button (18), you can select the weight of the baked goods - 500 g. or 750 gr.
Note: The weight of the baked goods determines the length of the baking time (see table "Running times for automatic programs").
Display (14)
On the display (14) you can control the entire baking process, during the operation of the bread machine, the following symbols are displayed: - (19) - raising the dough
- (20) - kneading dough
- (21) - choice of crust color
- (22) - weight selection
- (23) - baking process
- (24) - heating function
- (25) - digital values of operating time / delay
- (26) - cooking program number
Bread Maker Cycles
The bread maker does the following:
- Kneading the dough until smooth. The dough kneading process is indicated on the display (14) by the symbol (20).
- Proving dough - the process is indicated on the display (14) by the symbol (19).
- Baking - the process is indicated on the display (14) by the symbol (23).
- Heating - the display (14) shows the symbol (24). The finished bread will be kept warm for 60 minutes after the end of the automatic baking program. If you need to take out the bread, turn off the heating function by pressing and holding the START / STOP button (15).
Note:
- Never open the lid (3) while the bread is being baked; if the temperature changes suddenly, the dough may fall off and no longer rise.
- The baking process can be monitored through the inspection window (4) in the lid (3).
Additional functions of the bread maker
Adding ingredients
- The device is equipped with a container (5) for the automatic addition of ingredients (fruit pieces, nuts, etc.) during the dough kneading process.
- Load the ingredients into the container (5) before starting the automatic program.
- During the automatic program, the lower lid of the container (5) will open and the ingredients will be added to the dough.
Note: the function of adding ingredients during operation is not available for programs 8, 9, 12.
Memory
- In the event of an emergency power outage during the operation of the bread machine, the memory function is activated for up to 10 minutes.
- If the power supply is restored within 10 minutes, the bread maker will continue to run the set program from the moment when the program was paused.
- If there is a power failure for more than 10 minutes, it is necessary to reload the products, install and activate the automatic program.
Using a bread maker
Before connecting the bread maker to the mains, make sure that the operating voltage of the device matches the voltage of the mains. Note: When using for the first time, there may be an odor from the heating element, this is permissible.
- Open the lid (3) and make sure the baking dish (7) and paddle (8) are in place.
Note: before installing the blade (8), it is advisable to grease it with margarine or vegetable oil, this will facilitate its extraction from freshly baked bread.
- Place the ingredients in the mold (7) in the order described in the recipe. Usually the ingredients are placed in the following order:
- liquids;
- bulk ingredients (sugar, salt, flour);
- yeast and baking powder.
Note: the yeast should not come into contact with liquids or salt before kneading the dough. Make a small depression in the flour and place the yeast in it.
- Remove spilled food or liquids from the outside of the mold (7).
- Close the cover (3)
- Place the required ingredients in the container (5) that will be automatically added during the kneading process (pieces of fruit, nuts, etc.).
- Plug the power cord into the socket, a beep will sound, the display (14) will show the following symbols:
- medium crust brewing (symbol 21)
- weight 750 g., symbol (22)
- program number 1, symbol (26)
- program time 3:00 hours (25)
- Select the required automatic program by pressing the “MENU” button (12).
- Press the button (13) repeatedly to select the crust color.
- Press the button (18) repeatedly to select "BAKING WEIGHT" depending on the amount of ingredients placed in the baking dish (7).
- Set the delayed cooking time by pressing the buttons (16) "-" and (17) "+".
Note: Skip setting the snooze time if you want to start the installed program immediately.
- To start the automatic program, press the "START / STOP" button (15), while on the display (14) the dividing points of the digital values of the program runtime (25) will flash and the remaining runtime of the automatic program will begin to count.
- While kneading the dough, the lower lid of the container (5) will open automatically, additional ingredients will be added to the dough.
- The baking process can be monitored through the inspection window (4) in the lid (3).
- The end of the program will be indicated by sound signals.
- After the end of the automatic program, the heating function starts, the display (14) will show the symbol (24), the heating function will run for 60 minutes.
- After deactivating the heating function, a sound signal will sound, the display (14) will show the settings of the program “1” “BASIC”.
- To cancel the heating function, press and hold the "START / STOP" button (15).
- Unplug the power cord from the outlet.
- Put on heat-resistant oven mitts, open the lid (3), grasp the handle of the mold (7), turn it counterclockwise and take it out of the machine.
- Let the mold cool for about 10 minutes.
- Separate the baked goods from the pan (7) using a plastic kitchen spatula.
- To remove the bread, turn over the pan (7) and shake it gently.
- Before slicing the bread, remove the blade (8) with the hook (11).
- Cut the bread with a sharp bread knife.
Ingredients
Flour
The properties of flour are determined not only by the variety, but also by the conditions of grain growing, processing and storage. Try to bake bread with flour from different brands and brands and find the one that suits your needs. Wheat and rye flour are the main types of bakery flour.Wheat flour finds wider application, due to the pleasant taste and high nutritional value of wheat flour products.
Baking flour
Bakery (refined) flour, consisting only of the inner part of the grain, contains the maximum amount of gluten, which ensures the elasticity of the crumb and prevents the bread from falling off. Bread flour baked goods are fluffier.
Whole grain flour (wallpaper)
Whole grain (wallpaper) flour is obtained by grinding whole wheat grains together with the shell. This type of flour has a high nutritional value. Whole grain breads are usually smaller in size. To improve the consumer properties of bread, whole grain flour is often mixed with bakery flour.
Corn and oat flour
Combine wheat or rye flour with corn or oatmeal to improve the texture and flavor of the bread.
Sugar
Sugar enriches baked goods with additional flavors and gives the bread a golden hue. Sugar is a breeding ground for yeast growth. Add not only refined, but also brown sugar and powdered sugar to baked goods.
Yeast
Yeast growth is accompanied by the release of carbon dioxide, which contributes to the formation of a porous crumb. Flour and sugar are the breeding ground for yeast growth. Add fresh pressed or instant dry yeast. Dissolve fresh pressed yeast in warm liquid (water, milk, etc.), add fast-acting yeast to flour (does not require preliminary activation, i.e. adding water). Follow the recommendations on the packaging or observe the following proportions:
- 1 teaspoon of fast acting dry yeast = 1.5 teaspoon of fresh compressed yeast.
- Store fresh yeast in the refrigerator. The high temperature kills the yeast, in which case the dough does not rise well.
Salt
Salt gives the bread extra flavor and color, but slows down yeast growth. Do not use excessive amounts of salt. Always use fine salt (coarse salt can damage the non-stick coating on the baking dish).
Eggs
Eggs improve the structure and volume of baked goods, enrich the taste. Beat the eggs thoroughly before adding to the dough.
Animal and vegetable fats
Animal and vegetable fats make baked goods softer and increase shelf life. Before adding the butter, cut it into small cubes or let it thaw a little.
Baking powder and soda
Soda and baking powder (baking powder) shorten the time required to rise the dough. Use baking powder or baking soda when baking in EXTRA FAST. Soda must be pre-mixed with citric acid and a small amount of flour (5 g of baking soda, 3 g of citric acid and 12 g of flour). This amount of powder (20 g) is calculated for 500 g of flour. Do not use vinegar to quench baking soda, this makes the crumb less homogeneous and more moist. Simply pour the baking powder (baking powder) into the mold, following the directions in the recipe.
Water
Water temperature plays an important role when baking bread. The optimum water temperature is 20-25 ° С, for "SUPER FAST MODE" 45-50 ° С. You can replace the water with milk or enrich the taste of the bread by adding some natural juice.
Dairy
Dairy products improve the nutritional value and taste of bread. The crumb turns out to be more beautiful and appetizing. Use fresh dairy or milk powder.
Fruits and berries
Use only fresh and high quality fruits and berries for making jam.
Dosage
The secret of good bread is not only the quality of the ingredients, but also the strict observance of their proportions.
- Use a kitchen scale, measuring cup (9) and spoon (10).
- Fill the measuring cup (9) with liquid to the appropriate mark. Check the dosage by placing the cup (9) on a level surface.
- Thoroughly clean the measuring cup (9) from the remnants of the previous ingredient.
- Do not compact dry ingredients by pouring them into the measuring cup (9).
- It is important to sift the flour through a sieve before use to saturate it with air, this will guarantee the best baking result.
Cleaning and maintenance
- Turn off the bread maker, unplug the power cord from the electrical outlet and let the bread maker cool down.
- Wipe the housing (1) and cover (3) with a slightly damp cloth, then wipe dry.
- Remove the container (5) from the lid (3), rinse and dry.
- Wash the baking dish (7), paddle (8), measuring cup (9), spoon (10) and hook (11) with warm water and a neutral detergent.
Note:
- If the paddle (8) cannot be removed from the axle, fill the mold (7) with warm water and wait about 30 minutes.
- Mold (7) and paddle (8) are dishwasher safe.
- Dry the mold (7) and paddle (8) thoroughly before placing them in the bread maker.
- If there is dirt on the inside of the bread maker, remove the dirt and wipe the surface with a slightly damp cloth, then wipe dry.
- Do not immerse the machine body, power cord and power plug in water or any other liquid.
Storage
- Before storing the device, clean it and let it dry completely.
- Store the device in a cool dry place out of the reach of children.
|


