|
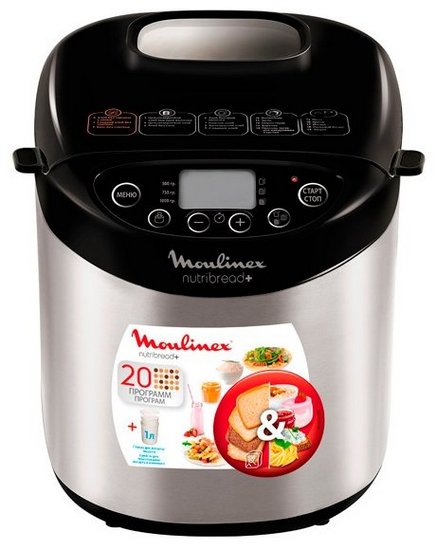
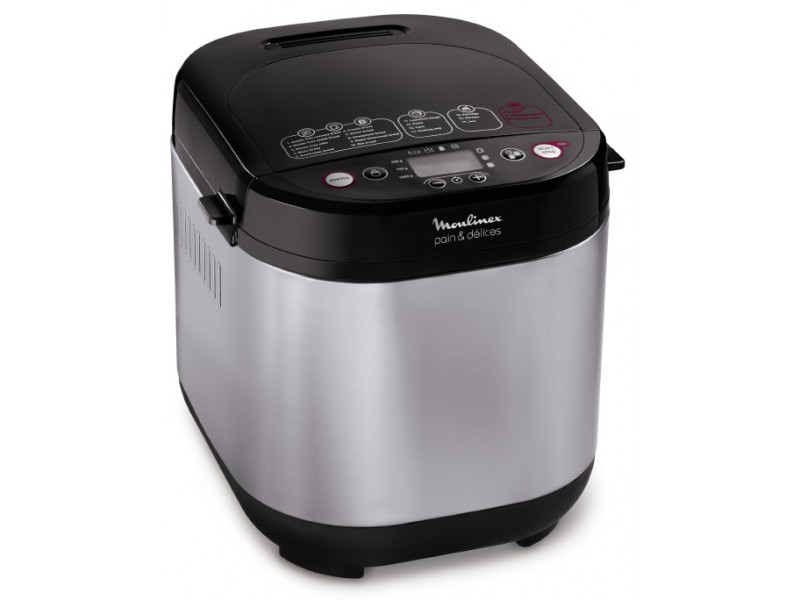
Moulinex OW312E32 Nutribread + Bread Maker Specifications
Power 700 W
Material Stainless steel / plastic
Bread sizes 500 g / 750 g / 1000 g
Number of programs 20
Gluten Free Bread Baking Programs 3
Healthy eating programs 3
Other dishes Dairy products
Recipes:
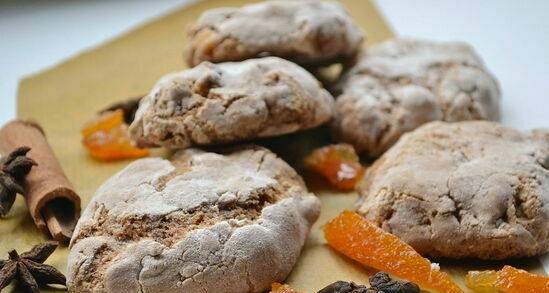
- Spicy Gluten Free Bread,
- Sweet gluten free bread,
- Gluten Free Pie / Cupcake,
- Classic bread,
- Classic quick baked bread,
- French bread,
- Sweet bread,
- Wholemeal bread
- Instant wholemeal bread,
- Rye bread / Borodinsky,
- Yeast dough, Pasta,
- Pie / muffin, Baking,
- Porridge, Groats,
- Jam / jam.
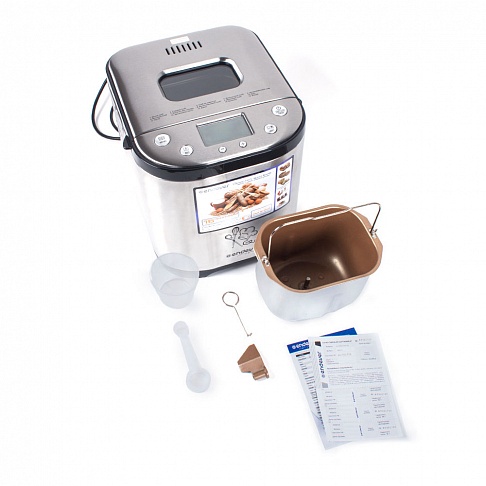
Standard accessories (measuring spoon, glass, spiral) Yes
Number of knives 1
Baguette trays with stand, brush and scoring tool NO
Yogurt or Dairy Jug Yes
Interface LCD interface
Browning levels Light / Medium / Dark
Delayed start Up to 15 hours
Keeping warm 1 hour
Ingredient addition signal Yes
PTFE Bread Pan Coating
Bowl shape Square
Sight glass Yes
Colors Silver + Black
Moulinex OW312E32 Nutribread Bread Maker
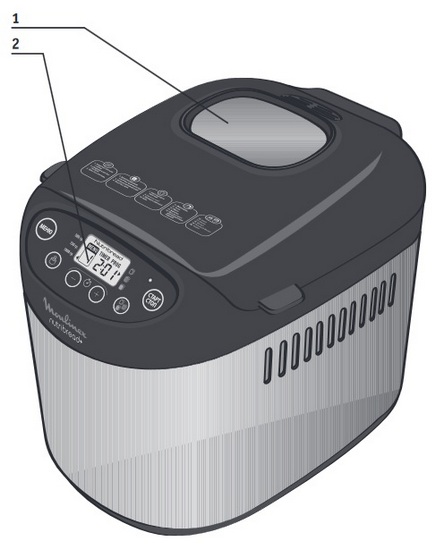
- - cover with a viewing window
- - dashboard
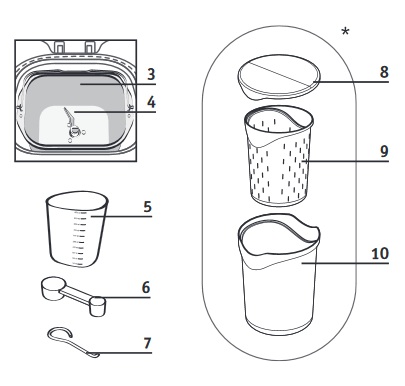
- - Bread bowl
- - mixing paddle
- - beaker
- - teaspoon / tablespoon
- - "Hook" for removing the blade
- - Storage lid
- - Glass for whey
- - Glass for yogurt
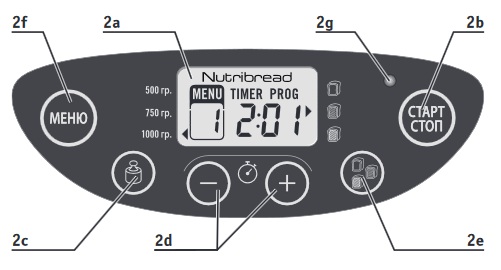
2a - liquid crystal display
2b - start buttons in different modes
2c - weight selection
2d - keys for setting timer start and setting time for program 11
2e - choice of crust color
2f - program selection operation indicator
Preparation
- Carefully read the instructions for use: with this appliance, bread is baked differently than by hand!
- All ingredients used should be at ambient temperature (unless otherwise noted) and carefully weighed. Measure out liquids using the supplied measuring cup. Use a double dosing spoon, with a tablespoon and a teaspoon. If the dosage is not correct, the results will be poor.
- Use the ingredients before their expiration date. Store them in a cool dry place.
- It is important to measure the exact amount of flour. Therefore, use a kitchen scale to weigh the flour. Use an active anhydrous baking yeast bag. Unless otherwise indicated in recipes, do not use baker's yeast. After opening a bag of yeast, use it within no more than two days.
- In order not to interfere with the raising of the dough, it is recommended to load all the ingredients into the vat from the beginning and to try not to open the lid during the cycle (unless otherwise noted). Carefully follow the order and the amount of ingredients indicated in the recipes. Add liquids first, then solid foods. The yeast should not come into contact with liquid or salt.
General bookmark order:
- > Liquids (butter, vegetable oil, eggs, water, milk)
- > Salt
- > Sugar
- > First half of flour
- > Powdered milk
- > Special solid ingredients
- > Yeast
- The baked bread is very sensitive to temperature and humidity. If the room temperature is very high, it is recommended to use a liquid colder than usual. At low temperatures, it may be necessary to heat water or milk (up to a temperature not exceeding 35 ° C).
- Sometimes it is also useful to check the condition of the dough during kneading: it should be a homogeneous mass that easily lags behind the walls of the bowl:
- if unmixed flour remains, add a little water,
- otherwise it may be necessary to add flour.
- Flour or water should be added very carefully (one tablespoon at a time), and be sure of the quality of the dough before adding new portions.
- A common mistake is that the addition of yeast is considered to provide a better rise in dough. On the contrary, with too much yeast, the structure of the dough becomes more brittle, it rises high, and drops when baking. The quality of the dough can be assessed by lightly tapping it with your fingers - the dough should "resist" being pressed, and the dents on it should be gradually smoothed out.
Specifics of using gluten-free programs
- Flour mixtures should be sieved with yeast to avoid clumping.
- Attention should be paid to the quality of the kneading: to ensure that all the ingredients are well mixed, scrape off any unmixed fragments from the edges of the bowl and move them in the middle with a spatula (made of wood or plastic to avoid scratching the coating).
- When adding ingredients, you must also mix them thoroughly for inclusion in the dough.
- Due to the nature of the ingredients in gluten-free recipes, the bread does not brown normally. The upper crust remains relatively light.
- Gluten-free bread does not rise like traditional bread and stays flat on top.
- Not all brands of ready-made mixes give the same result: some recipes may need to be adjusted. Therefore, we recommend experimenting (see example below).
Example. Adjust the amount of liquid to achieve the desired dough consistency. It should be relatively soft, but not runny.

Exception: The biscuit dough must remain relatively thin.
Before first use
• Unpack the appliance, remove the stickers and • Wipe all parts and the appliance itself with a damp clean the additional accessories, both with a cloth, outside and inside the appliance - A.
Quick Start Guide
- Unwind the power cord completely, only plug the appliance into a grounded power outlet • When using for the first time, you may get a slight odor.
- Remove the bread bowl by lifting it by the handle and slowly turning it counterclockwise. Then install paddle -B-D.
- Place the ingredients in the bowl in the order shown. Make sure all ingredients are measured exactly -E-F.
- Insert the bowl into the bread maker. Holding the bread bowl by the handle, insert it into the bread maker so that it fits on the drive shaft (you will need to tilt it slightly to do this). Then turn clockwise and the bowl snaps into place -G-H.
- Turn on the power to the bread machine. After the beep, the display shows the first program, that is, the program for baking bread with a weight of 1,000 g with a medium golden crust -I.
- Select the required program using the Q button.
- Click on the © button. The display will show the timer and the -J-K operation indicator will light up.
- At the end of the baking cycle, disconnect the bread maker from the power supply. Remove the bread bowl from the bread machine. Always use gloves, the handle and the inside of the lid get hot. Take out the hot bread and place it on the cooling rack -L for an hour.
Using a bread maker
The default setting is displayed for each program. Therefore, the exact settings are selected manually.
Choice
When you select a program, a sequence of steps is included that are performed one after another.
The menu key selects one of the various programs. On the indicator
the program execution time is indicated. Each time you press a key with a number on the display panel, you move to the next program, from 0 to 19.
Using gluten-free programs
For gluten-free breads and cakes, use programs 0,1 and 2. There is only one weight option for each of these programs (1000 g for programs 1 and 2; 750 g for program 3).
Gluten-free breads and muffins are suitable for people with gluten-sensitive celiac disease, i.e., intolerant of gluten, which is present in many grains (wheat, barley, rye, oats, Khorasan wheat, spelled, etc.).
It is important to avoid mixing with flour containing gluten.Thoroughly wash the bowl, spatula, and all utensils in which you will use gluten-free bread and muffins. Also, make sure the yeast you choose is gluten-free.
These gluten-free recipes were developed using ready-to-use gluten-free bread mixes such as Schar or Valpiform.
These types of gluten-free formulas are available in supermarkets and specialty stores. Note that not all brands of ready-to-use gluten-free formulas produce the same result.
The consistency of gluten-free flours is not conducive to the best mixing. Therefore, to prevent the formation of lumps, we recommend sieving the flour mixtures together with the yeast.
This is why there is no delayed start option in gluten-free programs. You should also use a flexible wooden or plastic spatula to remove the dough from the edges of the bowl and move it to the center so that no unmixed ingredients remain and the dough is uniform.
Gluten-free bread will be denser and lighter in color compared to regular bread.
Gluten free bread with salt. We recommend using a ready-made mixture. For this program there is only one variant of the weight -1000 g. The bread is baked from a ready-made mixture according to a recipe with a low sugar and fat content.
- Sweet bread without gluten. We recommend using a ready-made mixture. For this program, there is only one variant of the mass - 1000 g. Bread is baked from a ready-made mixture according to a recipe containing sugar and fats.
- Gluten free cupcake. We recommend using a ready-made mixture. For this program, there is only one weight option - 750 g. Bread is baked according to the recipe cupcake using a ready-made mixture and a baking powder.
- Quick-baked whole grain bread. This program is similar to the Whole Grain Bread program, only faster.
- Whole wheat bread. Program Whole flour bread, selected for baking bread from flour with bran.
- Bread without salt. Bread is the food that provides the greatest contribution of salt daily. Reducing salt intake can reduce the risk of heart disease.
- Quick baked bread. Program 7 is only suitable for the Super Quick Bread recipe. Quick baked breads are produced in a more compact size than with conventional programs.
- Rye bread. This program should be selected when using a large amount of rye flour or other similar cereals (eg buckwheat, spelled).
- French bread. The French bread program corresponds to the traditional French white bread recipe.
- Sweet bread. The Sweet bread program, adapted for sweet bread recipes with a high sugar and fat content. If you are using bun mixes, do not add more than 750g of dough.
- Baking. The Bake program is designed to cook pastries for 10 to 70 minutes (in 10 minute increments). This program can be used: a) in conjunction with the yeast dough program, b) to warm up and crisp on bread that has already been baked and cooled, c) to end the bread preparation in the event of a prolonged power interruption during the bread baking cycle. Do not leave the bread maker unattended during program 11. After reaching the desired crust color, stop the program manually by pressing the button.
- Dough. The Dough program is not suitable for baking. It is suitable for kneading and raising any yeast dough, such as pizza dough.
- Pie / cupcake. The Pie program enables the production of Baked Pastries and Pies using dry yeast. For this program, the weight setting is only available at 750 g.
- Jam. The Jam program is intended only for automatic preparation of sweet filling in the bowl.
- Unleavened dough for pasta. The Unleavened pasta program is ideal for soft breads with a thin crust. For example: pasta, gluten free pizza dough.
- Porridge.This program allows you to cook porridge and rice pudding with milk.
- Groats. This program allows you to cook various cereals: rice, buckwheat, etc.
- Yogurt. This program allows you to cook yogurt based on pasteurized cow, goat or soy milk. Place the yogurt glass in a container (without lid and whey filter). After cooking, store yoghurt in a cool place and consume it within 7 days.
- Drinking yoghurt. This program allows you to prepare drinking yoghurts based on pasteurized milk. Place the yoghurt glass in a container (no lid). Stir well before use. After cooking, store yoghurt in a cool place and consume it within 7 days.
- Cottage cheese. This program allows you to cook cottage cheese based on sour cow or goat milk or kefir. Insert the whey glass into the yogurt glass (no lid) and place in the container. The pumping stage is required for this program. After cooking, store the curd in a cool place and consume it within 2 days.
Ingredients
Gluten Free Flour: There are many "non-bread" flours (which do not contain gluten). The most common types of such flour are buckwheat, rice (white and brown), quinoa, corn, chestnut and sorghum.
To achieve the inherent elasticity of gluten, you need to mix different types of non-bread flours and add thickeners.
Thickeners: You can also add xanthan and / or guar gum to the dough to achieve the desired consistency and mimic the elasticity of gluten. These substances are used in the food industry as thickeners, stabilizers and emulsifiers.
Ready-to-eat gluten-free mixes: they make it easier to bake gluten-free breads as they contain thickeners and are guaranteed to be gluten-free; some of them are also organic.
Not all brands of ready-to-use gluten-free formulas give the same result.
Fats and Vegetable Oil: Fats add fluffiness and flavor to bread. This bread also has a longer shelf life. Excess fat slows down the rise of the dough. If you are using butter, cut it into small pieces to distribute it more evenly in the dough, or soften it beforehand. Do not pour liquid oil into the bread maker. Avoid contact of fats with yeast, as fat can interfere with the moisture saturation of the yeast.
Eggs: Eggs enrich the dough, improve the color of the bread and contribute to the formation of a tasty crumb. If using eggs, reduce the amount of liquid ingredients. Crack an egg and add liquids to the volume indicated for the liquid in the recipe. Recipes call for a medium egg of 50 grams; for larger eggs, add a little flour; for smaller eggs, reduce the amount of flour.
Milk: You can use fresh or powdered milk. If using powdered milk, add water to the originally indicated volume. If you are using fresh milk, you can also add water - the total volume of liquid must be equal to the volume indicated in the recipe. Milk also has an emulsifying effect, which allows for more uniform cavities and a more beautiful crumb appearance.
Water: Water saturates and activates the yeast. It also saturates the starch in the flour and provides crumbling. Water can be replaced, in part or in whole, with milk or other liquids. Use liquids at room temperature, except for those gluteless new bread recipes that require warm water (about 35 ° C).
Flour: the weight of flour is highly dependent on its type. Depending on the quality of the flour, the resulting baked goods may vary. Store flour in an airtight container, as it can react to fluctuations in temperature and humidity by absorbing or, conversely, releasing moisture. Adding oat flour, bran, wheat germ, rye flour, and finally whole grains to the dough results in a heavier and less fluffy bread.The use of premium flour is recommended unless otherwise indicated in recipes.
The results are also influenced by how sifted the flour is - the more whole it is (that is, if it contains particles of the shell of wheat grains), the less the dough rises, and the denser the bread turns out. You can also find ready-made baking dough in stores. When using this test, follow the manufacturer's instructions. In general, when choosing a program, adhere to the requirements for finished baked goods. For example, for whole flour bread, use program 5.
Sugar: Refined sugar or honey is preferred. Never use refined sugar or lump sugar.
Sugar nourishes the yeast, gives the bread flavor, and improves the browning color of the crust.
Salt: Salt adds flavor to baked goods and helps regulate yeast activity. It should not come into contact with yeast. Thanks to the salt, the dough is firm, compact and does not rise very quickly. Salt also improves the texture of the dough.
Yeast: There are several types of baker's yeast: fresh cubed, dried active yeast, or dried instant yeast. Yeast is sold in hypermarkets (in the bakery or fresh food section), but fresh yeast can also be purchased at the bakery. Put fresh yeast or dried easily dissolving yeast together with other ingredients directly into the vat of the appliance. Always chop fresh yeast well by hand, this will make it easier to mix. Only dried active yeast (in the form of balls) must be mixed with a little warm water before use. Choose a temperature around 35 ° C, at lower temperatures the yeast is less active, and at higher temperatures it may cease to work. Observe the prescribed dosage. If using fresh yeast (see conversion table below), increase the amount.
Equivalent Amount / Weight Between Dried and Fresh Yeast:
Dry yeast (in teaspoons)
1 1,5 2 2,5 3 3,5 4 4,5 5
Fresh shivers and (in grams)
9 13 18 22 25 31 36 40 45
To bake gluten-free loaf bread, you must use special gluten-free yeast.
Additives (dried fruits, olives, etc.): you can use your own recipes by adding any additives you want; in this case, however, it follows:
- > strictly observe the time indicated by the audible signal for the introduction of additives, especially the most gentle ones,
- > keep in mind that the hardest grains (e.g. flaxseeds or grains sesame) can be added at the very beginning of kneading to facilitate the use of the bread maker (for example, when setting the time manually),
- > thoroughly drain moisture from very damp ingredients (olives),
- > Lightly coat the fatty ingredients in flour for a smoother dough,
- > do not add too much of them - this can damage the dough, respect the amount of ingredients,
- > as specified in recipes so that ingredients do not fall out of the bowl.
Selection of ingredients for making yoghurt
Milk
What kind of milk to use?
Any type of milk can be used (for example, cow, goat, sheep, soy, and other plant-based milk). The consistency of the yoghurt may vary depending on the milk used. This appliance can use unpasteurized milk, long shelf life milk and all types of milk listed below:
Sterilized milk with a long shelf life: Ultra-pasteurized whole milk gives yoghurt a denser consistency. When using half skim milk, the yogurt becomes thinner. Alternatively, you can use half skim milk and add 1 or 2 tablespoons of milk powder to it.
- Whole milk: This milk makes the yoghurt creamier, with a thin film on the surface.
- Unpasteurized milk (farm): this type of milk should be boiled beforehand. It is recommended to boil milk for a sufficiently long period of time.Then let it cool before pouring it into the device.
- Milk powder: This type of milk gives the yoghurt a very creamy consistency. Always follow the directions on the original packaging.
Yogurt starter
The starter culture can be:
- Store-bought natural yogurt with as long a shelf life as possible.
- Yoghurt starter agent or lactic acid bacteria. In this case, follow the recommendations in the instructions for the leaven. These starters can be found in supermarkets, pharmacies, and some medical supply stores.
- One of your freshly prepared yoghurts should be natural yoghurt, as fresh as possible. This procedure is called cultivation.
The properties of starter cultures can be destroyed by exposure to too high temperatures.
Fermentation duration
Depending on the base ingredients used and the desired result, the yoghurt fermentation process takes from 6 to 12 hours.
Once the cooking process is complete, refrigerate the yoghurt for at least 4 hours and consume it within 7 days.
Rennet sourdough (for cottage cheese)
To make curd, you can use rennet or an acidic liquid such as lemon juice or vinegar to curdle the milk.
|