|
First FA-5152-3 bread machine specifications
Power 850 W
Maximum baking weight 1250 g
Special programs jam, sweet pastries, gluten-free pastries, muffins, French baguette, wholemeal bread
Additional functions selection of crust color, timer, baking weight adjustment, dough kneading
Loaf baking form
Maintaining temperature is, up to 1 hour
Number of baking programs 12
Number of kneaders 2
Case material plastic
Removable non-stick bread pan
Double blades for kneading dough
Measuring cup and spoon
Timer
Accessories are dishwasher safe
Power supply: 220-240 V., 50-60 Hz

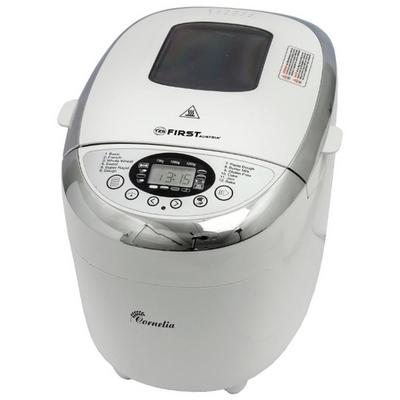
Breadmaker device First FA-5152-3 (fig. 1)
1. Device cover
2. Viewing window
3.2 kneading blades
4. Form for bread
5. Control panel
6. Case
7. Hook for removing the kneading blade
8. Measuring cup
9. Measuring spoon
You can use the automatic bread maker to bake as you like.
• You can choose from 12 different baking programs
• You can use ready-made baking mixes
• You can knead noodle or roll dough and make jam
• With the gluten-free baking program, you can successfully make baking mixes and recipes with gluten-free flours such as corn flour, buckwheat flour, and potato flour.
Control Panel (See Figure 2)
A. Display
1. Display of weight selection (750g, YOOg, 1250g)
2. Remaining baking time in minutes and programmed time
3. Selected color (intensity of browning)
(Medium ► Dark ► Rapid ► Light (Lower))
4. Selected program number
5. Sequence of program execution
B. Menu
Entering the desired program. The display shows the program number and the corresponding baking time.
Important:
When all buttons are pressed, you will hear a beep, unless the device is working.
C. Bread size
Choice of total weight (750g, YOOG, 1250g). Press the button several times until the desired weight appears on the display.
Note:
When the device starts, the default weight of the bread is 1250g. For programs 6, 7, 11 and 12, the bread size selection is not available.
D. Delay timer
Time-delayed baking
E. Color
Selection of crust color (Medium -► Dark -► Rapid -► Lower). Press the Color button several times until a check mark appears above the desired color. For baking programs 1-4, you can select the fast setting. Color selection is not available in programs 6, 7 and 11.
F. Start / Stop
Start and end an operation or reset the set timer. To interrupt the operation, quickly press the Start / Stop button until a beep appears and the time flashes on the display. The operation can be continued by pressing the Start / Stop button again. If you do not press the Start / Stop button, the device will automatically continue the program after 10 minutes. To complete the operation and reset the settings, press and hold the Start / Stop button for 3 seconds until a long beep. Note:
Do not press the Start / Stop button if you want to check the condition of the bread.
Memory function
After a power failure, when you turn it on again after about 10 minutes, the programs will continue from the same place. However, this will not happen if you have canceled / stopped the baking process by pressing and holding the Start / Stop button for 3 seconds.
Viewing window
You can check the status of the baking process through the inspection window.
Baking programs
You select the desired program by pressing the Meli button. The display shows the corresponding program number. The baking time depends on the selected program combination (see chapter "Program sequence").
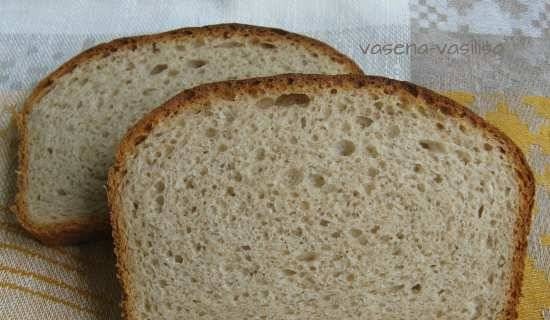
BAKING PROGRAM 1: BASIC
For white and mixed bread, mainly wheat or rice flour. The bread has a dense structure. You can select the crust color using the Color button.BAKING PROGRAM 2: FRENCH For light bread made from fine flour.
The bread is usually airy and crispy. This program is not suitable for recipes using butter, margarine or milk.
BAKING PROGRAM 3: COARSE FLOUR
For breads with heavy flours that require a long kneading and raising phase (e.g. wheat and rye flours). The bread is denser and heavier.
BAKING PROGRAM 4: SWEET For breads with additives such as fruit juices, coconut, raisins, dried fruit, chocolate or additional sugar. Thanks to the longer lifting phase, the bread is light and airy.
BAKING PROGRAM 5: SUPER FAST Very fast kneading, raising and baking. However, in this program the bread is the roughest.
BAKING PROGRAM 6: DOUGH
For making yeast dough for rolls, pizza or bagels. There is no baking phase in this program.
BAKING PROGRAM 7: PASTE Dough For making noodle dough. There is no baking phase in this program. BAKING PROGRAM 8: BUTTERFLY For breads baked with buttermilk or yoghurt BAKING PROGRAM 9: GLUTEN-FREE For breads made from gluten-free flour and baking mixes. Gluten-free flours take longer to absorb liquids and have a lifting characteristic.
BAKING PROGRAM 10: PIE
Kneading, lifting and baking, but the lifting phase is done with baking soda or baking soda.
BAKING PROGRAM 11: JAM
For making jams.
BAKING PROGRAM 12: BAKING For extra baking of too light or unbaked bread. There are no kneading and lifting phases in this program. The bread will be kept warm for about an hour after baking is complete. This will prevent the bread from getting too soggy.
• To terminate this operation prematurely, press and hold the Start / Stop button for 3 seconds until a long beep appears. To disconnect the device, disconnect the devices from the power source.
In programs 1, 2, 3, 4, 5, 6, 8 and 9, rapid beeps will sound during the program sequence. Shortly after these signals, add ingredients such as fruits or nuts. "ADD" appears. The ingredients are not chopped with a kneading blade.
If you have set the delay timer, you can put all the ingredients in the baking dish before baking. In this case, fruits and nuts should be cut into small pieces.
TIMER SETTING
The timer function makes baking possible with a time delay. Using the A and ▼ keys, set the desired end time of baking. Select a program. The display shows the required baking time. Using button A, you can change the end time of baking in 10 minute intervals up to the end time. Keep the key pressed to use this function more quickly. The display shows the total baking time and the delayed time. If you have postponed too long, you can correct it by pressing the ▼ key. Confirm the timer settings by pressing the Start / Stop button. An ellipsis will flash on the display and the set time will count down. When the baking process is complete, 10 beeps will sound and the display will show 0:00.
Example:
It's 8:00 am and you want fresh bread by 3:15 am, 7 hours and 15 minutes later. First you select program 1, then press the timer button until 7:15 is displayed, as the bread will be cooked in 7 hours 15 minutes. Note that the timer function does not work in the jam program.
Note:
Do not use the timer function on foods that perish quickly such as eggs, milk, cream or cheese.
BEFORE BAKING
For successful baking, please observe the following factors:
INGREDIENTS
• Remove the mold from the housing before placing the ingredients inside. If ingredients enter the oven, they may catch fire due to heating from the heating elements.
• Always place the ingredients in the dish in the order shown.
• All ingredients should be at room temperature for optimal yeast lifting effect.
• Measure the amount of ingredients accurately. Even slight deviations from the quantities indicated in the recipe can adversely affect the baking results.
Note:
Never use more than the specified amount. Too much dough can lift out of the baking dish and onto the heating elements, causing a fire.
Baking bread
PREPARATION
Observe the technical instructions
safety instructions specified in this manual. Place the bread maker on a flat and stable surface.
1. Remove the baking dish from the device.
2. Place the kneading arms on the supporting shafts in the baking dish. Make sure they are firmly in place.
3. Dip the ingredients for your recipe in the order shown in the baking dish. Add liquids, sugar and salt first, then flour, and last of all yeast.
Note: Make sure the yeast does not come into contact with salt or liquids. The maximum amount of flour and yeast depends on the recipe.
4. Place the baking dish back into the device. Make sure it is positioned correctly.
5. Close the cover of the device.
6. Plug the power cord into a power outlet. An audible signal will sound and the display will show the program number and the duration of the normal program 1.
... Select a program using the Menu button. Each press is accompanied by a sound signal.
8. Choose the color of the bread. A mark on the display shows whether you have selected a light, medium or dark color. You can also select the "Rapid" setting in order to shorten the baking time.
Note:
For programs 6, 7, 11, "Color selection" and "Rapid" functions are not available.
9. You can now set the end time of the program using the timer function. You can set a maximum delay of 15 hours.
Note:
The timer function is not available for program 11.
STARTING THE PROGRAM
Now start the program with the Start / Stop button.
The program will automatically perform various actions. You can watch the program sequence through the window of your bread machine. The lid of the device can be opened during mixing.
Note:
Do not open the appliance lid while baking. The bread may settle.
Tip: After 5 minutes of kneading, check the consistency of the dough. It should be soft, sticky. If it's too dry, add a little liquid. If too raw, add a little flour (1% to 1 teaspoon one or more times, as needed).
END OF THE PROGRAM
When the baking process is complete, 10 beeps sound and the display shows 0:00. At the end of the program, the device automatically switches to heating mode and stays there for up to 60 minutes. In this mode, warm air circulates inside the device. You can end the heating function prematurely by pressing and holding the Start / Stop button until you hear two beeps.
ATTENTION
Before opening the cover of the device, disconnect the mains plug from the socket. When the device is not in use, it must not be connected to the network!
BREAD REMOVAL
Always use oven mitts or oven mitts when removing the bread pan. Hold the baking dish tilted over the wire rack and shake gently until the bread slips out of the pan. If the bread does not separate from the kneading blades, carefully remove them with the attached kneading blade hook.
Note:
Do not use metal objects that could damage the non-stick coating. After removing the bread, immediately rinse the bread pan in warm water. This will prevent the kneading blades from sticking to the carrier shafts.
Tip: If you remove the kneading paddles after the last dough, the bread will remain intact when you take it out of the baking dish.
• Briefly press the Start / Stop button to interrupt the baking process or disconnect the device from the mains.
• Open the cover of the device and take out the baking dish. Dip your hands in flour, take out the dough and remove the kneading blades.
• Return the dough and close the lid of the device.
• Connect the device to the network and press the Start / Stop button. The baking process will continue. Let the bread cool for 15-30 minutes before eating. Make sure there is no kneading paddle before cutting the bread.
Attention
Do not start working with the bread maker until it has cooled down or warmed up. If the display shows "HHH" after the start of the program, the temperature inside the appliance is too high. Stop the program immediately and unplug the device. Then open the lid of the appliance and let the bread maker cool before reuse (except for the Baking and Jam programs). If the display shows "LLL" after starting the program, it means that the temperature inside the appliance is too low. Set the appliance to a more intensive mode for use (except for the Baking and Jam programs), If after pressing the Start /
Stop the display shows “EEO”, it means that the temperature sensor circuit is damaged, contact an authorized technician to check the sensor. If the display shows "EE1", it means that the temperature sensor has been short-circuited.
Cleaning and maintenance
Unplug the bread maker and let it cool down before cleaning. IMPORTANT:
The parts and accessories of the device are not dishwasher safe.
1. Bread pan: rub the pan with a damp cloth inside and out.
Do not use sharp objects or abrasive products to avoid damaging the non-stick coating. Dry the mold completely before putting it back in place.
2. Kneading paddle: if the mixer is difficult to remove from the axis, fill the mold with warm water and leave for 30 minutes. After that, the mixer can be easily removed from the shaft for cleaning. Wipe the mixer thoroughly with a damp cloth. note
that the bread pan and kneader can be washed in the dishwasher.
3. Cover and Window: Wipe the inside and outside of the cover with a damp cloth.
4. Case: Gently wipe the outside of the case with a damp cloth. Do not use abrasive cleaners as this may damage the surface finish. Never immerse the body of the Bread Maker in water for cleaning.
5. Before storing the bread maker, make sure that it is completely cool, wipe and dry it and close the lid.
|